On this page you can create an offer, choose offers connected to an affiliate network account (“assigned account’s offer”), or use “multiple offer create” option.

Creating a new offer
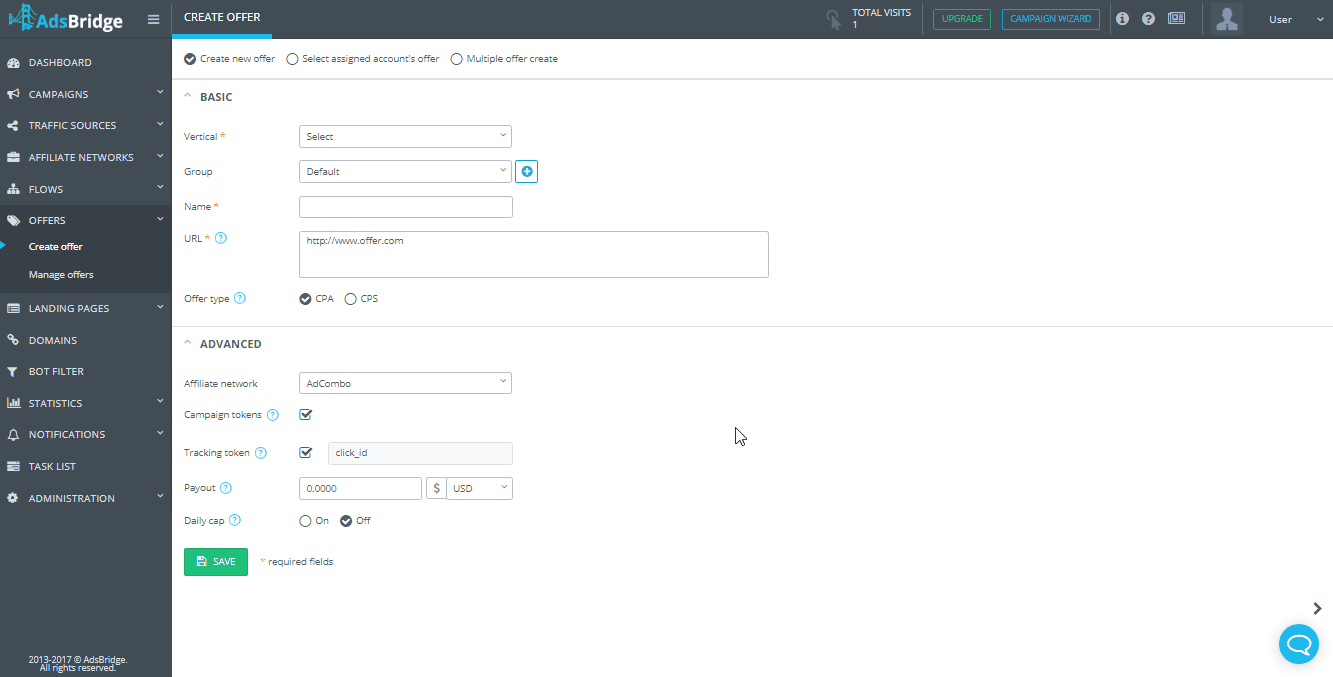
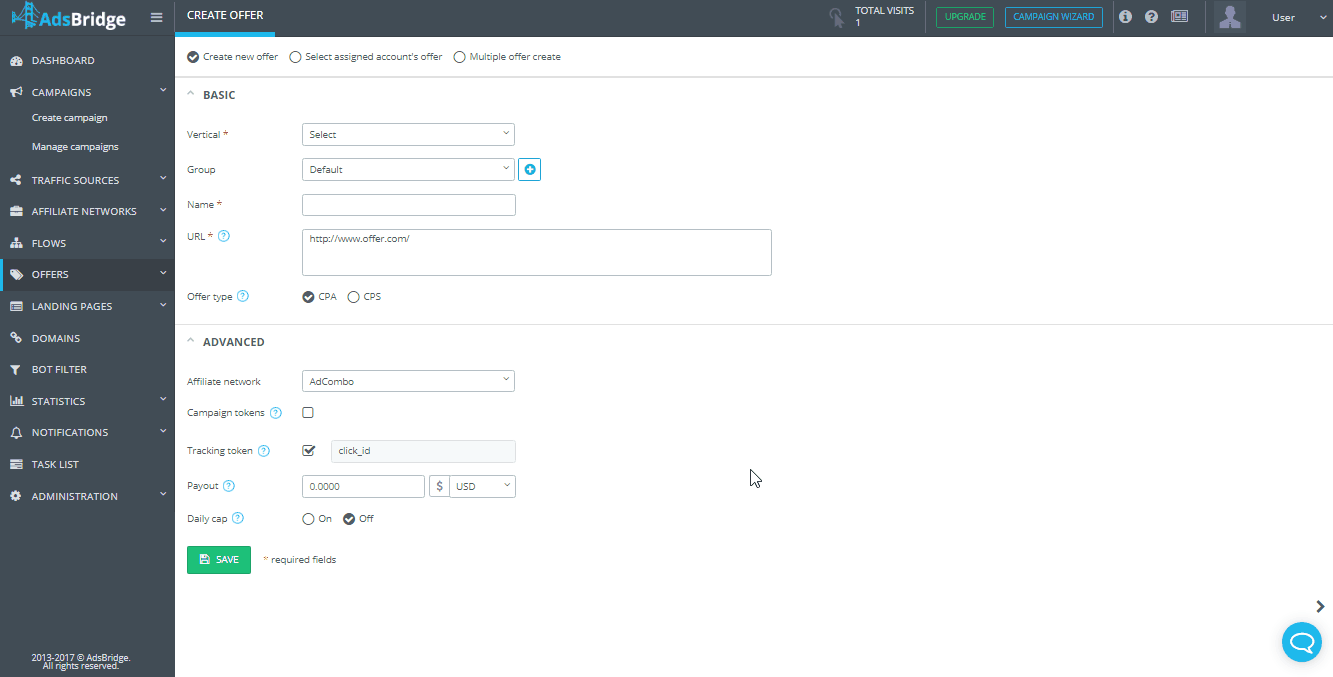
General setup
Vertical. This is a required setting. Please choose the vertical (theme) to which your offer relates. This feature quickens the process of searching for offers in our system

as offer statistics can be divided by vertical.
Group. You may create a group here by clicking the plus sign (+), or choose a previously created group from the drop down menu, which appears upon clicking the field.
This setting is not required and, if you choose to skip it, your offer will be places within the “Default group”.
Name. This is a required field. It is necessary to name your offer, under which you will be able to find it within statistics.
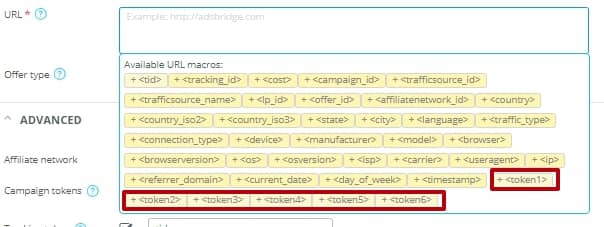
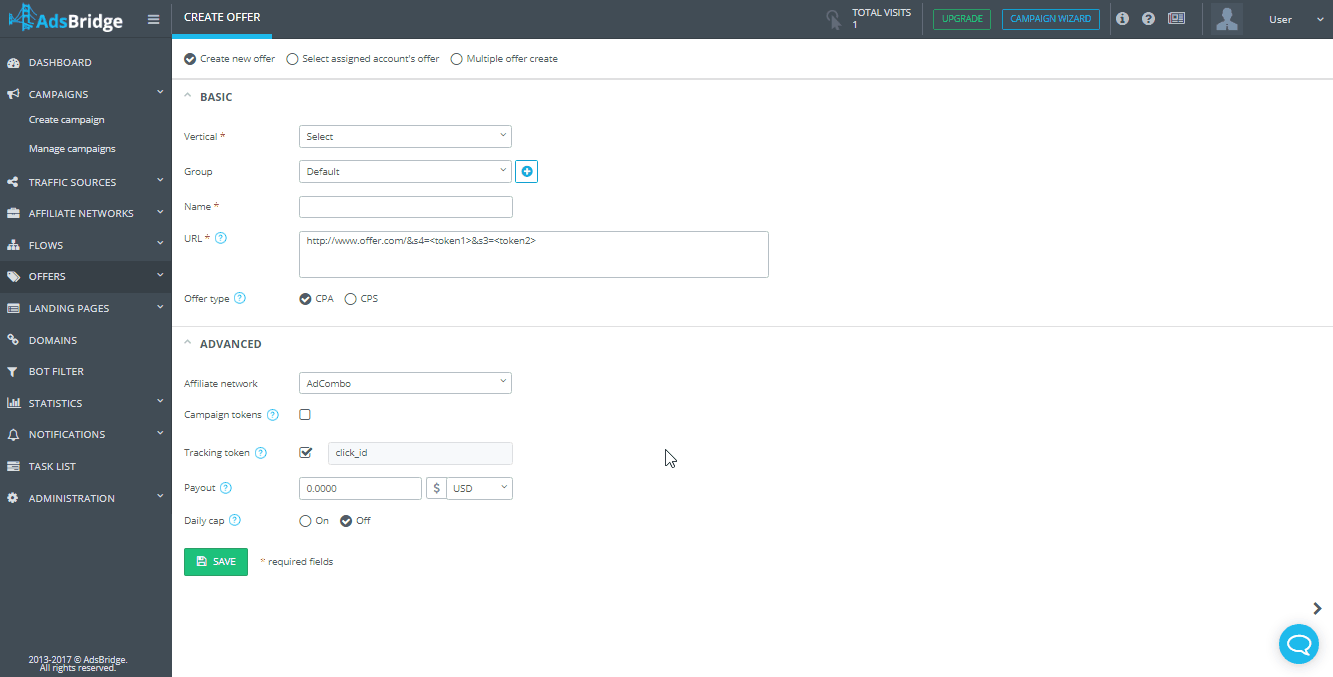
URL. It is necessary to place your offer’s URL in this field. Offer URLs are usually generated by your affiliate network. In order to add tokens to your URL, simply choose all necessary token in the menu that appears upon clicking the URL field. More detail regarding this setting will be explained below.
Offer Type. CPA represents price per action. This option implies a one-time payment for the targeted action. CPS represents price for the sale. This option provides the opportunity to track several targeted actions in the offer. For example, you can track several conversions from a single click id by adding the txid parameter to the postback.
Advanced Settings
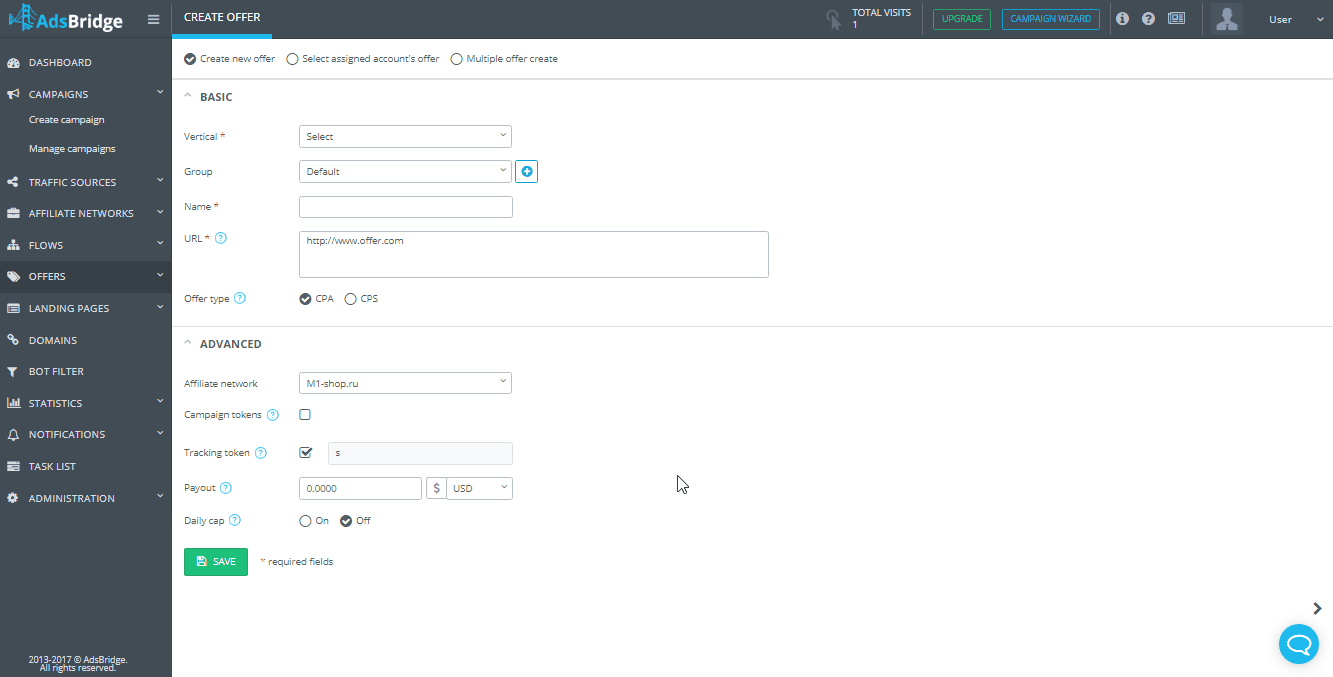
Affiliate Network. You may choose a previously created affiliated network here. Click “Select” to open the drop down menu. This setting is not required, but it will help you sort through your affiliate network statistics in the future. Upon choosing an affiliate network, the tracking tokens will be filled in automatically with the values you set within your affiliate network settings.

Campaign Tokens. This option is not required, and does not have to be turned on. This setting is responsible for sending additional traffic information to the affiliate network. By activating the “campaign tokens” option, all tokens that you added within your campaign setting (Primary and Additional tokens) will be automatically added to your offer URL and will be sent to the affiliate network.
With this option active, you will not be able to add token parameters to your offer URL manually
(but you will be provided with the following placeholders: <tracking_id>, <cost>, <campaign_id>, <trafficsource_id>, <trafficsource_name>, <lp_id>, <offer_id>, <country>, <language>, <city>, <traffic_type>, <connection_type>, <device>, <manufacturer>, <model>, <browser>, <browserversion>, <os>, <osversion>, <isp>, <carrier>, <useragent>, <ip>). If your affiliate network accepts offers with parameters differing from those which you have added into your campaign settings
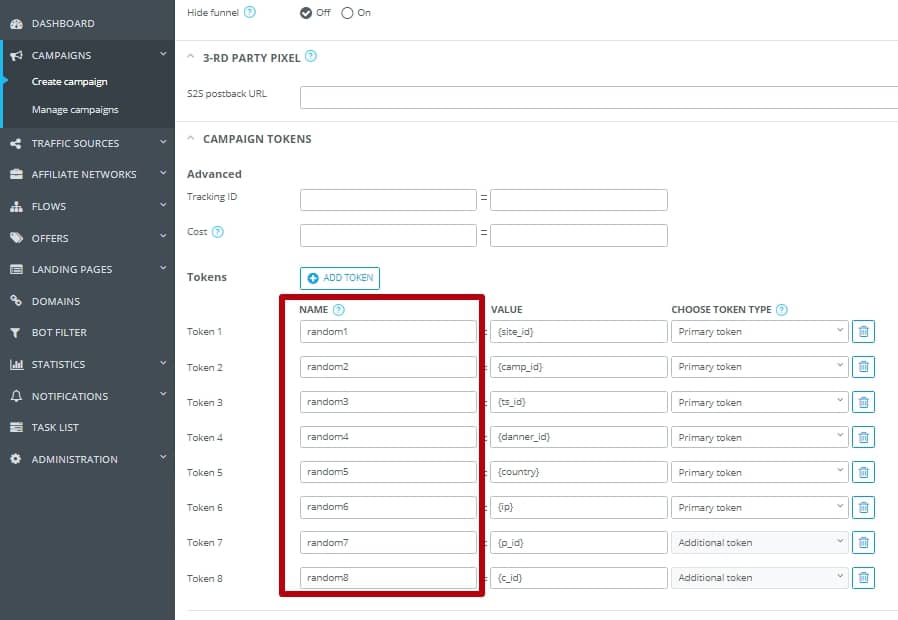
you will need to unmark the “campaign tokens” checkbox, and enter the parameters in the correct format manually.
Please note that upon unmarking the checkbox, additional parameters will not be able to be sent to the affiliate network.
If you often use a particular traffic source with a particular affiliate network, then, for the sake of saving time and for making the setup process easier, you you may set up the parameters of your affiliate network in the same way as token names in your campaign settings. We will take the example of ExoClick + an affiliate network on the HasOffers platform (HasOffers parameters that can receive values are as follows: {aff_sub}, {aff_sub2}, {aff_sub3}, {aff_sub4}, {aff_sub5}). In your campaign setting, you indicate token names, for example – aff_sub (with the value – {campaign_id}.

Upon adding an offer from an affiliate network which uses HasOffers into a campaign in which the token names are the same are the network parameter names
and upon activating “campaign tokens” in your offer

the {campaign_id} will be passed to the affiliate network correctly, and will also be added to the offer link in the following format: http://offerURL.com/?aff_sub=value_which_was_passed_through_{campaign_id}_from_your_traffic_source. Пример: http://offerURL.com/?aff_sub=campaign1234
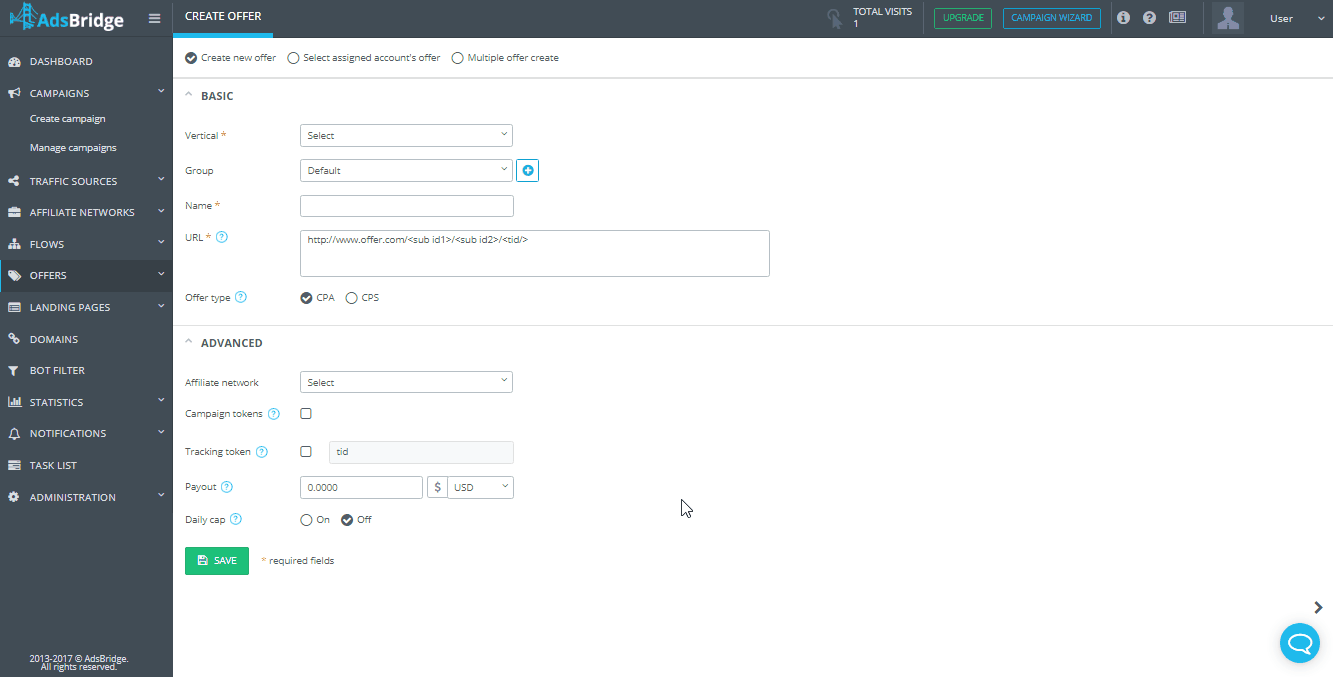
Please note that some affiliate networks use an atypical format for adding parameters to offer links. For example, the affiliate network Shakes only supports the following link format: http://offerURL.com/<sub_id1>/<sub_id2>/. In this case, you will need to add in the parameters manually upon unmarking the “campaign tokens” checkbox.
The following is an explanation of the parameters which our tracker can send to an affiliate network:
<tid> is the parameter that passes a unique click id to the tracker
<tracking_id> – click id of the traffic source (in the case that the traffic source has a parameter for passing its own click id to another platform, and in the case it is installed in AdsBridge)
<cost> – cost value
<campaign_id> – the id of the campaign in AdsBridge
<trafficsource_id> – the id of the traffic source in AdsBridge
<trafficsource_name> – the name of the traffic source in AdsBridge
<lp_id> is the landing page ID in AdsBridge
<offer_id> – the id of the offer in AdsBridge
<country> – country
<language> – language
<city> – city
<traffic_type> – the type of traffic
<connection_type> – connection type
<device> – device
<manufacturer> – manufacturer
<model> – model
<browser> – browser
<browserversion> – browser version
<os> – the operating system
<osversion> – the version of the operating system
<isp> – ISP
<carrier> – mobile operator
<useragent> – User
<ip> – IP
<sub_id1> – <sub_id6> – the parameters that are specified in the campaign settings as the primary tokens
Tracking Tokens. This field is used for setting up parameters from your affiliate network, in which the network is able to receive and pass the tracker’s click ID. In the case that you choose an affiliate network from the drop down menu, and a pre-set tracking token within that network, you will find that the values will be preset.
If you wish to use another parameter within your preset affiliate network for a click ID for a specific offer, then you will need to unmark the “tracking tokens” checkbox, and enter the values manually into the offer URL.

You could also simply not choose an affiliate network, but leave the checkbox marked, and indicate the necessary parameters for the offer manually.
Please note that upon choosing the second option, statistics will not appear in the affiliate network sections of your statistics. Also note that some affiliate networks use atypical formats for adding parameters into offer URLs.
For example, the affiliate network Shakes has the following format: http://offerURL.com/<sub_id1>/<sub_id2>/
In this example, you will need to add the <tid> parameter, which passes information regarding the tracker’s click ID, upon marking the “tracking tokens” checkbox. For example: http://offerURL.com/<sub_id1>/<sub_id2>/<tid/>
Please note that in the tracking tokens field, it is necessary to indicate the parameters without any symbols. For example, when using the affiliate network HasOffers, you will need to write out the value as aff_sub2 instead of {aff_sub2}.
Payout. In this field you can enter the value of the payment you receive per conversion and specify the currency (currently available: USD, EUR, GBP, RUB, UAH). By default, AdsBridge takes into account the payout value that comes through postback in the amt parameter. However, if this value does not come, the value specified in the settings of this field will be taken into account. In addition, this option can be used if the affiliate network does not have a parameter that transmits the cost value.
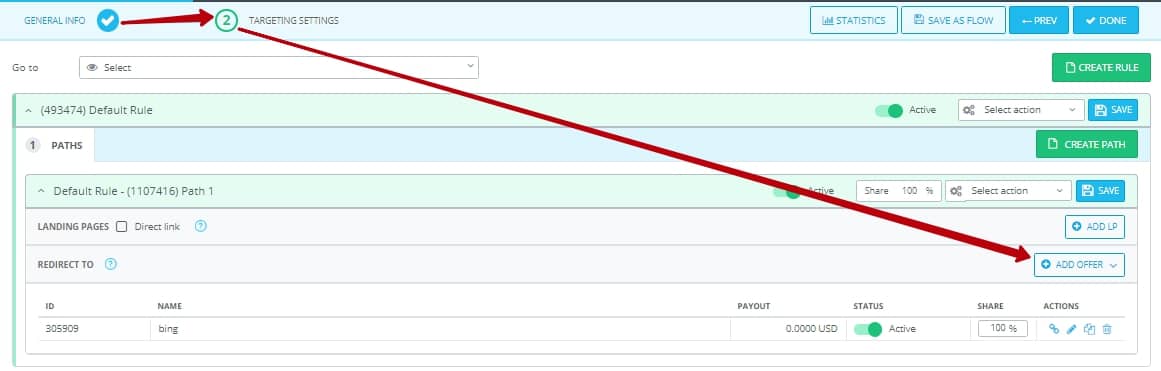
Daily cap. This option is optional. If you have a daily limit for conversions on a certain account (for example, 100), you can specify this number of conversions in this field, after which 2 more fields will appear: Redirect To and Time zone. In the field “Redirect to” you need to choose the offer to which traffic will be redirected in case of reaching the limit of conversions on the first account. “Time Zone” – here you must select the time zone, which will be considered for the offer’s daily limit of conversions.
After filling all the required fields, click “Save”. After saving, your new offer will be available on the “Manage Offers” page.
A little about setting up your own site as an offer in the AdsBridge system. In case you do not use an affiliate network and you need to track the conversions on your own site, the link of this site should be added as an offer link. Leave the “tracking tokens” checkbox with the tid value enabled.
Assigned account’s offer
Assigned account information
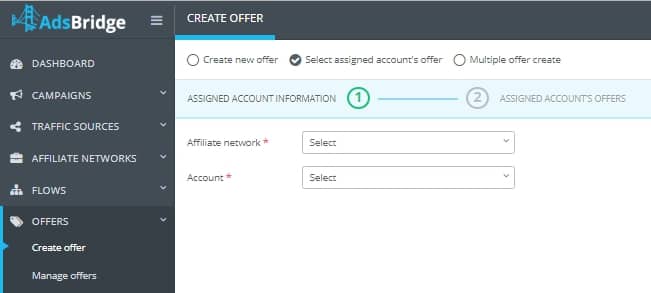
These settings are obligatory.
“Affiliate network”. Here you need to select one of the integrated affiliate networks, currently available on AdsBridge. Such an affiliate network must be previously added from the AdsBridge templates on the “Create affiliate network” page.
“Account”. Select the needed account. It must be previously assigned on the page of creation/editing of an integrated affiliate network.
Once you fill in these fields, the “Next” button will become active. Click on it to proceed with the second step of the settings.
Assigned account’s offers
On this page, you will see a list of offers that are available for your account on the affiliate network side, as well as information about them: ID, Name, Price format, Payout, Currency, Status.
To request the offer, you will need to click on the corresponding icon in the Actions menu on this page.
To refresh the page with a list of offers, press “Refresh”.
To add an offer to AdsBridge, you will need to select a line with this offer and click on the “+” button. After that, you will see the page for editing the assigned account’s offer. All required fields on this page are marked with an “*” symbol.
Basic settings
“Creative”. Choose the creative of an affiliate network, which you’d like to use with this offer.
“Vertical”. Choose the vertical (theme) of this offer. Later on, you can search offer in the system and view its statistics on a specific vertical in the “Mange offers” section.
“Group”. Here you can create a group of offers by clicking on the “+” icon or choose the existing group from the drop-down list of this field. It is not an obligatory field and serves only for your convenience. If you skip it, then the offer will be included in the “Default” group.
“Name”. The name of an offer is set automatically. It is formed from the offer name on the affiliate network side + the creative ID. You can edit the name as you like.
“URL”. Once you choose a creative, the offer URL will be automatically set in this field. You can edit this URL, i.e. add the necessary placeholders to pass additional information to the affiliate network side.
“Offer type”. CPA is the cost per action. This offer type means a one-time payment for the targeted action. CPS is the cost per sale. This option enables the tracking of several targeted actions on the offer. Several conversions from one click ID can be tracked by adding the txid parameter to the postback.
Advanced settings
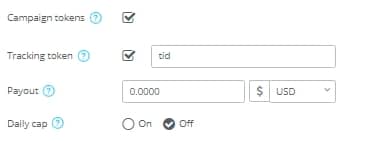
“Campaign tokens”. This option is not obligatory. With the ticked checkbox near the “Campaign tokens”, all tokens that were added in the campaign settings (basic and additional) will be automatically added to the offer URL and sent to the side of an affiliate network. You will find more information about this option in the “Create new offer” paragraph of this User guide.
“Tracking token”. In this field, you will see a pre-set parameter of an affiliate network, in which this affiliate network can receive and pass back the tracker’s click ID. Such parameter can’t be edited, therefore, in case of a specific offer, when you need to use another parameter for the click ID, you will need to clear the “Tracking token” checkbox and manually enter the value in the offer URL. Also, if you set the transition of additional information about traffic to the affiliate network side with a ticked “Tracking token” checkbox, you will need to use other parameters of the affiliate network, which can receive such additional information about traffic, except for the parameter that is already set as a “Tracking token”.
“Payout”. The payout that you receive for the conversion will be indicated here. You can edit this value. Also, you can specify currency (such as USD, EUR, GBP, RUB, UAH). By default, AdsBridge takes into account the payout value that comes through postback in the amt parameter. However, if this value does not come, the value that was set in the settings of this field will be taken into account.
“Daily cap”. This option is not obligatory. In case you have a daily cap for conversions on a specific offer (let’s say, 100), then you can set it here, and after that, you will see two more fields: Redirect to and Time zone. In the “Redirect to” field, you need to choose the offer to which you want to redirect traffic in case conversions reach the limit on the first offer. “Time zone” is for setting the time zone by which the daily cap of conversions for the offer will be counted.
Postback settings
With the help of this option, you can automatically set the postback on the side of an affiliate network.
“Current postback URL”. This field can’t be edited. It is used for displaying the current postback, which is set on the affiliate network side for the chosen offer.
“Postback URL to set”. The AdsBridge postback is displayed in this field and includes macros of the integrated affiliate network. If necessary, you can edit it and click the “Set postback” button to send a new postback to the affiliate network side.
After you fill in the required fields, click on the “Save” button and a new offer will be available on the “Manage offers” page.
Please note, when editing such an offer, you will see the interface for editing the usual offer, and not for the assigned account’s offer. The only difference is that on the edit page of the assigned account’s offer, you are able to set the postback on the side of an affiliate network via the AdsBridge account.
Multiple offer create
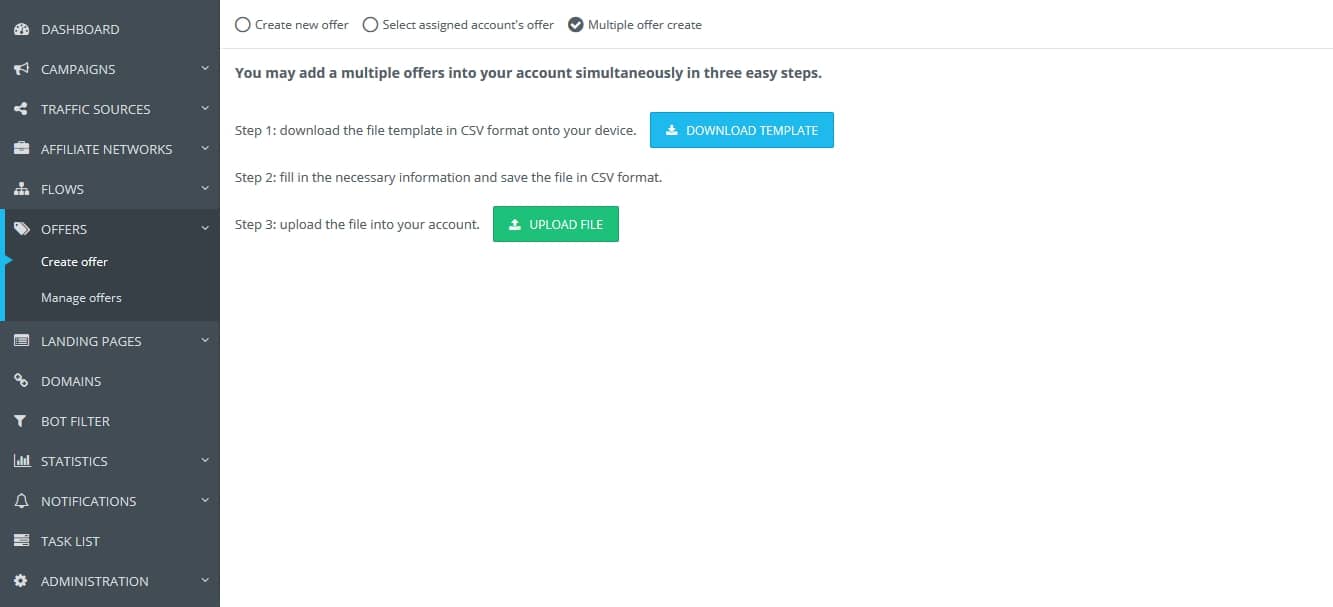
On AdsBridge you can upload several offers at a time.
For this, choose the “Multiple offer create ” option.
Step 1 – download the file template in CSV format onto your device.
Step 2 – fill in the necessary information and save the file in CSV format.
In the file, you need to specify required columns and optional columns.
Required columns:
- the names of the offers (you can’t use the same names),
- URL,
- the vertical,
- the type (Web or WAP)
- Payout
- Currency
Optional columns:
- Group ID (data from your account)
- Affiliate network ID (data from your account)
- Campaign tokens ( On – 1, Off – 0)
- Tracking token ( To activate the function, enter the name tracking token. To deactivate – leave the cell empty)
- Daily cap (On – 1, Off – 0)
- Time zone [-12:00; +12:00]
- Redirect to – offer ID (data from your account)
- Conversions cap
In the link of the offers, you can immediately specify the parameters that need to be passed to the offers. Find more information on available placeholders and how to add them in the “creating a new offer” paragraph.
Step 3 – upload the file to your account.