Here you can add landing pages (pre-lenders in this case) for further use in the campaigns.
There are several options for creating landing pages:
- Visual editor
- HTML editor
- Landing page from templates
- Self-hosted landing page
- LP upload

Landing pages created in HTML or in the visual AdsBridge editor, as well as added from templates, are stored on our side and use CDN. A reference to this kind of landing page will be the campaign URL to which it was added. Landing pages on your own hosting that you attach on the tab of adding landing page, are stored on your hosting.
1. Visual editor.
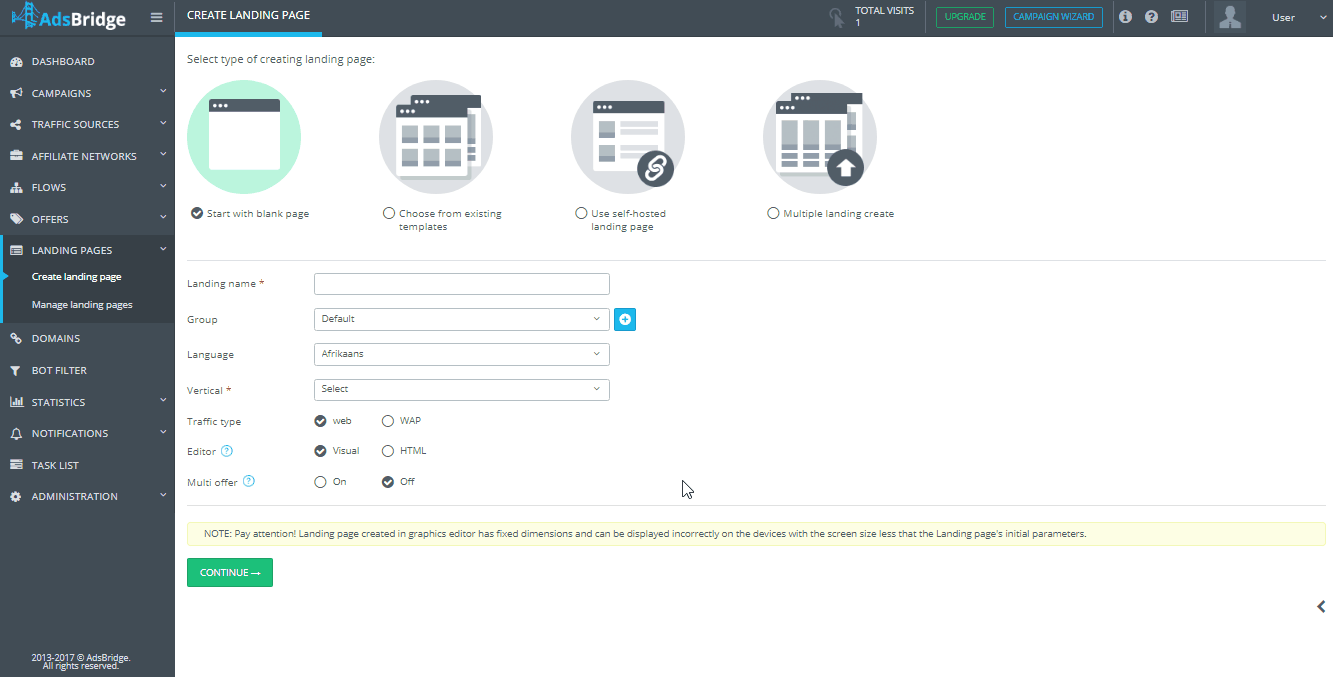
To open a visual editor, choose the “Start with blank page” option in the “Create landing page” section.
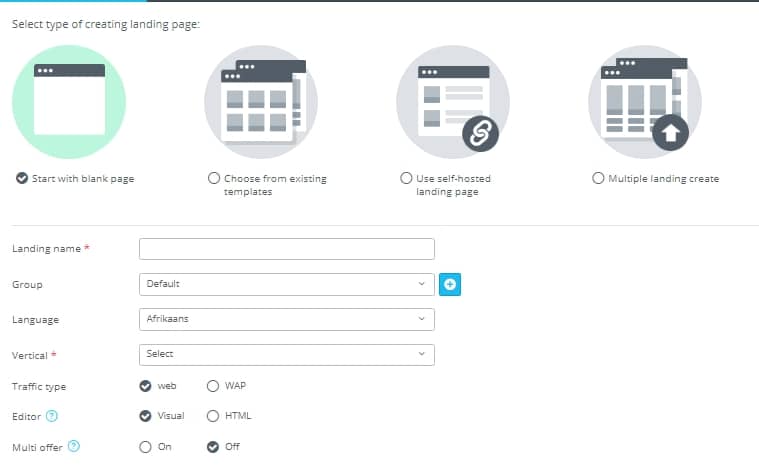
“Landing name” is an obligatory field. Here you need to specify the name of your LP so that later you can find it in the system faster and view statistics on it.
“Group”. You can create a group of LPs by pressing the “+” button or choose a group from a drop-down menu of this field. It is optional. If you skip this setting, your LP will be added to the “Default” group.
“Language”. Specify the language of your LP. This field is optional and does not affect the targeting or LP display. In the future, this option will help you find a landing page in the system.
“Vertical”. Choose a vertical (theme) of your LP. Later on, this option will help you find a landing page in the system and view statistics by specific vertical. The following options are available: Adult, BizOp, Cams, Dating, Dating Adult, Download, E-commerce, Education, Email Submit, Financial, Gambling, Gaming, Health, Home staging, Incent, Lead generation, Mainstream, Mobile Apps, Other, Penny Auction, Pills, Pin Submit (Web), Retail, Services, Sweepstakes, Traveling, Utilities, VOD.
“Traffic type”. Here you specify the traffic type. This field is optional and does not affect the targeting or LP display. In the future, this option will help you find a landing page in the system.
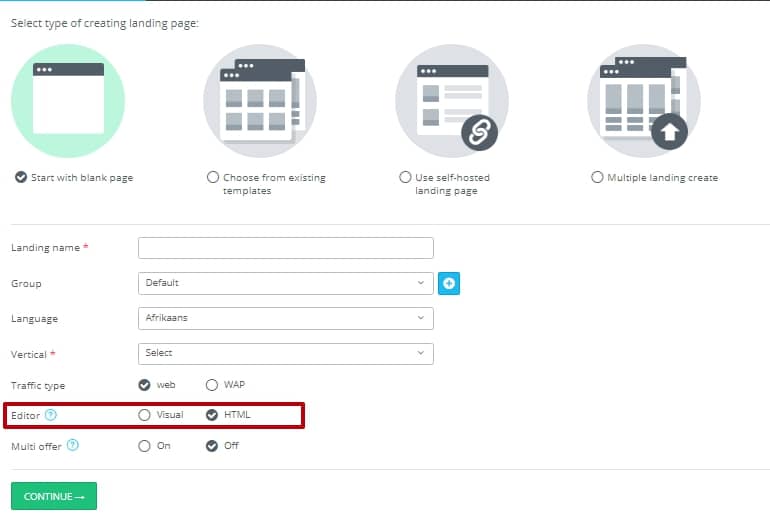
“Editor”. Here you choose which editor to use: Visual or HTML. Please note that you will be able to edit your landing page only in the editor in which it was created. At the moment, you can’t switch between editors.
“Multi offer”. Tick “ON” if you plan to use more than one offer on your LP.
“Number of offers”. Here you specify the number of offers you want to use on this LP.
The visual editor contains preview area (1), a panel with elements (2), additional panel (3), action panel (4), and a sidebar for “management and attachment” (5)
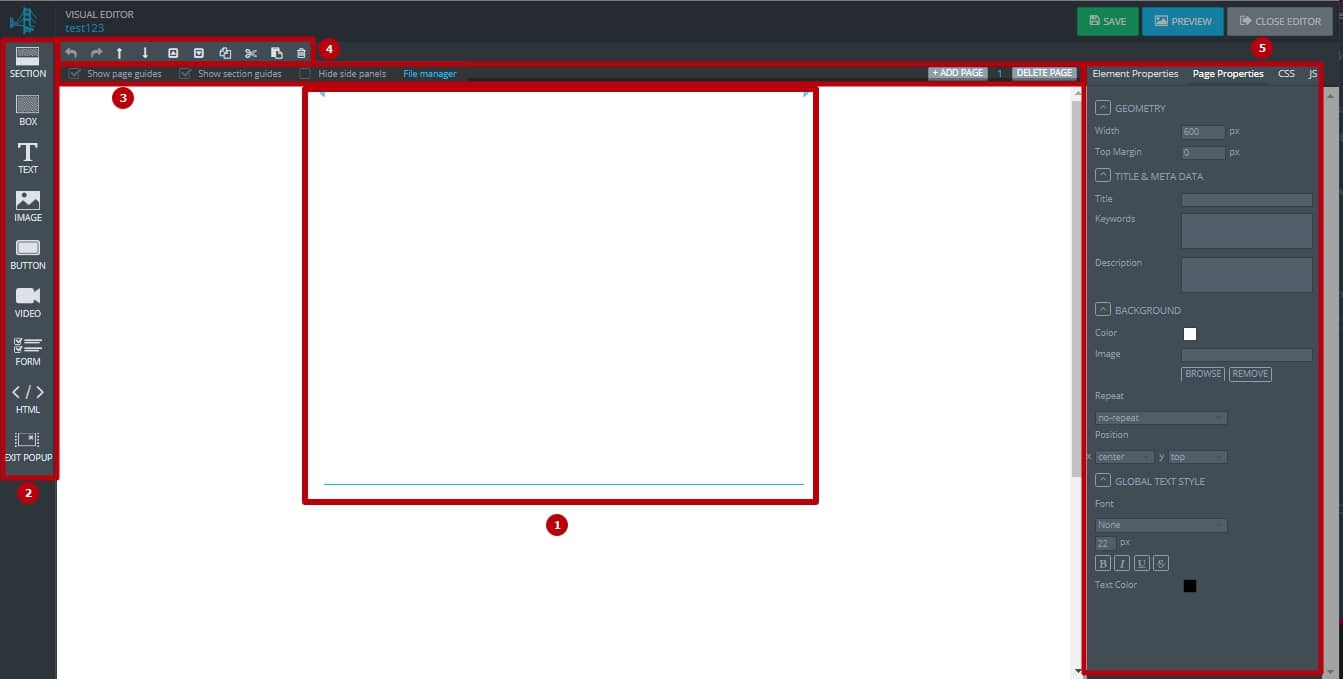
1) Preview area
The preview area is meant for viewing the page and managing the elements. Vertical guides show the width of the specific part of a web page. Controlling the positions of elements in the viewing area is done using the drag & drop method. To select an item, just click on it.
2) Panel with elements
The elements panel contains a set of items that can be represented on a web page. They are:
– Section
– Box
– Text
– Image
– Button
– Video
– Form
– HTML
– Exit popup
We’ll go over the purpose and description of the elements below.
3) Additional panel
The additional panel is intended for connection and media files download. You can upload images, video and audio you want to use later on your web page through the “File Manager”.
To the left of the additional panel, there are elements that control the visibility of guides, section contours, display of the sidebars. The “File manager” opens a pop-up where you can view and manage already downloaded images, video, favicons, audio, and upload new elements for their further use.
To the right of the additional panel, there are elements for LP management. Here you can create or delete additional pages.
4) Actions panel
The action bar is used to manage the entire page and allows you to do the following:
– Undo
– Redo
– Move the selected element the layer above
– Move the selected element under the layer
– Bring the selected element forward
– Send the selected element backward
– Copy
– Cut
– Paste the copied element
– Delete the selected element
5) Sidebar for “management and attachment”
The sidebar in the “Visual editor” is used to manage the page content in the tag area for the selected element, and to manage the page properties and its elements.
In the “Element properties” tab, you can edit the selected element on the page.
In the “Page properties” tab, you can set the page name, meta tags, keywords, and description. Also, there is global text style setting.
In the “CSS” tab, you can upload files with styles and attach those of the third-party sources using the link. You are able to manage the order of files’ attachment and remotely edit already uploaded files.
In the “JS” tab, you can upload JavaScript and attach one of the third-party sources using the link. You are able to manage the order of files’ attachment and remotely edit already uploaded files.
Page properties
Before creating a page, you must apply the settings available in the “Page Properties” tab. These are general settings that apply to the entire page as a whole.
There are such groups of properties:
– Geometry
You set the width of the content part of the page and a top margin (the area above the page). The width size can be edited using the section guides in the preview area.
– Title & Meta data
Here you specify the page title, its keywords, and description. The title will be shown in the header or in the browser tab.
– Background
You set the background color, image, repeat property and its position.
– Global text style
Here you set the font for the entire page, the size in pixels, the fatness, the font (normal, italic, underlined, crossed), and the text color.
Elements creation on the page
To create elements, drag and drop them on the preview area.
Section— this element occupies the whole width of the page. It is an obligatory field in which other elements are placed.
Using the setting of a sidebar control and attachment in the “Element properties” tab, you can specify the height of the section, the properties of its border (thickness, style, color), corner rounding, background properties, transparency (transparency will be applied to all elements inside the section).
Block — this is element can be adjusted in size and position inside the section. It can be used to adjust the separate blocks on the page. The elements placed in the block are positioned relative to the box. Using the “Element properties” tab, you can specify the size (width and height), position, set borders, box shadow (color, blur, offset), background properties and transparency.
Text — the element that for placing text.
Through the “Element properties” tab, you can specify the size (width and height), position, text, line spacing, set the font, borders, background, visibility and horizontal align (left, right, or center).
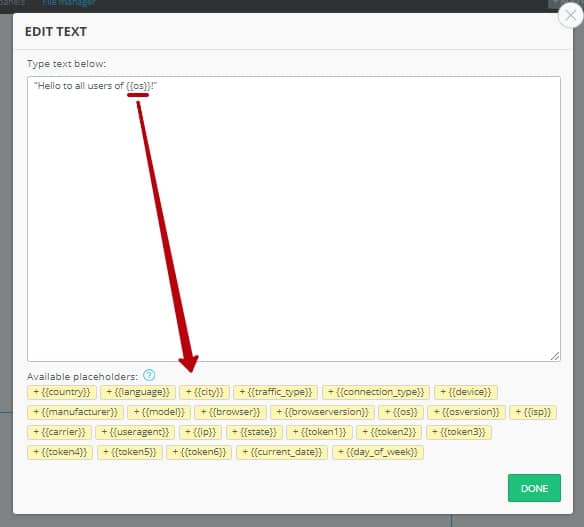
Also, you can use placeholders in the text to make landing pages more personalized for a user. For example, if you want to display the text “Hello to all users of Android!” for OS Android users, and “Hello to all users of iOS!” for iOS users on one and the same landing page, it is necessary to enter the “Hello to all users of {{os}}!”. The list of placeholders is displayed below the text field.
You can use the following ones:
{{country}} – country
{{language}} – language
{{city}} – city
{{traffic_type}} – traffic type
{{connection_type}} – connection type
{{device}} – device
{{manufacturer}} – manufacturer
{{model}} – model
{{browser}} – browser
{{browserversion}} – browser version
{{os}} – operation system
{{osversion}} – OS version
{{isp}} – ISP
{{carrier}} – carrier
{{useragent}} – user agent
{{ip}} – user IP
{{state}} – state
{{token1}}{{token2}}{{token3}}{{token4}}{{token5}}{{token6}} – the value that is passed from the side of a traffic source in a corresponding token.
{{current_date}} – current date
{{day_of_week}} – current day of the week
At the moment all placeholders are replaced with the Latin alphabet.
Image — element that presents information in the form of downloadable images. When you add this element, a pop-up window appears where you specify the image file (*.jpg, *.png, *.gif formats). It can be uploaded from the computer or selected from the already existing images in the manager. The maximum file size is 16 MB. Nevertheless, the recommended total weight of your LP should not exceed 300 Kb so that all elements are loaded as quickly as possible. Please note that the image added in the visual editor cannot be displayed if AdBlock is enabled. We recommend you to check your landing page before sending traffic to it.
Now AdsBridge also has the ability to upload the favicon, which will be displayed in the browser next to the title of your LP. To do this, you need to upload an image with a title “favicon” in the .ico format (for most browsers), .png and .svg (to support modern Microsoft, Android, Apple devices). Simultaneous loading of all three formats will ensure the display of the favicon in all major browsers.
Through the “Element properties” sidebar, you can specify the size (width and height), position, change the image file, specify the action when a user clicks on the image (the redirection can be made on the target page in the same window – _self, or in a new window – _blank), set the visibility of borders, rounding corners, transparency.
Please note that you can also add an image with a link. To do this, simply attach a link to the image in the corresponding field and click “Done”. Pictures added by reference do not use CDN.
Button — this element is a link, clicking on which the user is redirected to the target page.
Through the settings in the “Element Properties” sidebar, you can set the size (width and height), position, specify the action when a user clicks the button, select the ordinal number of the offer that the user will click on when clicking the button. In case of adding landing page with one offer, it is enough to choose the “Target url” in the “Click action” section.
For landing pages with the “Multi-offer” function in the visual editor for different buttons, specify the ordinal number of the offer to which the user will be redirected from this button. To do this, left-click on the desired button of a landing page and in the right sidebar, in the “Action click” section in the “Action” drop-down list, select the ordinal number of the offer (the number of offers in the list corresponds to the number you specified in the “Number of offers” field when creating a landing page).
Please note that you cannot change the number of offers for the landing page, as well as edit the multi-offer LP using our editor if it is added to at least one of the campaigns. That is, in order to edit this kind of a landing page, you first need to remove it from the campaigns.
If you are using multi-page LP, in this section you can select the page to which the button will lead.
Through the “Element properties” sidebar, you can specify how to do the redirection from the button (it can be made on the target page in the same window – _self, or in a new window – _blank), specify the button text and the font properties (font name, size, fat, text, text color), adjust the text shadow (shadow color, blur, offset), display borders, round corners, set the shadow. It is possible to control the button background in the normal state when you hover the cursor over it and in the state at the time of pressing. It is possible to adjust the transparency, shift the text of the button horizontally and apply horizontal alignment.
Video — this element is used to add video from the side services, i.e. YouTube or Vimeo. When you add an item, the pop-up appears with an input field, in which you must specify the iframe code from the video.
How to get the code from YouTube: under the video on the service, you need to click
“Share”, select the necessary options and copy the code.
How to get the code from Vimeo: in the upper right corner of the video on the service, click “Share”. You will see the pop-up with settings where you need to set the necessary options and copy the code.
Form — is for inserting form. Upon pasting it, you will see the pop-up form for creation.
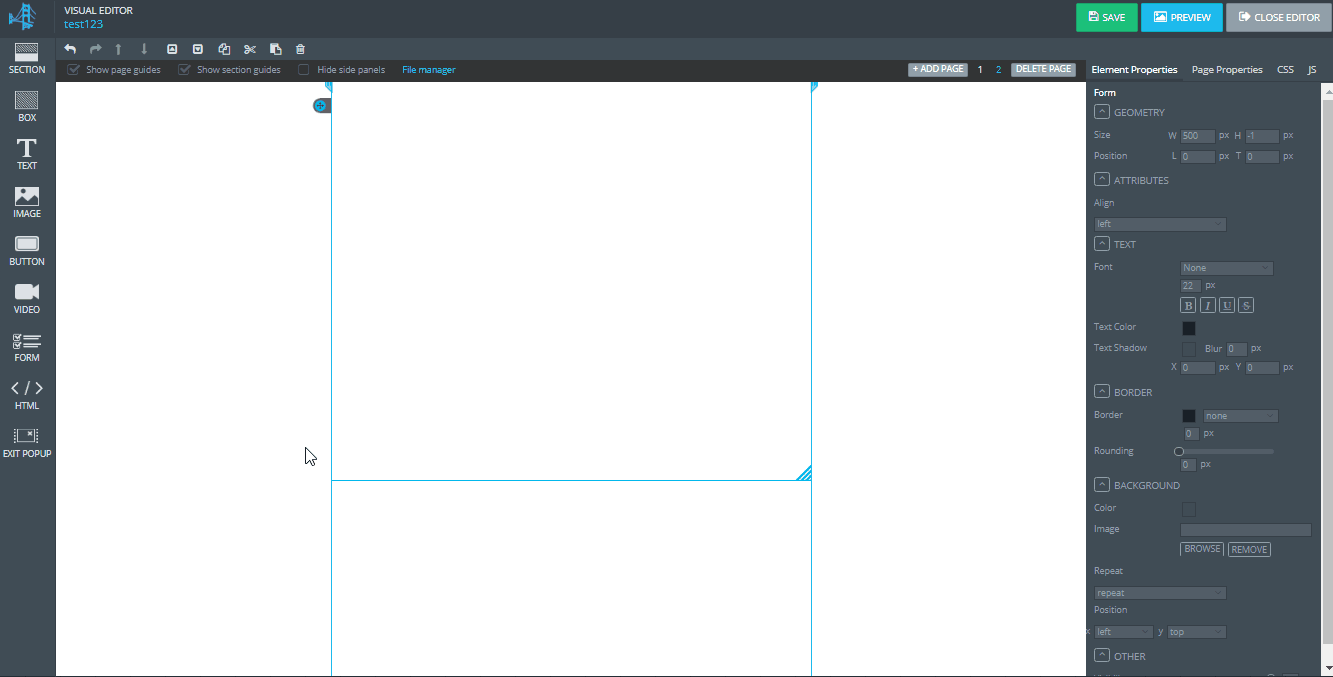
All fields in the form are divided into the following types: input field (Text field), a selection from the list (Drop-down menu), checkboxes with the possibility of selecting several options (Checkboxes), the switch with the ability to select only one option (Switch), and also Hidden field. The fields are created by clicking on the name of the corresponding field in the left column of the pop-up window. There are predefined fields with prepared lists of values: country, state, income, date of birth, time zone.
You can customize the selected field in the right column of a pop-up. Here you can specify the field title, select whether to display it or not, field name, preset field value, tooltip text (disappears at the beginning of input), validation text, required field option. It is possible to edit the list of values. Managing the order of fields and the ability to delete it is in the middle column of the preview.
Once you go through creation and setting of all necessary fields, press “Done”. The form will be created in the preview area and you can adjust it using the “Element properties” tab. Here you set the form size and its position, the form placement (horizontal, where the fields’ titles are on the left, the vertical ones – the titles above), specify the font, set boundaries, round corners, adjust background and transparency.
Please note that the data that users enter in the form is not stored on the AdsBridge side, but you can connect a service such as MailChimp, Aweber, etc.
HTML— is used to insert HTML code, including style, script. With the help of this element, you can add the code of third-party services to the landing page, created in the “Visual editor”.
Exit popup — a system browser message that is displayed to the user when trying to close the tab with a landing page.
This pop-up consists of 3 parts:
- Text message, in which you can motivate the user not to leave the page (for example, offer a discount, another product or something else);
- Button to close the tab;
- Button, clicking on which the user remains on the page.
Our editor allows you to add exit pop-up and edit elements under numbers 1 and 3.
The setting is done in the following way:
- Drag the “Exit popup” icon to the work area of the page where this pop-up should work.
- Click on this element to select it and in the “Element Properties” tab, you’ll see the area for editing. There are 2 fields here that affect the pop-up functionality:
1) In the text field, you can enter content that will be shown to the user when trying to close the page.
2) In the “Action” drop-down list, select the action for the “Stay on this page” button. Here the following options are available: Landing Page, Page 1, 2 … N (depending on the number of LP pages), Offer 1,2, … N (depending on the number of offers, if this is a multi-offer LP).
Please note:
- Some traffic sources, in particular, MyTarget, can ban your campaign because their rules prohibit the use of such pop-ups on the page where the user lands after clicking on the banner.
- These pop-ups can cause user complaints, which is why browsers, incl. Google Chrome can put your domain on the blacklist. In this case, it will be enough just to change the campaign domain to a new one.
- Exit pop-up is available only in the visual editor mode and in pre-configured AdsBridge LP templates.
In order to check how your LP will be displayed, click on the “Preview” button. Please note that the link that is used to preview the LP is a system link and will not work as a common link to your landing page. Also, in the preview, when you click on the CTA button, the test page of the offer will open, and not the one added to the campaign. To check the redirects, you need to pass by a campaign URL to which the landing page(s) and offer(s) are added.
Once you are done with editing, press “Save” and “Close editor”.
2. HTML editor.
To open aт HTML editor, choose the “Start with blank page” option in the “Create landing page” section.
“Landing name” is an obligatory field. Here you need to specify the name of your LP so that later you can find it in the system faster and view statistics on it.
“Group”. You can create a group of LPs by pressing the “+” button or choose a group from a drop-down menu of this field. It is optional. If you skip this setting, your LP will be added to the “Default” group.
“Language”. Specify the language of your LP. This field is optional and does not affect the targeting or LP display. In the future, this option will help you find a landing page in the system.
“Vertical”. Choose a vertical (theme) of your LP. Later on, this option will help you find a landing page in the system and view statistics by specific vertical. The following options are available: Adult, BizOp, Cams, Dating, Dating Adult, Download, E-commerce, Education, Email Submit, Financial, Gambling, Gaming, Health, Home staging, Incent, Lead generation, Mainstream, Mobile Apps, Other, Penny Auction, Pills, Pin Submit (Web), Retail, Services, Sweepstakes, Traveling, Utilities, VOD.
“Traffic type”. Here you specify the traffic type. This field is optional and does not affect the targeting or LP display. In the future, this option will help you find a landing page in the system.
“Editor”. Here you choose which editor to use: Visual or HTML. Please note that you will be able to edit your landing page only in the editor in which it was created. At the moment, you can’t switch between editors.
“Multi offer”. Tick “ON” if you plan to use more than one offer on your LP.
“Number of offers”. Here you specify the number of offers you want to use on this LP.
The editor is designed to create web pages in the AdsBridge system for further publication and use for marketing purposes. The editor has a code area (1), an additional panel (2) and a sidebar for “control and attachment” (3).
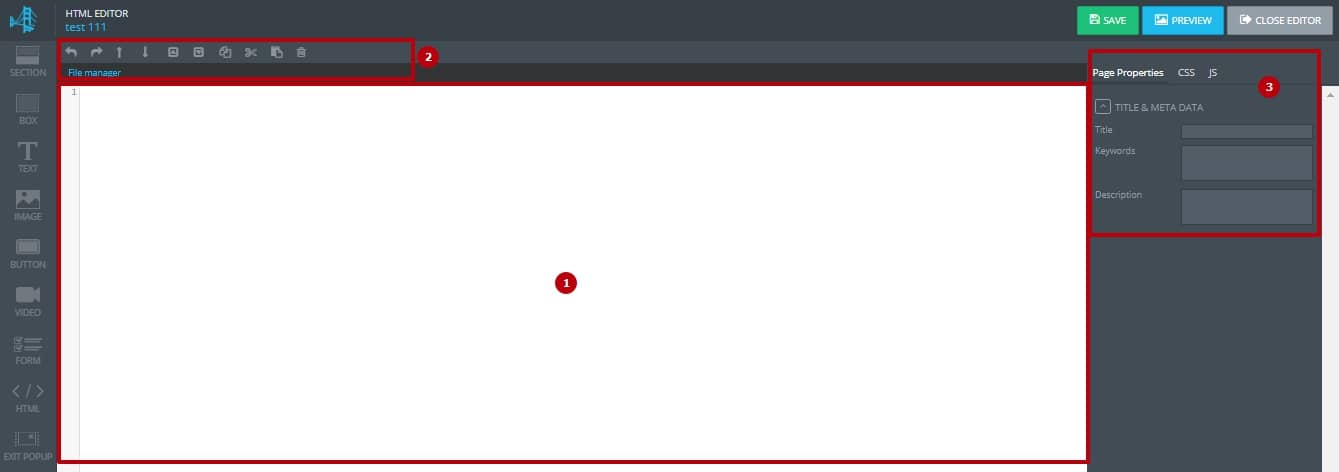
1) Code area
The code area is for pasting and editing the HTML. The code added here (including JavaScript) when viewing on the final page will be put between the <body></body> tags.
In order not to lose the unsaved page, it is necessary to monitor the correct closing of the tags, as well as the pairing of the quotes in them. We advise you to add JS and CSS code through the appropriate tabs. In the code entry field, you can leave only the JS that cannot be used between <head> </ head> tags. Also, you should remove the code that is usually added above the <body> tag and below the </ body> tag.
2) Additional panel
It is used to connect and upload the multimedia. In the HTML mode, you can use only the “File manager” for uploading images, favicons, video and audio files for further usage on the web page.
3) Sidebar for “control and attachment”
In the HTML editor, this sidebar is used for managing the page content in the area between tags.
In the «Page properties» tab, you set the page title, meta data, keywords, and description.
In the “CSS” tab, you can upload files with styles and attach those from the third-party sources using the link (for example, to attach the Google Fonts, you should specify this link – https://www.google.com/fonts ). You are able to manage the order of files’ attachment and remotely edit already uploaded files.
In the “JS” tab, you can upload JavaScript and attach one of the third-party sources using the link (for example, to attach the jQuery library from Google CDS, specify this link – https://developers.google.com/speed/libraries/devguide). You are able to manage the order of files’ attachment and remotely edit already uploaded files.
Working with links
The main purpose of the web pages created in the editor is to provide information and redirect the user to the landing page by clicking on the link or another pre-determined action. All links in the HTML code that will lead from the target page to the LP must have the value of the “href” attribute in the form of the hashtag #.
If you create a landing page that leads only to one offer, instead of linking the offer itself, you can use such link:
<a href=”#”>CONTENT</a>
After you add this kind of a landing page and the necessary offer in the campaign settings, this format of the link will automatically be adjusted to the campaign and will display the desired offer upon redirect.
If you create a multi-offer LP and use more than one offer for it, then the links in the editor should be in the following format:
<a href=”#”>Offer 1</a>
<a href=”#2″>Offer 2</a>
<a href=”#3″>Offer 3</a>
Offer1, Offer2, Offer3 – you set them in the target campaign settings after adding such a landing page.
Please note, you cannot change the number of offers for the landing page, as well as edit the multi-offer LP with the help of our editor if this landing page is added to at least one campaign. In order to edit this kind of a landing page, you first need to remove it from the campaign.
If there are other links (the <a> tags) in the HTML code, from which the redirection to other pages is undesirable, the javascript:void(0) value is set for the “href” attribute (e.g., <a href=”javascript:void(0)”>Stay</a>). To avoid confusion when using the final page, you need to check whether there is a possibility of moving from this page to the target page (you should start with creating a campaign with a test landing page).
In order to create a multi-offer LP in the AdsBrdige editor or a landing page with step-by-step questions, you need to use the JavaScript code, which hides the specific areas and displays the needed content. We recommend you to ask specialists to write the script for your LP.
Working with images
All addresses for images in HTML and uploaded CSS files are substituted for each final page. The process of substituting addresses is done by stages:
- When saving the HTML code or previewing the final page;
- When loading a CSS file (when editing styles remotely in the downloaded file, the addresses are not replaced again);
- When copying a page using the “Manage landing pages” tab.
Please remember that:
— image addresses in JavaScript code are not substituted;
— the file names must be correct.
Working with HTML
The final pages are formed with an element for HTML5.
Working with CSS
You can upload or attach CSS files remotely. An example of remotely connected CSS files can be a link attachment via the sidebar “control and attachments” (the CSS tab) to the CSS Bootstrap library or a file that connects special fonts with Google Fonts, which can later be used in downloadable custom CSS files. Uploaded CSS files can be remotely deleted. please remember that the CSS code should be correct— all curly braces should be closed, the quotes in the backgrounds should be paired or they should not be at all. Otherwise, the page will not be displayed correctly or will not be saved.
Working with GEO
AdsBridge provides you with a possibility to specify users’ GEO at the moment of opening the final page.
AdsBridge provides the ability to determine the location of the user at the time of opening the landing page. To use this possibility, you need to connect the script with the following code:
When attaching the script, the following JavaScript functions are available:
geoip_country_code();
geoip_country_name();
geoip_city();
geoip_region();
geoip_region_name();
geoip_latitude();
geoip_longitude();
geoip_postal_code();
geoip_area_code();
geoip_metro_code();
You can check the descriptions of all these functions here: http://dev.maxmind.com/geoip/legacy/javascript/
Example of using HTML:
Please remember that the location may not be defined or determined incorrectly. The location script works only when the page requests the AdsBridge system, and it will not work locally or from addresses that are not connected to the system.
Also, you can use placeholders in the text to make landing pages more personalized for a user. For example, if you want to display the text “Hello to all users of Android!” for OS Android users, and “Hello to all users of iOS!” for iOS users on one and the same landing page, it is necessary to enter the “Hello to all users of {{os}}!”
The list of placeholders is displayed below the text field. You can use the following ones:
{{country}} – country
{{language}} – language
{{city}} – city
{{traffic_type}} – traffic type
{{connection_type}} – connection type
{{device}} – device
{{manufacturer}} – manufacturer
{{model}} – model
{{browser}} – browser
{{browserversion}} – browser version
{{os}} – operation system
{{osversion}} – OS version
{{isp}} – ISP
{{carrier}} – carrier
{{useragent}} – user agent
{{ip}} – user IP
{{state}} – state
{{token1}}{{token2}}{{token3}}{{token4}}{{token5}}{{token6}} – the value that is passed from the side of a traffic source in a corresponding token.
{{current_date}} – current date
{{day_of_week}} – current day of the week
At the moment all placeholders are replaced with the Latin alphabet.
Frequent errors
The code is formatted in the code area. We do not recommend you to use in the JavaScript such comments as //. The line is fully commented, and when formatting, part of the code can fall into this line.
In order to check how your LP will be displayed, click on the “Preview” button. Please note that the link that is used to preview the LP is a system link and will not work as a common link to your landing page. Also, in the preview, when you click on the CTA button, the test page of the offer will open. To check the redirects, you need to pass by a campaign URL to which the landing page(s) and offer(s) are added.
Once you are done with editing, press “Save” and “Close editor”.
3. Landing page from templates.

To create a landing page from a template, select the “Choose from existing templates” option in the “Create landing page” section.
“Landing name” is an obligatory field. Here you need to specify the name of your LP so that later you can find it in the system faster and view statistics on it.
“Group”. You can create a group of LPs by pressing the “+” button or choose a group from a drop-down menu of this field. It is optional. If you skip this setting, your LP will be added to the “Default” group.
“Language”. Specify the language of your LP. This field is optional and does not affect the targeting or LP display. In the future, this option will help you find a landing page in the system.
“Vertical”. Choose a vertical (theme) of your LP. Later on, this option will help you find a landing page in the system and view statistics by specific vertical. The following options are available: Adult, BizOp, Cams, Dating, Dating Adult, Download, E-commerce, Education, Email Submit, Financial, Gambling, Gaming, Health, Home staging, Incent, Lead generation, Mainstream, Mobile Apps, Other, Penny Auction, Pills, Pin Submit (Web), Retail, Services, Sweepstakes, Traveling, Utilities, VOD.
“Traffic type”. Here you specify the traffic type. This field is optional and does not affect the targeting or LP display. In the future, this option will help you find a landing page in the system.
“Multi offer”. Tick “ON” if you plan to use more than one offer on your LP.
“Number of offers”. Here you specify the number of offers you want to use on this LP.
Once you fill in these fields, move to the next step by clicking the “Continue” button. Below you will see the templates.
To check the landing page templates of a specific vertical, apply the filter.

To view the whole list again, click on the “Clear filters”.
To preview the LP, click on “Preview”. Once you choose a template, press the “Use this” button to start editing.
The editing of such LP is done in the AdsBridge visual editor. At the moment, there is no way to download the code of a pre-set landing page for editing it in the HTML editor, or for downloading it to your own hosting.
Read more information about the editing capabilities in the visual mode in the “Visual editor” section of this user guide.
In order to check how your LP will be displayed, click on the “Preview” button. Please note that the link that is used to preview the LP is a system link and will not work as a common link to your landing page. Also, in the preview, when you click on the CTA button, the test page of the offer will open. To check the redirects, you need to pass by a campaign URL to which the landing page(s) and offer(s) are added.
Once you are done with editing, press “Save” and “Close editor”.
4. Self-hosted landing pages.
To add your self-hosted LP, select the “Use self-hosted landing page” option in the “Create landing page” section.
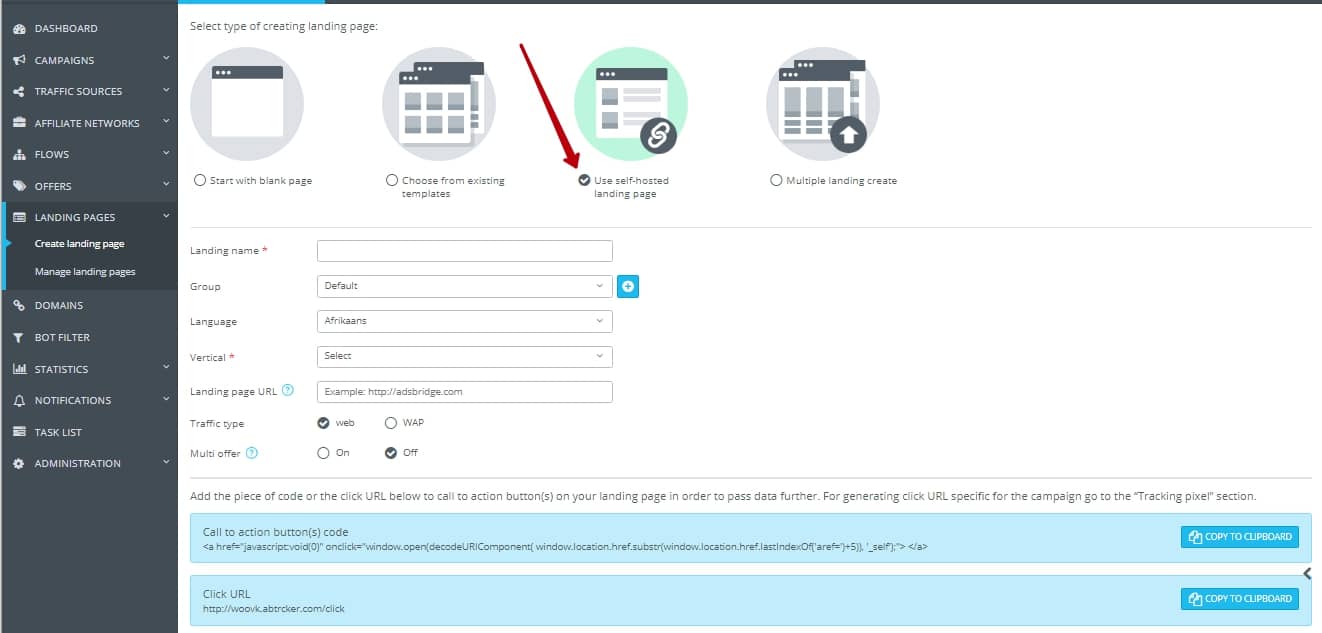
“Landing name” is an obligatory field. Here you need to specify the name of your LP so that later you can find it in the system faster and view statistics on it.
“Group”. You can create a group of LPs by pressing the “+” button or choose a group from a drop-down menu of this field. It is optional. If you skip this setting, your LP will be added to the “Default” group.
“Language”. Specify the language of your LP. This field is optional and does not affect the targeting or LP display. In the future, this option will help you find a landing page in the system.
“Vertical”. Choose a vertical (theme) of your LP. Later on, this option will help you find a landing page in the system and view statistics by specific vertical. The following options are available: Adult, BizOp, Cams, Dating, Dating Adult, Download, E-commerce, Education, Email Submit, Financial, Gambling, Gaming, Health, Home staging, Incent, Lead generation, Mainstream, Mobile Apps, Other, Penny Auction, Pills, Pin Submit (Web), Retail, Services, Sweepstakes, Traveling, Utilities, VOD.
“Landing page URL”. Here, you need to specify the URL of your landing page. Example: http://www.mylandingpage.com/
“Traffic type”. Here you specify the traffic type. This field is optional and does not affect the targeting or LP display. In the future, this option will help you find a landing page in the system.
“Multi offer”. Tick “ON” if you plan to use more than one offer on your LP.
“Number of offers”. Here you specify the number of offers you want to use on this LP.
Below these fields you will see the following:
1) Call to action button(s) code
<a href=”javascript:void(0)” onclick=”window.open(decodeURIComponent( window.location.href.substr(window.location.href.lastIndexOf(‘aref=’)+5)), ‘_self’);”> </a>
2) Click URL
http://example.test.com/click , where example is your unique domain in the AdsBridge system.
These options will be provided at your choice. Its functionality is the same (redirect to offer and a number of click on the CTA buttons), which means you don’t have to add this code and click URL at the same time.We recommend you to use Click URL because it is easier to insert it into the code. Please note that if you use a custom domain in a campaign, it is also necessary to use Click URL on this domain. You can check which Click URL to use on your landing page for a specific campaign on the “Tracking pixels” page in the “User menu”. However, if you use one and the same landing page in campaigns with different domains, we recommend you to use the Call to action button code since the Click URL won’t work correctly in this case.
Press “Copy” to copy this code or click URL.
If your landing page uses the “Multi-offer” option, insert the CTA button code or Click URL with an order number of offers on different buttons of your LP.
The example of CTA button code on a multi-offer landing page with 3 offers:
— for the first — <a href=”javascript:void(0)” onclick=”window.open(decodeURIComponent( window.location.href.substr( window.location.href.lastIndexOf(‘aref=’)+5) + ‘&multi_offer=1’), ‘_self’);”> </a>
— for the second — <a href=”javascript:void(0)” onclick=”window.open(decodeURIComponent( window.location.href.substr( window.location.href.lastIndexOf(‘aref=’)+5) + ‘&multi_offer=2’), ‘_self’);”> </a>
— for the third — <a href=”javascript:void(0)” onclick=”window.open(decodeURIComponent( window.location.href.substr( window.location.href.lastIndexOf(‘aref=’)+5) + ‘&multi_offer=3’), ‘_self’);”> </a>
The example of a Click URL on the multi-offer landing page with 3 offers:
— for the first— http://example.test.com/click?multi_offer=1
— for the second— http://example.test.com/click?multi_offer=2
— for the third— http://example.test.com/click?multi_offer=3
To add a token to the URL of your landing page, it is necessary to choose the required placeholders from the list below. When passing via the campaign URL, these placeholders will be replaced with the corresponding values.
On a self-hosted LP, you can also display the user data that the tracker identifies. For this, do the following:
1) Add the code to your landing page:
<html>
<head>
<script>
function getURLParameter(name) {
return decodeURIComponent(
(RegExp(name + ‘=’ + ‘(.+?)(&|$)’).exec(location.search)||[,null])[1] || ”
);
}
</script>
</head>
<body>
Hello <script>document.write(getURLParameter(‘model‘))</script> Caution! Your OS version is not up-to-date enough to visit that site. Press the button to update!
</body>
</html>
In this script, the model of the user’s device is used as an example. You can change the text of the script.
2) In the settings, add a required placeholder to the landing page URL to pass the information to the landing page for further placement on it (e.g. script is set to display the model of a user device, then you will need to add “&model=<model>” to the end of the landing page URL. This way, the link will look like this: http://mylandingpage.com?model=<model>). The script will take the parameter name and display it on a landing page.
The following placeholders are available:
{{country}} – country
{{language}} – language
{{city}} – city
{{traffic_type}} – traffic type
{{connection_type}} – connection type
{{device}} – device
{{manufacturer}} – manufacturer
{{model}} – model
{{browser}} – browser
{{browserversion}} – browser version
{{os}} – operation system
{{osversion}} – OS version
{{isp}} – ISP
{{carrier}} – carrier
{{useragent}} – user agent
{{ip}} – user IP
{{state}} – state
{{token1}}{{token2}}{{token3}}{{token4}}{{token5}}{{token6}} – the value that is passed from the side of a traffic source in a corresponding token.
{{current_date}} – current date
{{day_of_week}} – current day of the week
At the moment all placeholders are replaced with the Latin alphabet.
Please note: when you change the domain of the campaign that uses the self-hosted landing page, you also need to change the domain for the click URL. Otherwise, a landing page with a click URL on a domain that differs from the campaign domain will not redirect to the landing page. You can always check the correct click URL for a specific campaign on the “Tracking pixels” page, which is located in the “User menu”.
Once you fill in all the fields, press “Continue” to save your landing page.
5. Landing page upload
On AdsBridge you can upload several self-hosted landing pages at a time.

For this, choose the “Multiple landing create” option.
Step 1 – download the file template in CSV format onto your device.
Step 2 – fill in the necessary information and save the file in CSV format.
In the file, you need to specify required columns and optional columns.
Required columns:
- the names of the landing pages (you can’t use the same names),
- URL,
- the vertical,
- the type (Web or WAP)
Optional columns:
- Group ID (data from your account)
- Language
- Number of offers
In the link of the landings, you can immediately specify the parameters that need to be passed to the LPs. Find more information on available placeholders and how to add them in the “Self-hosted landing page” paragraph.
Step 3 – upload the file to your account.