Many traffic sources want to make sure that traffic reaches the stated destination. Therefore, your campaigns usually go through the process of moderation by the bots on their side before they go to real traffic. To send these bots to another path or site and determine the number of bot redirects, you need to set the AdsBridge bot filter.
The settings consist of two stages: “General settings” and “Filtering settings”.
Let’s review the “General settings” option:
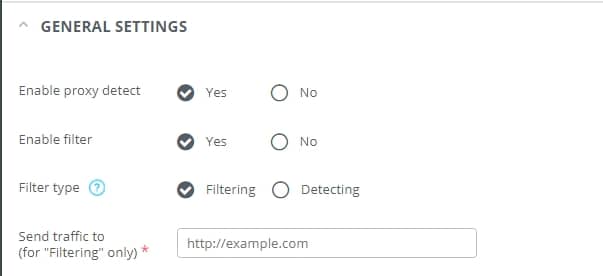
“Enable proxy detect” – thanks to this option, you can view statistics by visits, clicks, proxy traffic conversions, and also send it to the Rule for Proxy traffic in campaigns. To enable this function, tick “Yes“. After you mark the checkbox and save all the settings, you will see the option “Proxy detection” in the campaign settings on the first step (if the proxy setting is disabled on the bot filter setting page, this option will not be in the campaign settings). Detection of Proxy traffic is activated and deactivated in each campaign separately.
“Enable filter”– this option activates the bot filter. After you tick the “Yes” checkbox and save all the settings, you will see the “Bot filter” option in the campaign settings on the first step (with the bot filter disabled, this option will not be in the campaign settings). Bot filter is activated and deactivated in each campaign separately.
“Filter type” – with this option you can set the path for bot traffic. If you select the “Filtering” option, the traffic that corresponds to the conditions you added in the “Filtering settings” will be marked as a bot and be redirected to the offer/link entered in the “Send traffic to (for “Filtering” only)” field. The “Tracking” option defines the traffic as a bot and redirects it to the appropriate distribution rule for your campaign. That is, in the campaign settings, you can set a special distribution rule for bot traffic. Please note that the selected filter type will be used in all campaigns in which you activate the bot filter.
“Send traffic to (for “Filtering” only)” – in this field you need to enter the link/offer, to which the bot traffic will be sent when the “Filtering” is enabled.
You can hide the “General settings” by clicking on the arrow next to the name of this block.
Let’s review the “Filtering settings” option:
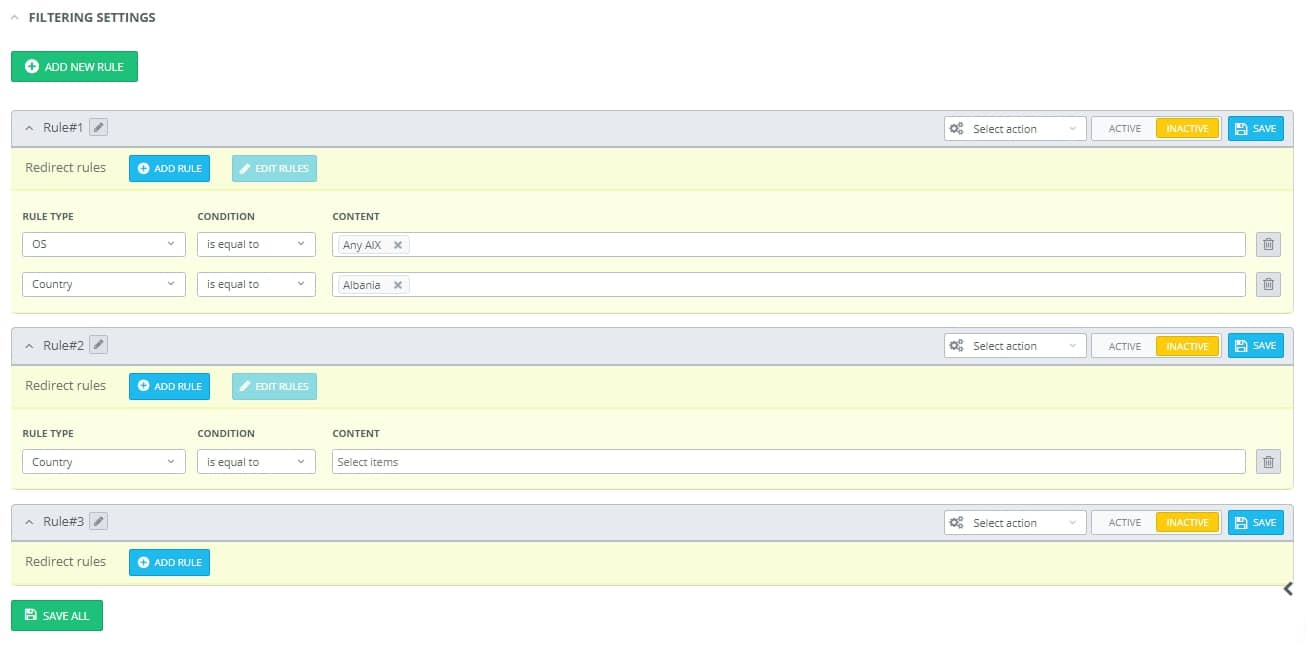
“Add rule” – when clicking on this button, a new rule is added for setting conditions. When you add each rule, it is named Rule # 1, Rule # 2, Rule # 3, etc. by default. However, the path name can be edited. To do this, you need to click on the “Edit” icon next to the rule name, after which you can change the name of the path, and click on the “Submit” button.
“Select action” – this option allows you to copy or delete the rule.
“Active/Inactive” – using this option, you can activate or deactivate a specific rule.
“Save” – saves the rule.
“+Add rule” – ads a redirect rule.
“Edit rules”– if necessary, after saving the redirect rules, you can edit these rules by clicking on this button.
“Traffic type” – in this field, you can select the desired value in the drop-down list. Currently available options are country, referrer, traffic type, IP address, ISP, OS, language, carrier, connection type, device type, device manufacturer, device model, browser, Sub ID, day of the week, time, useragent, uniqueness.
“Condition” – you can set the condition using this option. Available options are: is equal / is not equal for options such as uniqueness, time, day of the week, device model, device manufacturer, device type, connection type, carrier, language, ISP, IP address, traffic type, country; equal / is not equal / contains / does not contain – useragent, sub id, browser, OS, referrer.
“Content” – in this field, the corresponding value will be displayed for each redirect rule.
The setting is the same as for the distribution rules in the campaign. Traffic, which corresponds to the rules set here, will be considered bot and will either be filtered out or simply recorded in statistics as bot according to your settings.
Please note that when you add all the redirect rules and values within the same rule, the traffic that meets all the conditions in the rule will be marked as a bot, since the redirect rules within the same rule (Rule) operate according to the logical connection “AND“. To set the logical connection “OR” between redirect rules, you need to create a separate rule for each of them. Also, all traffic that meets the redirect rules will be marked as a bot in all campaigns where the bot filter is enabled.
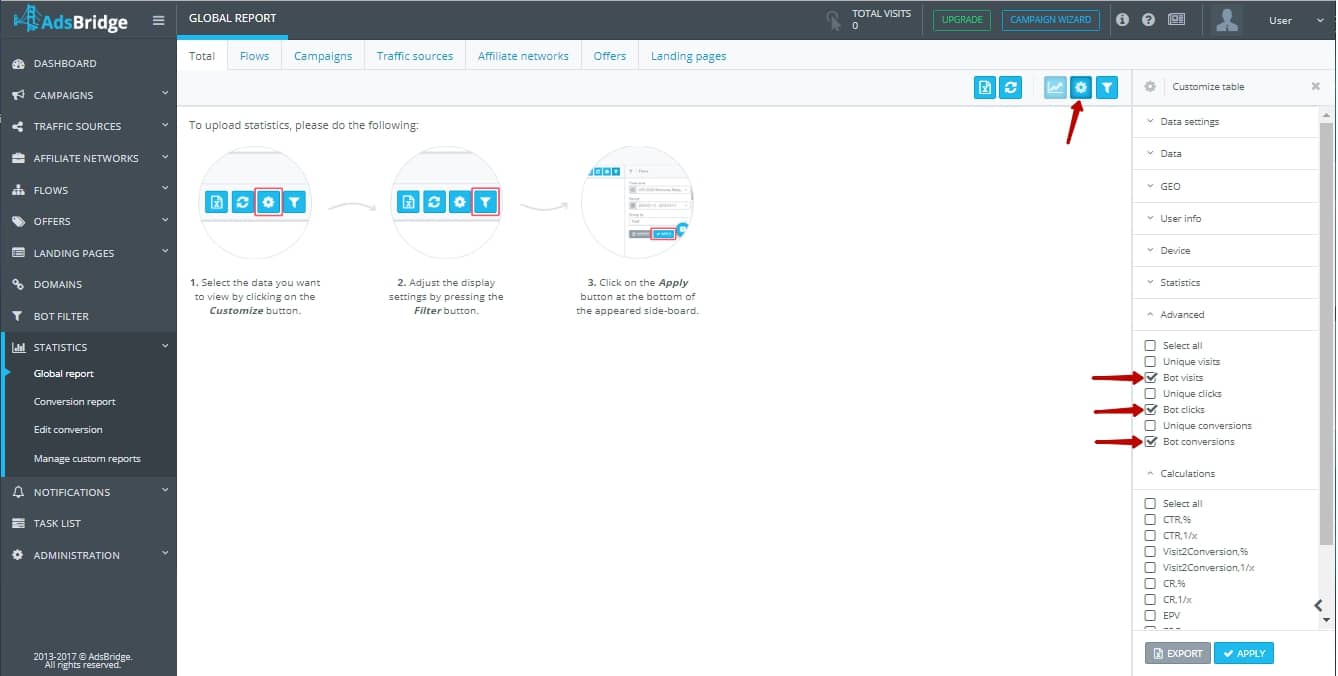
In order to see the bot visits, clicks, and conversions in the statistics, you need to tick the corresponding checkboxes:
To learn more about how to set up a bot trap, go to https://www.adsbridge.com/a-bot-trap-within-one-campaign/.