You may create new campaigns right after you are done with creating a Traffic source (not necessarily), Affiliate network (not necessarily), Offer, Landing page (not necessarily), or adding a Domain (not necessarily).
The Create campaign subsection implies two steps – General Info and Targeting Settings.
STEP 1. General info.
I. BASIC.
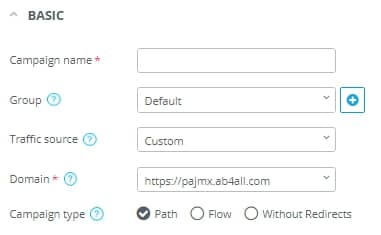
1.“Campaign name”. You can name the campaign as you want (the name length must be at least 3 characters and can contain the letters of both registers a-z‚ A-Z‚ numbers 0-9‚ and the following symbols: — ‚ _, *, /, &, [, ], (, ), !, №, %, ?, @, #, <, >, +, comma, period). The campaign name must be unique.
2. “Group”. You can select one of the previously created campaign groups from a drop-down list and add a new campaign to it. As standard, all your campaigns are located in the “Default” group. To create a group, click on the “+” sign to the right of the given field, enter the group name and hit “Apply.”

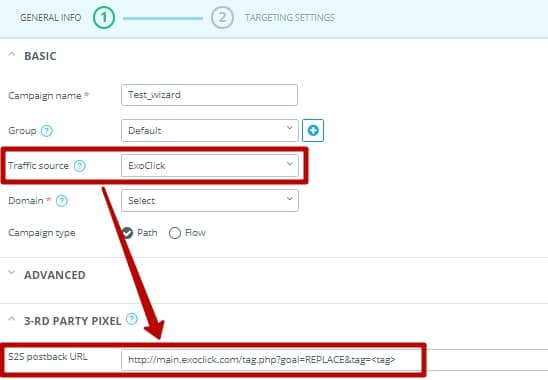
3. “Traffic source”. Select the pre-set traffic source to automatically fill in the Campaign Tokens fields (see paragraph IV. Campaign Tokens below). If you haven’t added any traffic sources yet, you can fill in the Campaign Tokens fields manually. In case a traffic source is selected, you will not be able to edit the Campaign Tokens below. To edit the Tokens without removing a traffic source from the campaign settings, you will have to change over to the Traffic Source Edit page.
4. “Domain”. Choose a redirect domain that all the campaign traffic will be sent to. By default, upon registration you are given a subdomain on a basis of the AdsBridge system, which can be used for your campaigns. For example: exemple.systemdomain.com, where exemple is your unique subdomain. As a rule, the system-related subdomain comes first on the list. If you want to add more domains, switch over to the “Domains” section of your account. In the following, you will be able to select them in campaign settings within this field.
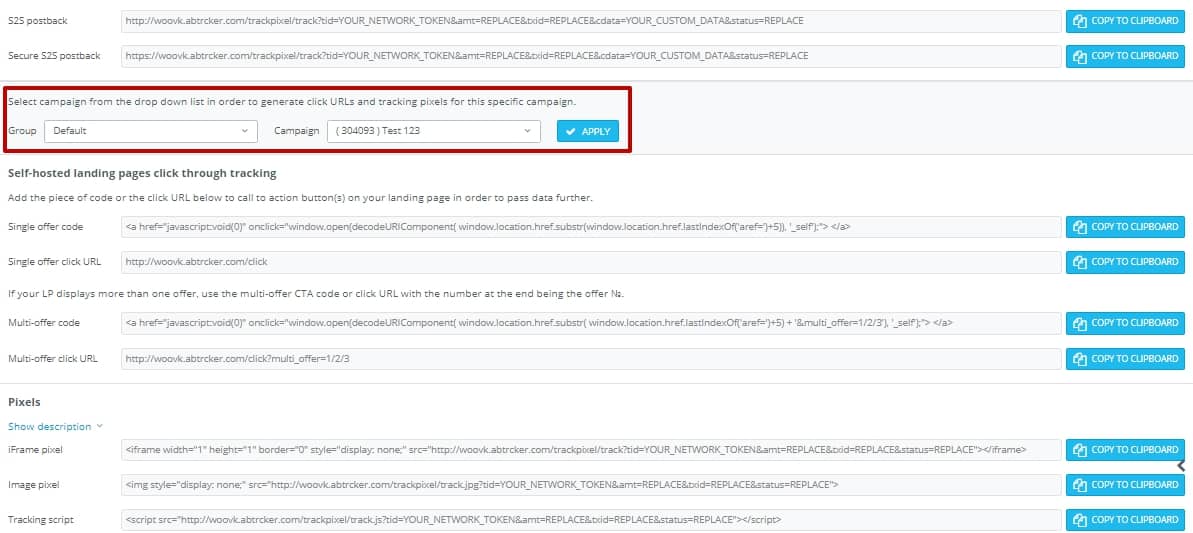
Please note: as to self-hosted landing pages for your campaigns, it’s necessary to use the tracker’s Click URL on the CTA buttons of such a landing page. Also, if your affiliate network lacks the option to transmit conversions by means of S2S postback, or if you keep track of conversions from your own website, you may use tracking pixels (Image, JavaScript, iFrame) to monitor your campaign’s conversions. In case of changing a campaign domain that runs conversion tracking pixels or a self-hosted landing page, you are supposed to change the domain for Click URLs and tracking pixels as well. Otherwise, a pre-lander with Click URL domain different from the campaign one will not redirect to a landing page, and the pixel with a domain different from the campaign one will not transmit a conversion on such a campaign. You can always learn the actual tracking pixels and Click URLs for any given campaign from a “Tracking pixels” page within the “User menu”.
5. “Campaign type”. 3 options are available: Path, Flow and Without Redirects. The type is selected depending on the target settings of your campaign.
Path – targetting setting that is applied for one campaign only.
Flow – it is a ready targetting setting that can be applied for many campaigns at once.
Without Redirects – tracking setting without redirects. This type is available when working with self-hosted landing pages. When choosing this type the landing page URL should be entered in the field below.
II. ADVANCED.
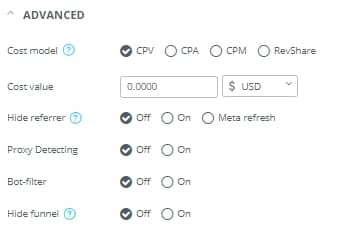
When applying campaign type “Without Redirects” additional settings have 2 items: “Cost model” and “Cost value”. There are all settings listed below for campaign types Path and Flow.
6. “Cost model”. Choose a cost model to pay for traffic and enter the cost value:
– CPV (Cost per Visit) – cost per one visit to a landing page. This cost model is often associated with cost-per-click (CPC) and cost-per-mille, or CPM, (especially as to pop-under traffic, when a single following a campaign link equals to a view, as the campaign link was opened in another browser window);
– CPA (Cost per Action) – cost per one action (e.g., one conversion). If you select this model, the pre-determined value (or the value coming from the side of traffic source through a parameter that transfers the costs) will be brought into the statistics section (namely, the “Costs” column) only after a conversion takes place.
– CPM (Cost per Mille) – cost per one thousand of banner impressions. If you opt for this model, make sure you have set a traffic source in order to keep track of impressions and place an “Image pixel” on your banner.
– RevShare (Revenue Share) – stands for a certain percent of conversion payout.
7. “Cost value”. Here you can specify the static value on a certain cost model for any given campaign. Aside from that, this field enables you to select the necessary currency that will be used for displaying both static cost values (specified at the step of campaign creation) and dynamic cost values (that are related to a certain campaign and are collected from a traffic source).
Please note: If you make use of the dynamic cost transfer by means of your traffic source’s special Token, but you have already configured this field, the dynamic value will be considered first (applied to CPV and CPM cost models).
8. “Hide referrer”. With the help of this feature, you may hide the details of your traffic and/or pre-landers. By checking this checkbox within the campaign settings, you show the affiliates the exact amount of data you are ready to share: a clear domain (by default, it’s the AdsBridge system subdomain for hiding a referrer: example.ab4hr.com). You can also add your own domain; just go to the “Domains for “Hide referrers” tab within the “Domains” section.
“Meta refresh” is a feature that stands for leaving a referrer empty and imitating the direct changeover to the website. Concerning the browsers that do not support this feature, the referrer will be displayed the same way it’s done under the active “Hide referrer” feature (example.ab4hr.com, or the subdomain you’ve added).
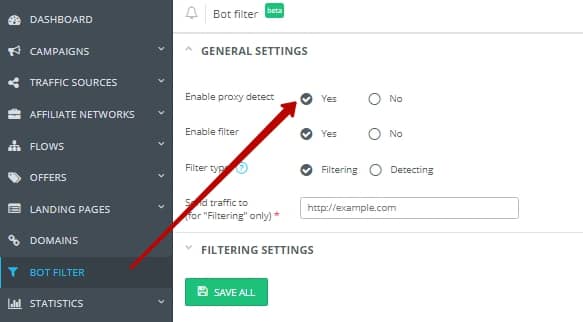
9. “Proxy detecting”. This feature appears in the campaign settings after you enable it within the “Bot filter” section.
To activate detection of proxy traffic for a certain campaign, select the checkbox “Yes”.
Please note that this feature is linked to an additional Distribution Rule for proxy traffic, which can be found on the Create target settings page.
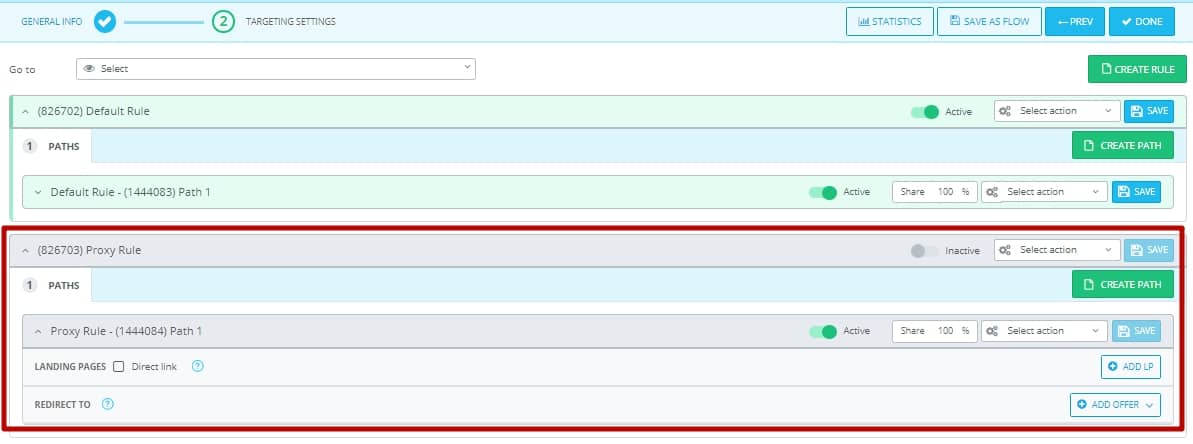
Basically, the activation of this function enables the Rule, the deactivation – disables it. In case of activation / deactivation of the Rule in the targeting settings, the system will automatically select the corresponding checkbox.
10. “Bot filter”. This feature appears in the campaign settings after you activate the bot filter in the corresponding section of the account (“Bot Filter”). To enable a bot filter for a specific campaign, select the checkbox “Yes”.

11. “Hide the funnel”. This function allows you to hide the pre-lander from advertisers or managers of affiliate networks.
The option works as follows:
For instance, when you click upon this campaign link
http://example.ab4all.com/c/11111?token1={token1}
the system generates a checksum (which stands for the combination of parameters of the real user), and then it forms another link, which will look like:
http://example.ab4all.com/j/11111?hash[checksum]
This links will be deemed as referrer on the side of Affiliate network.
Upon making a clickthrough with parameters different from those that served a basis for generating a checksum, or 60 seconds later, this transition will be redirected to the link specified in the “Return URL” field, and not to the actual funnel. Using this option, you can hide the real funnel from the curious account managers of the Affiliate network.
III. 3-RD PARTY PIXEL.

12. “S2S postback URL”
This field contains a postback link of your traffic source (if such functionality is provided on its side) or a postback link of the affiliate platform tracker. This feature is used in case you need to transmit conversions, and any other information from the tracker to the traffic source or to the affiliate platform tracker. In other cases, this link is optional. You can contact the manager of your traffic source to get a postback link for AdsBridge.
Please note that transfer of conversions-related data can be made not only to your traffic source or the affiliate platform tracker but also to any other service of your choice that supports S2S postback. Click “Add another” to activate this setting.

If you use a previously created traffic source containing the Tracking ID and Postback URL, then the Postback URL of the traffic source will be automatically applied to the “S2S postback URL” field.
Set-up of the 3-rd party pixel in case the campaign lacks a traffic source.
“Tracking ID” stands for the parameter name and the traffic source macro, which is meant to transmit the unique value for each transition (Click ID). This field can be found in the section below, go to “Campaign Tokens” -> “Advanced”.
“S2S postback URL” is a postback URL in a format required by a traffic source. Here’s the most common link format: http://traffic_source_postback.com/?parameter_of_theTS=parameter_of_theTracker.
In order to transmit dynamic values, you will have to use the AdsBridge macros, so the example of postback URL of a traffic source in the tracker will look like as follows:
http://traffic_source_postback.com/?parameter_of_theTS=<tracking_id>.
Please note that the addition of parameters in such format as <parameter1><parameter2><parameter3> is not always correct, and that’s why the postback URL with such parameters might not work out. However, the link formats may differ, for instance, some traffic sources may receive parameters through front slash (/), comma (,), colon (:) and other marks. You need to utilize the postback URL format that will enable a traffic source to take additional values.
After you’re done setting up the “3-rd Party Pixel”, there is no need to set the affiliate’s S2S postback URL on the target site. All you need to do is to set the AdsBridge postback only. The tracker will automatically highlight the pixel of the affiliate/traffic source as soon as it receives a conversion from the affiliate network.
With the help of placeholders, which are available below the URL field (they are opened with a click upon this field), you can transfer the amount of costs (for example, as for the RevShare cost model), payouts, and other available values. When you click upon any of the placeholders, the desired parameter will be automatically added to the link.
13. The list of Tokens available for addition to postback:
<payout> – payout for a conversion;
<tid> – value of tracker’s Click ID;
<txid> – value of transaction ID;
<tracking_id> – parameter that is used to transmit the Click ID of a traffic source to the side of the mentioned traffic source through a postback (see item 8. S2S postback URL);
<cost> – costs value;
<campaign_id> – campaign ID in the AdsBridge system;
<trafficsource_id> – traffic source ID in the AdsBridge system;
<trafficsource_name> – name of the traffic source in the AdsBridge system;
<lp_id> – landing page ID in the AdsBridge system;
<offer_id> – offer ID in the AdsBridge system;
<country> – country;
<language> – language;
<city> – city;
<traffic_type> – type of traffic;
<connection_type> – type of connection;
<device> – device;
<manufacturer> – manufacturer;
<model> – model;
<browser> – browser;
<browserversion> – version of browser;
<os> – operation system;
<osversion> – operation system version;
<isp> – ISP;
<carrier> – mobile network operator;
<useragent> – user agent;
<ip> – IP;
<token1>…<token6> – values that are transmitted through the essential campaign tokens;
<cdata>,<cdata2> etc. – values that are transmitted from the side of affiliate network by means of CDATA parameters of the AdsBridge postback. They enable you to transfer data from the offer side to the traffic source. These parameters will not be displayed in the AdsBridge stats.
14. 3-rd Party JS Pixel
This field is designed to set up a js tracking pixel of your traffic source (if this function is provided from its side, for example, Facebook, Adwords). This feature is used in case you need to pass conversions from a tracker to the traffic source.
Please note, if you use a JS pixel to pass conversions to the traffic source, then you need to set up our iFrame pixel at the side of the offer.
Click “Add another” to activate this setting.

IV. CAMPAIGN TOKENS.
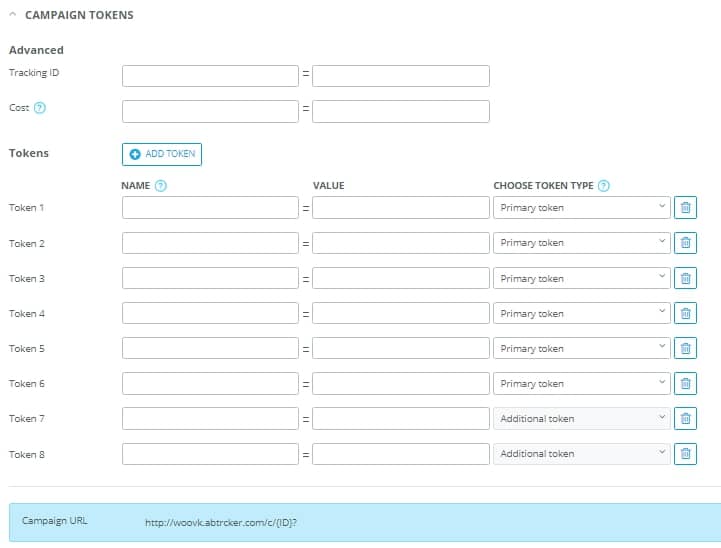
“Token ID” stands for certain values that can be added to your campaign link for further transmission of their values from the traffic source to AdsBridge or the target site. Contact your traffic source representative to get the macros that transmit these values.
14. “Tracking ID”
It is used to transmit a unique Click ID. Its process of setup does not impact the tracking on the side of our platform; however, if you need to transmit conversions to a source, then this parameter is the key. Provided that this parameter is set correctly, AdsBridge will take on the Click ID value of the traffic source and, subsequently, match it against its Click ID and send the correct value back to the traffic source.
Tracking ID consists of a name and a macro, which you can clarify with the representative of your traffic source.
15. “Cost”
Here you can add a parameter that conveys the costs, if available at your traffic source. It consists of a name and a macro that you can clarify with the representative of your traffic source.
16, 17. “Add Token”
These Tokens are indispensable in terms of creating a unique campaign link, as well as for passing parameters from traffic sources to AdsBridge or to the target site (the affiliate network). They can be adjusted in 2 steps:
– Specify a name. With this name, the Token will be added to your campaign link, so you can choose the name yourself. Do not use the same name for all parameters, as this may have an impact on tracking. Additionally, if you often use a certain traffic source with a specific affiliate network, you can pre-set the parameters across which it will receive additional information (for example, the name of the parameters).
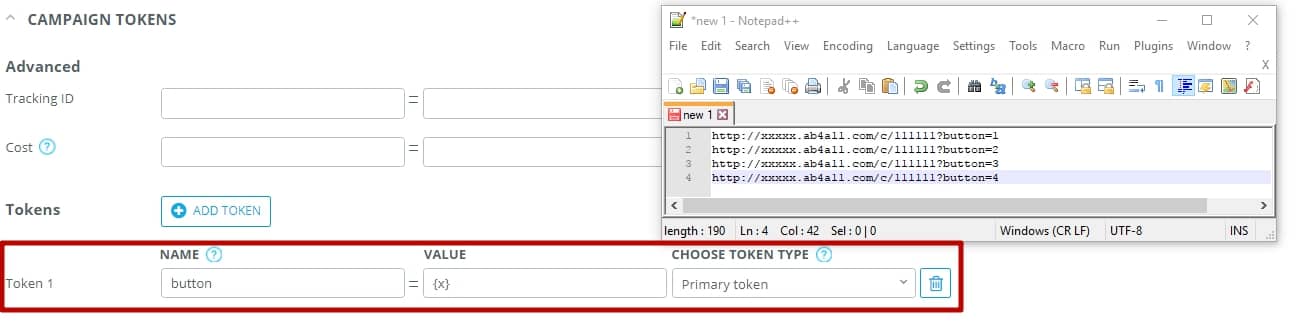
– Specify the Token value. In case of a static value (for example, you’ve got the <banner> parameter, through which you will always get the value 1), you need to enter this specific value in the “Value” field. In case of a dynamic value (which can change with every single clickthrough of your campaign link), fill in the “Value” field with the macro of the traffic source (which is supposed to take different values each time the link is clicked upon). A list of macros is available within your traffic source documentation, or you can check it with the account manager of your traffic source. We also recommend using the popular source: http://trackingtokens.com.
Let’s consider these two cases separately:
1) Static Value of Token: you’ve got an email with 4 buttons and want to track which of them had the most transitions. To do this, you need to specify, say, Token1: button=х (here’s the example of you campaign link after such a configuration is applied – http://example.test.com/c/test1?button=х), and by inserting the campaign link into Button 1, you provide the campaign link in this form: http://example.test.com/c/test1?button=1. The procedure for three remaining is the same, except for the button value. Thus, for Button 2 the link will look like http://example.test.com/c/test1?button=2, for Button 3 – …button=3, and for Button 4 it will be …button=4, respectively. When a user clicks upon Button 1, you will see the value “1” in the Token column within the AdsBridge stats, and so on.
2) Dynamic Value of Token: you buy traffic from a given source (ad network) and want this traffic source to give you information about which site came the user who clicked on your banner. To do so, go to settings of your campaign (or traffic source), and input the following: Token1 site=parameter, after the equality sign (“=”) you need to specify the traffic source macro, which will be replaced by the corresponding value with each click on the link, (for instance, site=[site_id ], make sure to specify the value of this macro on the side of traffic source). Therefore, you will see such values site1, site2, site3… siteN for each visit in the Token1 column within the AdsBridge stats. With that being said, the macro works as follows: when a user clicks upon your campaign link, they will be redirected from a traffic source to your AdsBridge campaign. At the moment of clickthrough, the macro is replaced by the traffic source to the corresponding value in order to transfer data to the tracker or target site. For example, if at the moment of clickthrough, your traffic comes from site1, the [site_id] macro will be replaced with site1:
http://example.test.com/11111?site=site1.
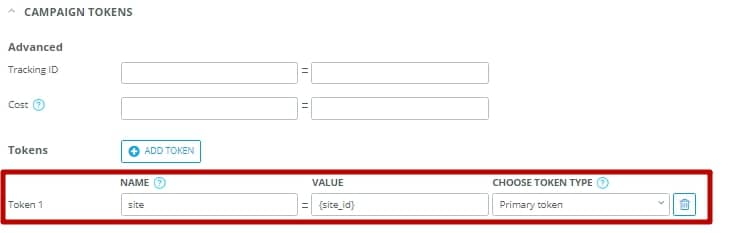
Please note that our system contains Primary and Additional Tokens. As for the Primary ones, their number does not exceed 6, and they will be displayed in our tracker’s statistics section. Additional Tokens will not be stored in the stats; yet still, they can be passed to your affiliate network, where you will be able to preview their values . You can use as many Additional Tokens as you need. Moreover, the Primary Tokens must be written only in the first 6 lines, otherwise you will not be able to see the basic values that are added as Token7, Token8, etc.
Settings for passing the traffic data from the traffic source to affiliate network can be found in the “Offers” section of this user guide.
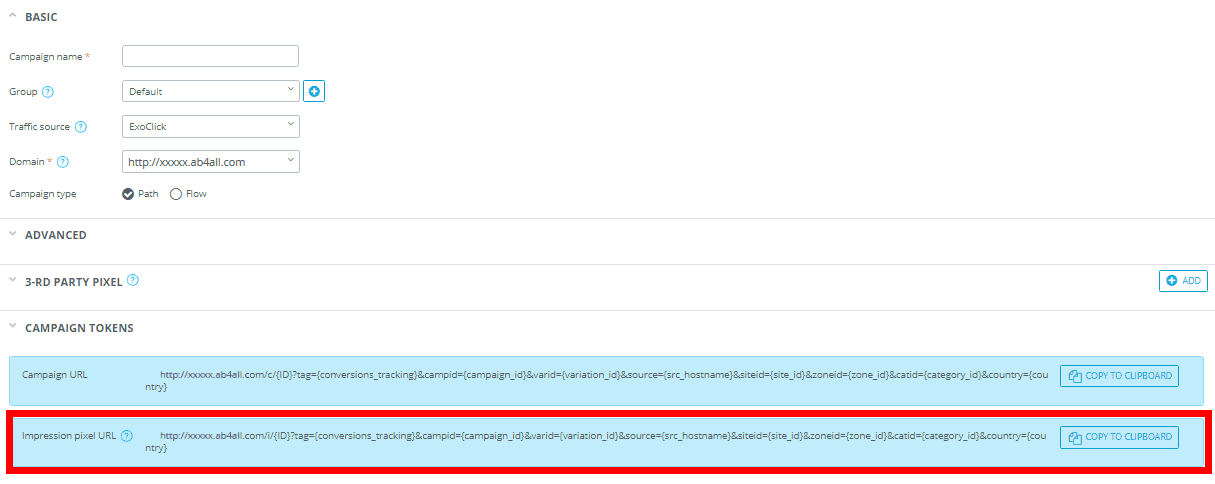
18. “Campaign URL”
After the campaign settings are saved, you will see its unique URL. Let’s have a closer look at the campaign link:
http://subdomain.domain.com/c/111111?token1={token1}
http://subdomain.domain.com/test/111111?token1={token1}
The URL comprises several components:
subdomain – your unique subdomain in the AdsBridge system (or your custom domain’s subdomain);
domain – the system domain in AdsBridge (or your custom domain’s subdomain);
c – campaign URL for live traffic;
test – campaign URL for tests;
111111 – unique system ID generated automatically;
?token1={token1} – parameters that you have provided as Campaign Tokens.
19. “Tracking Pixel URL”
You will see this link if you have selected the “Track impressions” checkbox in the traffic source settings and added such a traffic source to the campaign settings.

In order to place a tracking pixel on the traffic source’s side, you will have to:
- Make sure that your traffic source provides the option of placing a tracking pixel. You can check this information with your traffic source representative.
- Copy the Tracking Pixel URL.
- Paste the URL to JavaScript, Image or iFrame, for example.
- Paste the tracking pixel to your ad unit or the corresponding field on the traffic source’s side. Please note that you are supposed to paste the link in .js, .img or .iframe format.
Tracking pixel will work out for every impression of your ad. Based on the collected data, the AdsBridge system will provide the estimated costs for the CPM model.
Please note that the Tracking Pixel URL is different from the campaign link (http://example.test.com/i/11111? is used instead of http://example.test.com/c/11111?). Moreover, the links differ by functionality. You cannot use the Tracking Pixel URL as a target link on the side of traffic source, because this is a system URL that is meant to track impressions.
To ensure the tracker operates properly, you’ll also have to customize the 2nd step of the campaign creation settings.
STEP 2. Targeting settings.
The second step of campaign creation routine embraces targeting settings.
Visually, the setup of the Campaign type “Path” slightly differs from the Campaign Type “Flow” that you have selected at the first step.
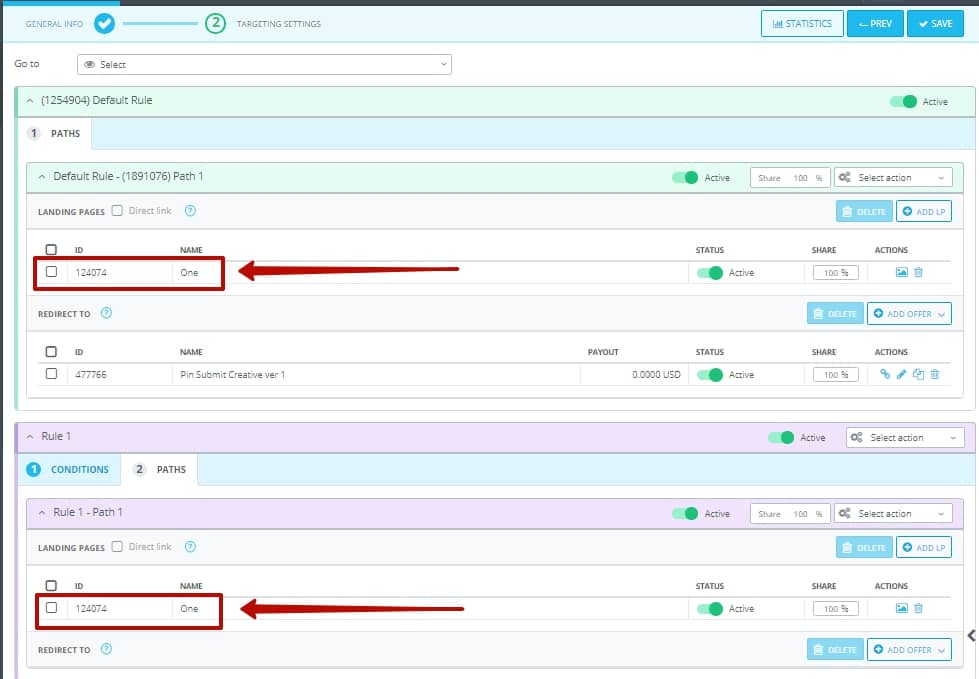
Campaign Type “Path”
If you select the “Path” type (set by default), then it’s necessary to set the rules in the targeting settings, according to which each specific segment of your traffic will be sent to the corresponding Distribution Rule in this campaign only.
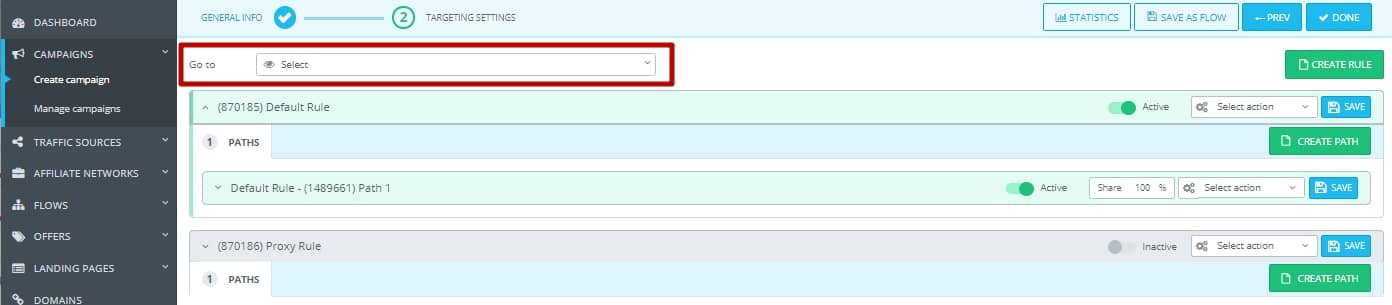
Targeting settings.
“Go to” – using this feature, you can quickly change over to the desired Rule or Path in the targeting settings.
“Traffic monetization” rule is the part of campaign which includes possibility to choose required vertical where to distribute the traffic. If the incoming traffic follows this rule and fits specific vertical, then it will be automatically monetized.
In order to use this rule you need to activate checkbox above.
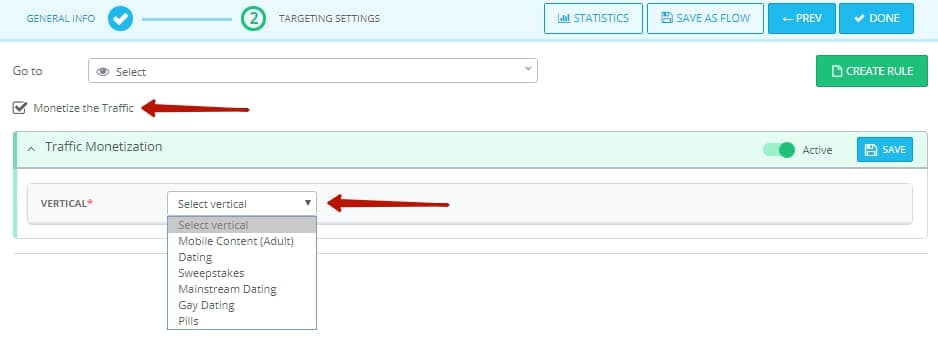
Traffic will be distributed on such rule if it doesn’t fit any of the above-mentioned distribution rule. If you don’t need any distribution rule, then you may just activate “Traffic monetization” and earn from the traffic.
Earned money available for withdrawal you may check in the section “Payments”, click here to learn more.
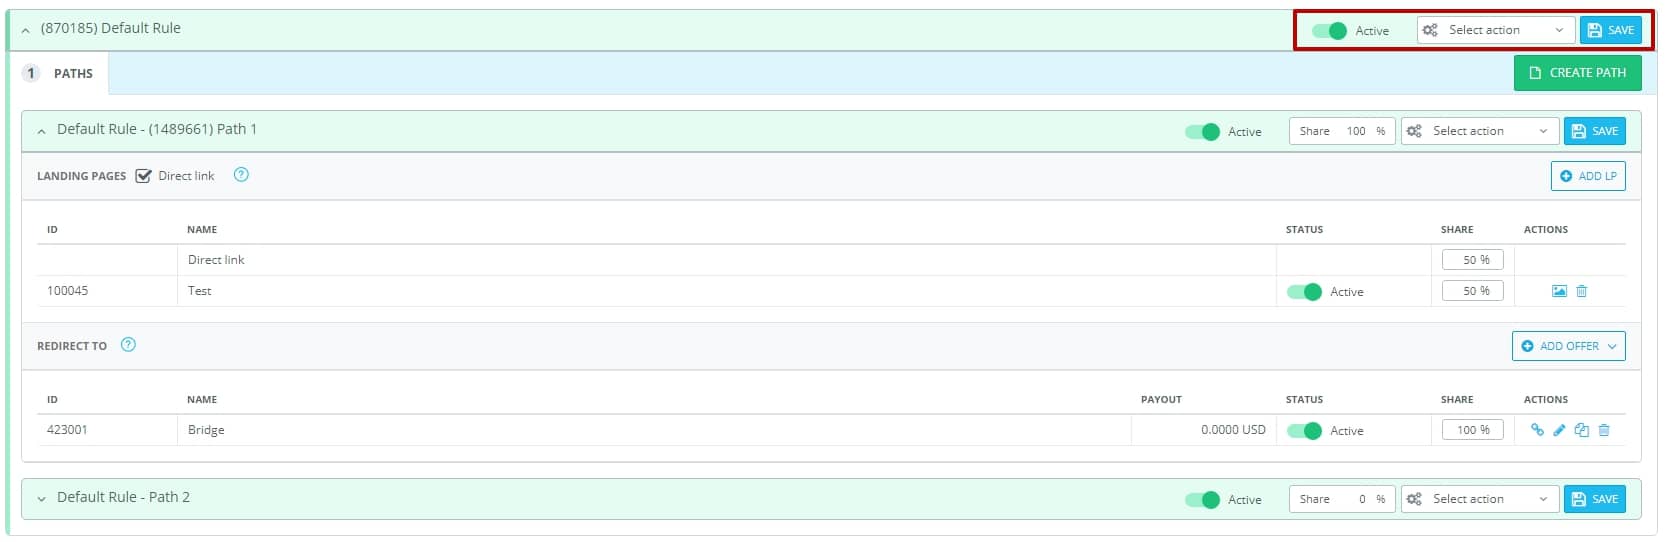
“Default Path” is a campaign component embracing the default paths. Traffic will be sent to such a rule in case it does not correspond to any of the Rules with certain distribution conditions.
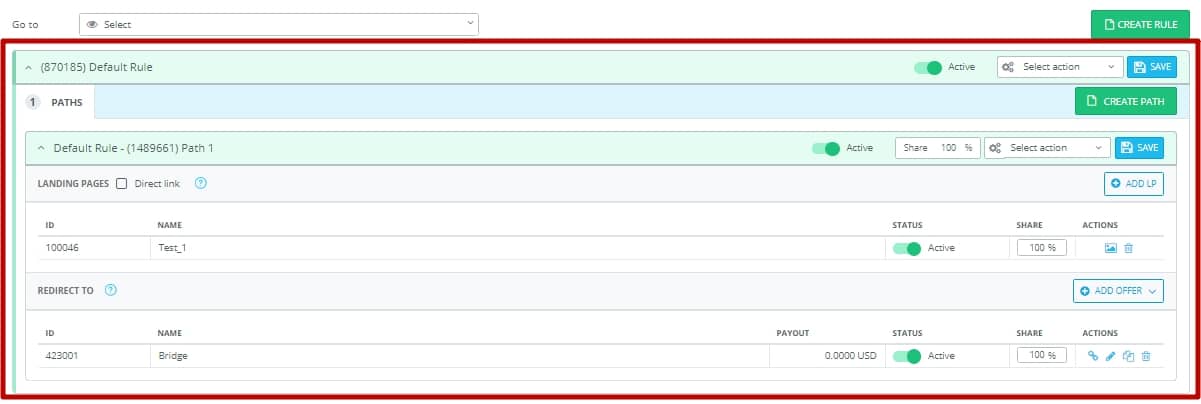
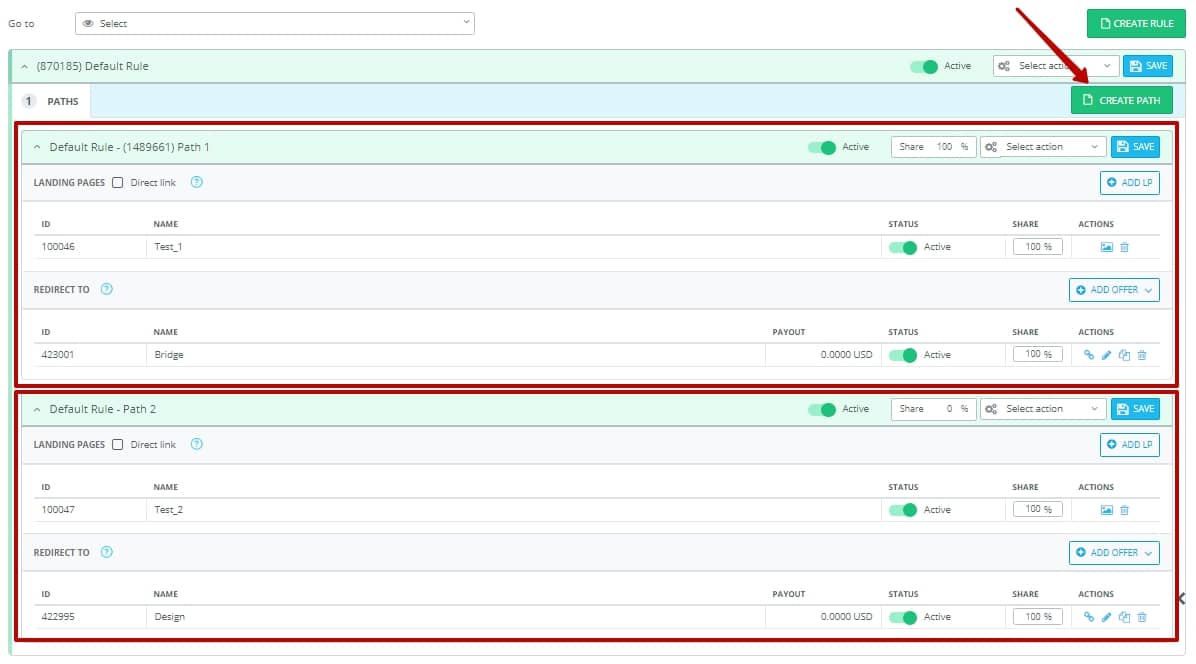
If there’s no need to recourse to traffic distribution, it will be enough to set the “Default Rule” only. Under this Rule, you’re able to add up to 100 Paths for their further splitting. To add a new path, just click the “Create path” button.
«Path» is a set of campaign –related elements to which the traffic goes: an offer, or offer+pre-lander combo, or splitting of such elements.
The list of available actions for setting up the paths in the “Default Rule”:
“Landing page” field
“Direct link” checkbox. If you select this checkbox, the users will be immediately redirected to the offer link.

You can also split-test the direct links with landing pages. To do so, activate the checkbox and put the landing pages together.

“+ Add LP” – when clicking this button, you will see a pop-up where you’re supposed to choose one or several landing pages to be added to this distribution path.
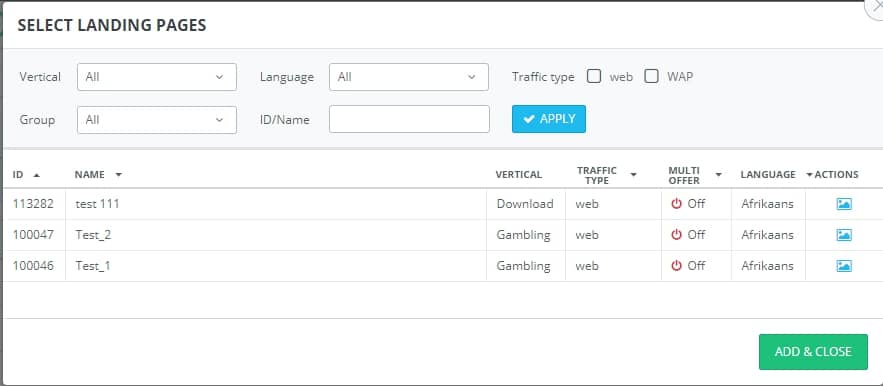
Please note that you can search landing pages by such parameters as:
“Vertical” – click upon the field and select the required vertical from the drop-down list. During the search, the pre-landers are displayed within a certain vertical. It depends on the vertical that you have selected in the LP settings.
“Group” – click upon the field and select the desired group from the drop-down list. During the search, the pre-landers are displayed within a certain group. It depends on the group that you have selected in the LP settings.
“Language” – click upon the field and select the desired language from the drop-down list. During the search, the pre-landers are displayed within a certain group of languages. It depends on the language that you have selected in the LP settings.
“ID / Name” stands for the landing page search by its ID or name.
“Traffic type” stands for the landing page search by traffic type. During the search, the pre-landers are displayed according to a certain traffic type. It depends on the traffic type that you have selected in the LP settings.
After you have set the necessary parameters for landing page search, click “Apply”.
The pop-up enables you to preview the landing pages data such as:
“ID” is the identifier of a landing page in the system. For example: 97839;
“Name” is the name of a landing page. For example: Landing_page_name;
“Vertical” stands for the vertical name, which is selected for the corresponding pre-lander. For example: Information goods / E-commerce;
“Traffic type” – for example, WAP / Web;
“Multi Offer” – the number of offers that users are redirected to from a certain landing page. For example, Off (if the option is deactivated) / 3 (the number of offers);
“Language” – for example, English / Afrikaans;
“Actions” – this feature allows you to preview a landing page. When you hover over the icon, you will see a thumbnail of the pre-lander (in case it’s created in the AdsBridge editor. If the landing page is created on your own hosting, the thumbnail will contain a notification that the pre-lander is created on your own server). By clicking upon the icon, you will be shown a preview page.
Please note that in this case the CTA button of the Landing page either will not work, or display the “Offer Example” page (for those created in the AdsBridge editor). When a user uses a campaign link to change over to this landing page and clicks on the button, they will be redirected to a real offer added to this campaign.
In order to select one or several landing pages, just click on it/them and select “Add and close”. To unselect the added pre-landers, just click on the line with such landing pages once again.
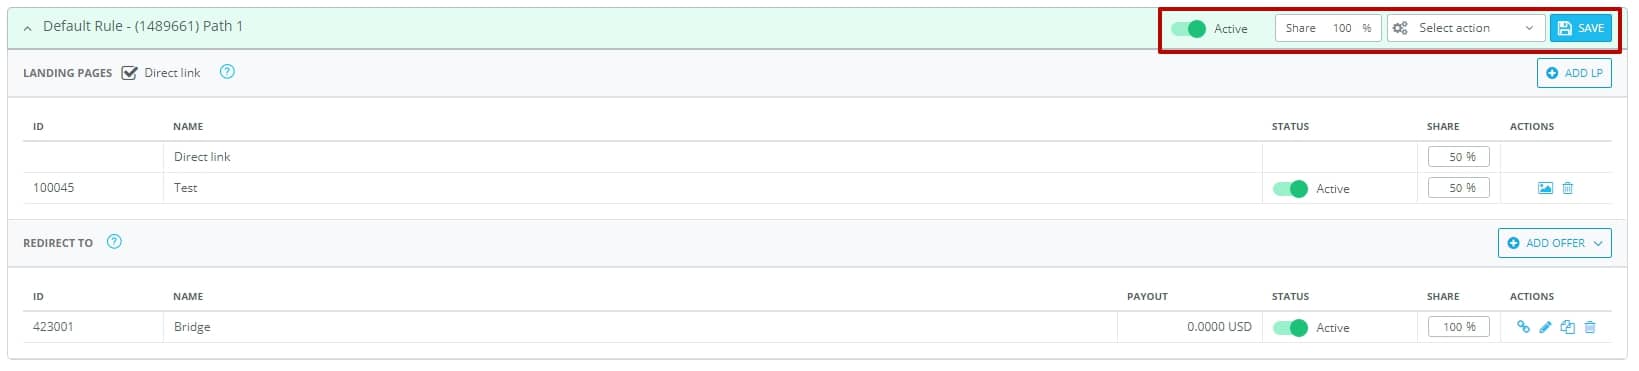
The “Landing page” field within the Path settings contains the following information:
“ID” is the identifier of the landing page in the system. The direct link has no ID, so the cell will be empty.
“Name” refers both to landing page and direct link names.
“Status” – Active / Inactive. This option allows you to disable any given landing page in the Path, without removing them from the campaign. To deactivate a direct link, just unselect the “Direct link” checkbox.
“Share” is the percentage, according to which traffic is distributed between landing pages, or landing pages and direct links. If you would like to set up, for example, a split-testing of landing pages with 50% of the traffic for each of them, you just need to click upon “Share”, and the interest will be automatically distributed evenly. Also, you can edit the percentage by hand.
“Actions” stands for a preview of the pre-lander in a thumbnail when you point to it or a changeover to the preview page with a click upon the related icon. Also, here you can delete the landing page.
“Go to” field

Here you can add a previously created offer or create it directly in a campaign. You are allowed to do the following:
“+ Add offer” – by clicking upon this button, you will see a drop-down list “Select offer” or “Create new offer”. If you click upon “Select offer”, you will see a pop-up where it’s possible to select one or several offers that you would like to add to this distribution Path.
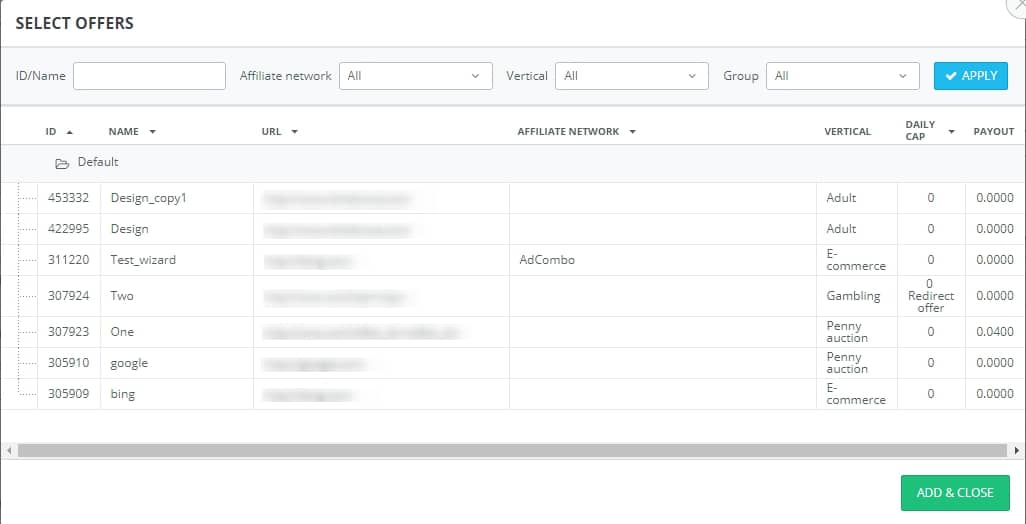
Please note that you can search offers by the following parameters:
“ID / Name” – the offer ID in the system or its name;
“Affiliate network” – click on the field and select the desired affiliate network from the drop-down list. During the search, the offers are displayed within a certain affiliate network depending on whether it’s chosen or not in the offer settings.
“Vertical” – click on the field and select the desired vertical from the drop-down list. During the search, the offers are displayed within a certain vertical depending on whether it’s chosen or not in the offer settings.
“Group” – click on the field and select the desired group from the drop-down list. During the search, the offers are displayed within a certain group depending on whether it’s chosen or not in the offer settings.
After you have set the necessary parameters for offer search, click “Apply”.
The pop-up enables you to preview the offers data such as:
“ID” is the identifier of an offer in the system. For example: 298902;
“Name” is the name of an offer. For example: Offer_name;
“URL” represents an offer link, provided in the corresponding field in the offer settings. For example: http://www.offer.com/;
“Affiliate network” stands for the platform name that was selected in the offer settings. For example: ClickDealer. This field can be empty if the affiliate network is not selected in the offer settings.
“Vertical” stands for the vertical name. For example: Information goods / E-commerce;
“Daily cap” – specifies whether the daily cap is switched on for a given offer, and if yes, shows the number of conversions under such a cap. For example: 100;
“Payout” stands for a fixed payout value for one conversion in the offer settings. For example: 0.5000.
In order to select one or several offers, just click on it/them and select “Add and close”. To unselect the added offers, just click on the line with them once again.
The “Create new offer” option works differently. It allows you to quickly create an offer, which will be automatically displayed at the offer management page. You can fill in the required fields only, and then get back to offer editing in the “Manage offers” section. To learn more about creating new offers, check the “Create offer” subsection of this User Guide.
Here’s the list of available actions for the Path:
“Active” / “Inactive” – activates or deactivates the Path.
“Share” – if you need to split the distribution paths, select here the percentage, according to which the traffic will be distributed.
“Select action” drop-down list:
“Rename” – by clicking upon this button, you are able to edit the Path name. To save the new name, click “Apply”.
“Copy” – this button duplicates the path with the same settings and name (+ _copy1).
“Delete” – removes the path.
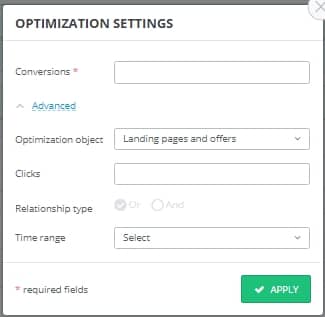
“Activate auto optimization” – opens a pop-up with auto optimization settings.
Here’s the list of available actions for the Rule:
“Copy” is used to make a copy of the rule. In case of copying the Default Rule, the system will add another Distribution Rule that lacks the condition but contains the same components (landing page, offer, number of distribution rules) as the copied Default Rule.
“Activate path auto optimization” opens the pop-up with the auto optimization settings applicable to the entire Rule.
“Proxy Rule” is displayed in case the proxy detection checkbox is activated in the Bot filter settings. You just need to pre-determine where to redirect the proxy traffic. The setup process repeats the one for Default Rule.
“Rule 1”, “Rule 2”, “Rule 3”, etc. are the traffic distribution rules with special conditions. If you need to add such a rule, press the “Create rule” button in the upper right corner above the “Default Rule” window.
Afterward, you will see a new rule below all the previously created ones. This rule will contain two tabs:
- Conditions;
- Paths.
As for the “Conditions” tab, you are supposed to add conditions according to which traffic will be sent exactly to this path.
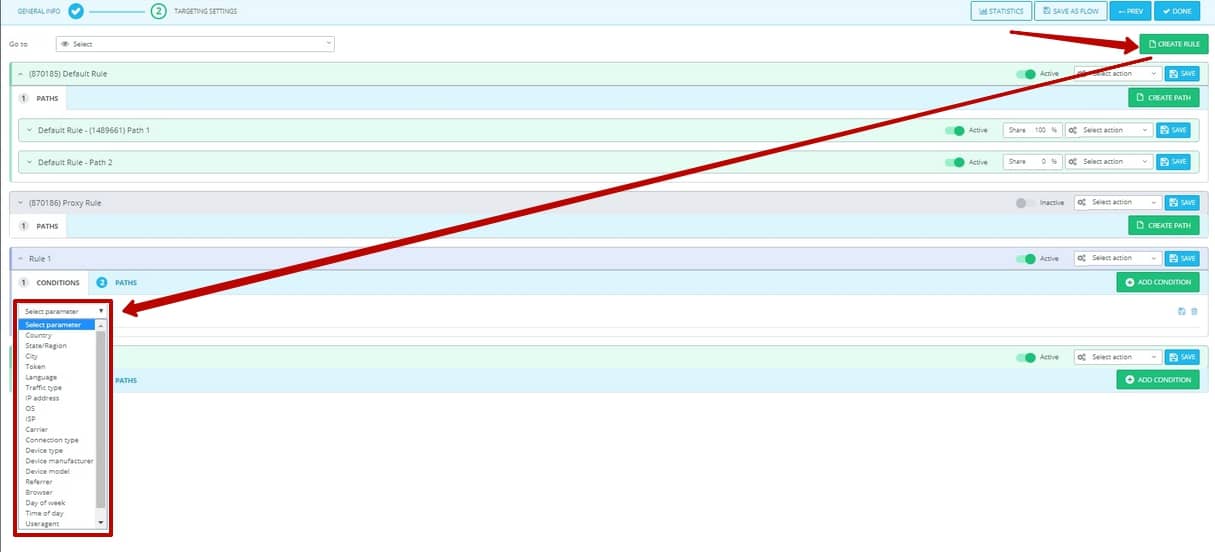
Currently, you may use the following conditions:
“Country” – select one or several countries from the drop-down list, traffic from which will be (with the condition “is equal to”) or will not be (with the condition “is not equal to”) redirected to this Rule. If you didn’t find the required country from the drop-down list, try to start typing its name in the text input field, as some of the variants may be hidden due to the large database size.
“State / Region” repeats the procedure of country selection; choose the required states and/or regions from the drop-down list.
“City” – select the desired city (or cities) from the drop-down list.
“Token” is a condition for distributing traffic by parameters that are transmitted in a campaign URL (for example, by traffic source parameters or any other static parameters).
Here you can choose the type of condition: is equal to, is not equal to, contains, does not contain. Also, you can check the “Empty Token” checkbox if you need to send traffic with an empty Token value to this Rule (and vice versa). When setting up this condition, you need to select the name for the Primary Token, based on which you would like to distribute traffic. Then you need to input the value / values in the nearby field. It’s also possible to select the “Custom” Token. In this case, you need to specify the name of the parameter that will be added to the Campaign URL, and the necessary value for traffic distribution.
“Language” – select the desired language / languages from the drop-down list. The traffic is distributed according to the language of the user’s browser.
“Traffic type” – select Web, WAP and/or Tablet.
“IP address” – enter a specific IP or IP interval.
“OS” – select the required operating systems from the drop-down list. Here you can also choose the type of condition: equal, not equal, higher than, lower than.
“ISP” – select the required Internet providers from the drop-down list.
“Carrier” stands for mobile operator.
“Connection type” – Wired, Wi-Fi or Mobile.
“Device type” – iPad, iPhone, iPod, Android, Android Tablet, Windows Phone, BlackBerry, Smart Phone, Feature Phone.
“Device manufacturer” – select the required device manufacturers in the drop-down list.
“Device model” – select the desired device model from the drop-down list.
“Referrer” – you can specify one or several referral links in this field. We recommend using such condition types as “contains” or “does not contain” in order to distribute traffic correctly. Also, you can select the “Include empty referrer” checkbox if you need to send traffic with an empty referrer value to this Rule.
“Browser” – select the required browser from the drop-down list.
“Day of week” – here you can select the day of the week when the traffic will be (with the condition “is equal to”) or will not be (with the condition “is not equal to”) sent to this Rule. Make sure to specify the time zone for the correct traffic distribution.
“Time” – here you can choose the time when traffic will be sent to this Rule (if the condition type is “equal”) or will not be sent (if the condition type is “not equal”). Do not forget to specify the time zone for the correct distribution of traffic.
“Useragent” – specify a useragent. You can also run traffic by the empty value of useragent. This option contains the following types of conditions: is equal to, is not equal to, contains, does not contain. We recommend using such condition types as “contains” or “does not contain” in order to distribute traffic correctly.
“Uniqueness” – this option allows you to distribute traffic by uniqueness. Uniqueness is tracked within a campaign on a 24-hours basis.
After you’re finished with setting conditions, head over to the second step of rule creation – the “Paths” tab. The procedure for path set-up repeats the one of the “Default rule”.
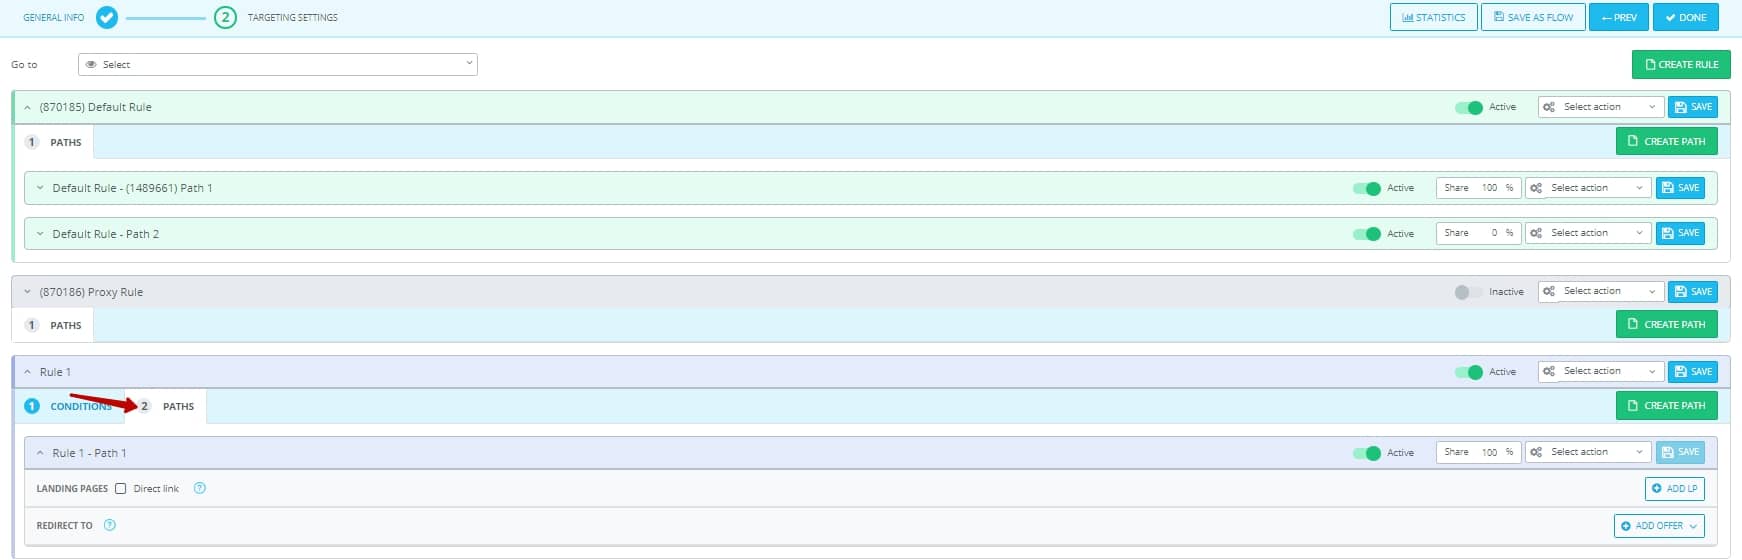
When you have finished setting the Rules, click “Save” in the top right corner of the Rule. Please note that after saving the rule, its name will change to a list of conditions separated by a slash (/). Feel free to edit this name.
Please note that there is a logical connection “OR” between the Rules, and there is a logical connection “AND” between the conditions in the Rule. First, traffic will be sent first to the Rule that it corresponds the most (according to the number of matches). Then, traffic is distributed in order of priority – to the Rule, which stands above the other. You can use several transition conditions within the same Rule. To do this, click upon “Add condition” and select the desired traffic filtering options from the drop-down list. When using several transition conditions for one Distribution Rule, keep in mind that the user will be redirected to this Rule only in case all the specified conditions are met. If traffic does not comply with at least one of the transition conditions, it will be redirected to the “Default rule”.
Here’s the list of available actions form the “Target settings” page:
“Statistics” enables you to view the statistics for this campaign.
“Save as flow” lets you save the campaign settings as a flow and then apply it to this campaign.
“Prev” – takes you to the previous page with general settings of any given campaign.
“Done” – save campaign settings.

Campaign Type “Flow”
The difference in setup of such a campaign is that you’ll notice the “Select flow” drop-down list at the second step of campaign creation, “Target settings”. By clicking upon this field, you will see the list of flows created within the corresponding section of admin panel.
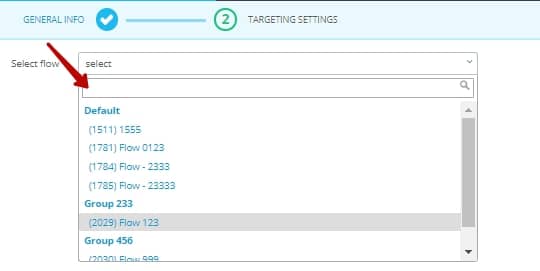
Select the one you would like to use for your campaign. After that, you will see the settings identical to the type of the “Path” campaign below. To learn more about the setup process, check the section that contains the essential information on creating such campaigns. Please note that so far you can edit the flow settings after you’ve added it at the second step of the campaign creation. However, the changes will be applied to all campaigns that use this flow.
Campaign Type “Without Redirects“
If you choose “Without Redirects“ type, then you need to add a self-hosted landing page and your offer to the Default Rule in the targeting settings.
You can set up split testing between offers. To do that, add some offers to the rule and assign percentage between them.
In the targeting settings of the campaign type “Without Redirects“ you can create additional distribution rule and set up necessary conditions and paths there.
All available conditions with its settings are described above for the campaign type “Path“.
Please note! Campaign type “Without Redirects“ can be applied only for one landing page, i.e. when using 2 distribution rules, the same landing page sould be added to the distribution paths.
After you’ve saved the setting there will be popup window with optional scripts to use. It contains necessary URLs and the script to apply:
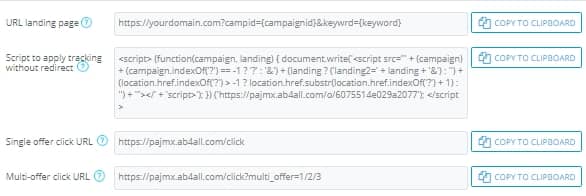
- Script to apply tracking without redirect – copy this script and past to the html-source code of your self-hosted landing page between <body></body>.
- Click URL – add this link on the СТА button of your landing page in order to apply data sharing on AdsBridge tracker.
- URL landing page – this is final landing page url. You need to copy this link and paste it to your traffic source.
Activate Auto Optimization
The functionality brief description:
– Auto optimization is the system of decision-making on the best traffic distribution aiming to increase the EPV (Earnings per visit) for pre-landers and EPC (Earnings per click) for offers.
– Optimization is based on the statistics obtained during the last step and the data history (statistics obtained for the last 10 steps).
– Auto optimization connects to the Rule or Path within a campaign. This is done in order to optimize taking into account the actual data obtained by this distribution rule.
– Landing pages (further – LP) are optimized independently from the offers.
When auto optimization is enabled, you CAN:
– add and/or delete LPs and/or offers (for new elements, you need to specify a test percentage for the element to enter into the rotation and work with it until it’s time for the first optimization);
– activate/deactivate LPs and/or offers;
– change the auto optimization settings;
– view the optimization log;
– disable the distribution rule;
– move the distribution rule;
– delete the distribution rule.
When auto optimization is enabled, you CAN’T:
– change the splitting percentage for the elements by hand;
– add multi-offer LPs with active offers.
Here’s the example of activation and setup process:
Step 1: Create a distribution rule.
The optimal number of elements in rotation is 3 to 5 (3 to 5 LPs and 3 to 5 offers).
Step 2: Activate and set up auto optimization.
It’s crucial to specify the optimization step: namely the number of conversions, which can be assumed as sufficient to conclude that the statistics is reliable and there’s enough data for analysis and optimization.
When setting up auto optimization rules, you can choose one of three available options: LP optimization, offer optimization, or simultaneous optimization of both LPs and offers. You can also provide an additional optimization condition (the number of clicks, the time interval); it is also possible to combine these indicators with a logical connector (“AND” / “OR”).
Step 3: View the optimization log.
After the first launch of the optimization, you are enabled to view the optimization log, which can be downloaded in CSV format. It contains the essential data on the basis of which it was concluded to redistribute interests between active elements (LPs / offers), as well as old and new distribution rates of interest.
You should always remember that:
— when you activate auto optimization, the current percentage rates will be taken for the initial ones (set for the elements at the moment of auto optimization launch);
— the current statistics on the distribution rule will differ from the data in the optimization log (it stores the accumulated data for the last 10 steps, on the basis of which the decision was taken to redistribute the interest);
— optimization is based on EPV and EPC indicators (which means, you need to specify the correct conversion payouts in offers to configure postback properly);
— the minimum percentage for each element is 1%;
— when adding a new element, you should specify the initial percentage for it, which will be incrementally removed from the elements active at the moment of addition;
— the system neither deactivates nor deletes LPs and/or offers, the user can control it on their own;
— when the status of the element changes from active to inactive, the percentage that was assigned to the deactivated element is proportionally distributed among the active ones. The percentage of the deactivated element is automatically reset to zero;
— when the status of an element changes from inactive to active, this element is assigned a minimum percentage (1%), which cannot be edited.
Please note that the auto optimization enabled for a Path within a Flow will take into account the cumulative statistics from all campaigns where this Flow is used.
Also, we have added a new functionality that implies the auto optimization of distribution Paths. This feature can be activated within the Rule action menu, containing several distribution paths.