This report displays detailed information about conversions. Unlike the general report, there are columns for information from postback posted on the side of the affiliate network.
The “Conversion report” page consists of 6 tabs: “Flows”, “Campaigns”, “Traffic sources”, “Affiliate networks”, “Offers”, “Landing pages”.
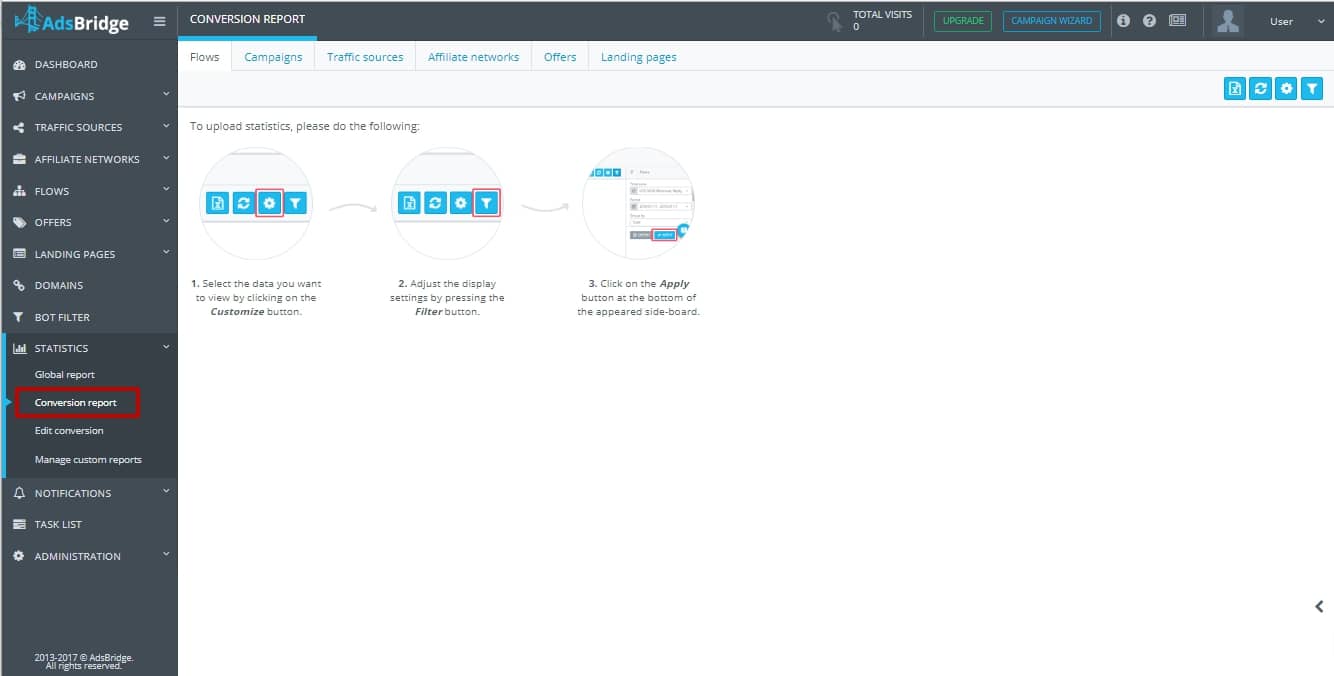
To upload statistics, do the following:
- Select the data you want to see by clicking the “Customize table” button.
- Select the parameters to be displayed by clicking the “Filter” button.
- Press “Apply” at the bottom of a panel.
You can do the following actions on the page:
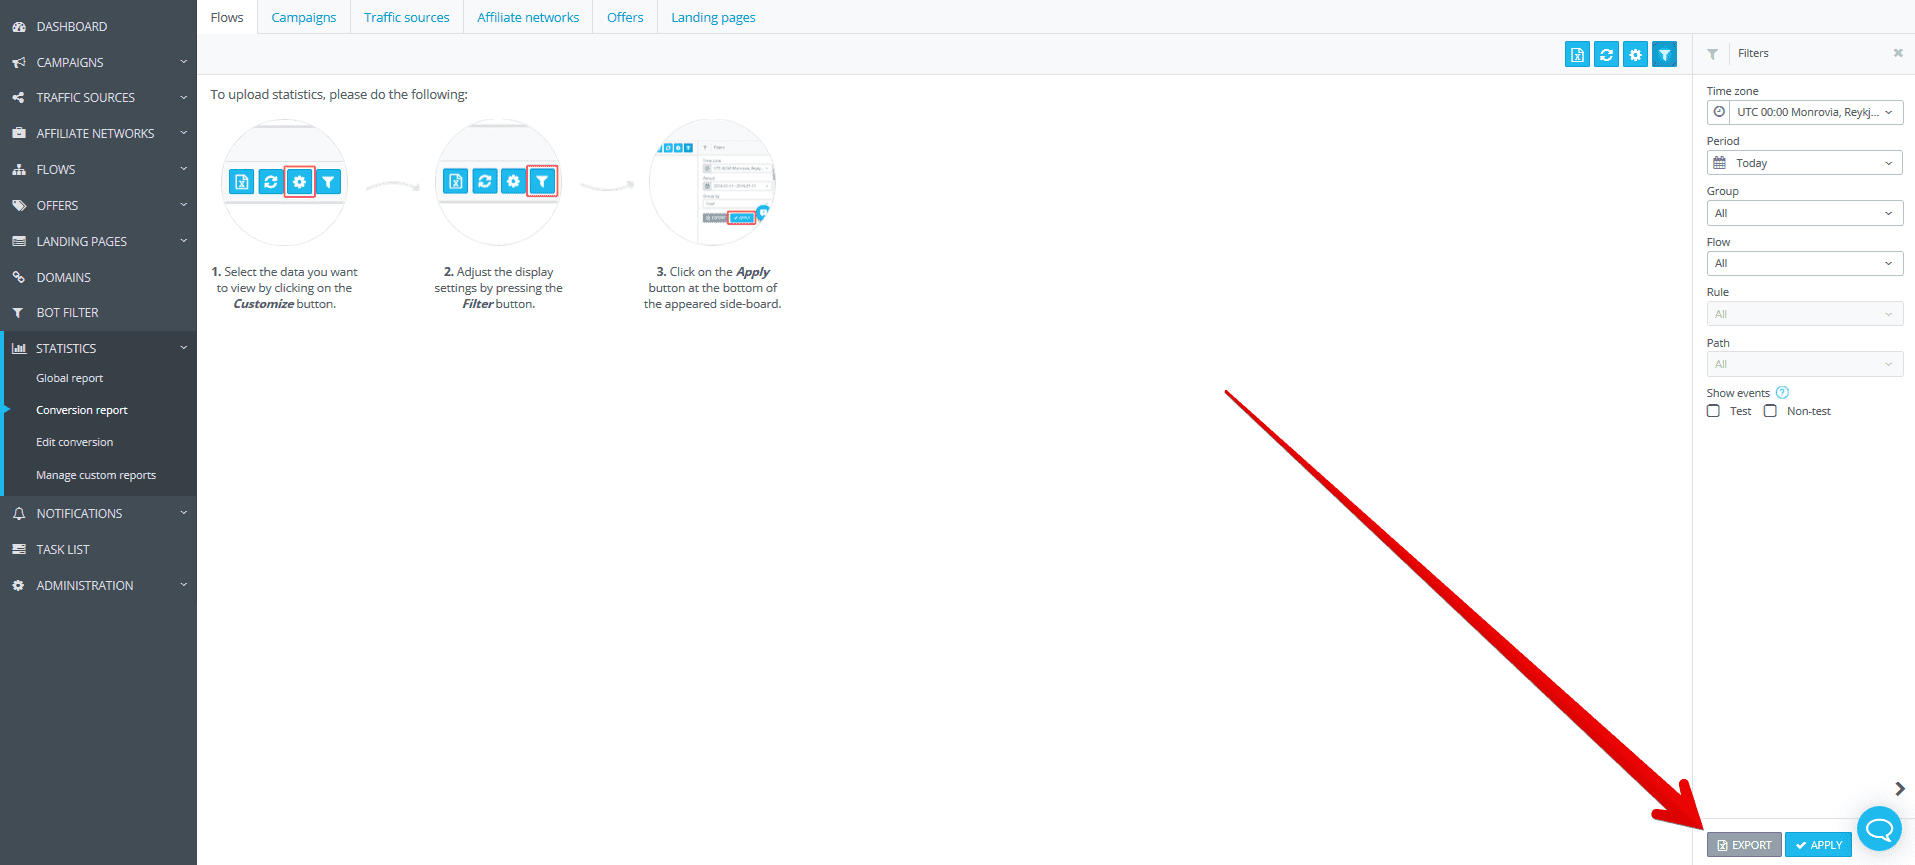
“Export” – exports the uploaded statistics to CSV. AdsBridge also has the ability to download statistics without first displaying it on the screen. To do this, select the necessary statistics settings in the side menu and click on the “Export” icon next to the “Apply” button.
“Refresh” – refresh the stats on the page. Please note, when clicking on the “Refresh” button, you will apply the last saved statistics settings. To apply the new filter settings, you have to click on “Apply”.
“Customize table” – includes the side menu with statistics settings. Here you can add any column to your conversion report. Simply click on the drop-down list and mark the checkboxes near required columns.

In the table settings, you can see the following parameters:
1) Currency. Choose the currency, in which you’d like to view statistics. There is a drop-down list with the following options: USD, EUR, GBP, RUB, UAH.
2) Your report. Choose the pre-set report template that you created in the “Manage reports” section.
3) Conversion info. All tabs contain such checkboxes:
– Select all – this option allows you to select or unselect all the checkboxes within a section.
– Postback time – the moment when a conversion entered the tracker. If a conversion was downloaded manually, the postback time will be the time when the download ends. Here is an example of displaying the postback time in statistics: 2017-05-11 17:03:31. Note that the postback time does not match the default click time. However, AdsBridge has an option that allows you to display the conversion by the click time. If this option is more convenient for you, please contact your account manager with a request to enable it. Bear in mind that a new logic of conversions’ distribution starts working right after this option is enabled on the account, and it will be applied to all your campaigns.
– Time of click – the moment when the user clicks. If you set a direct link to the offer for your campaign, this will be the moment when the user clicks on the campaign URL. If a landing page is set in a campaign, then the time of a click will be the moment when the user clicks on the CTA button (the transition from LP to the offer page). Example of displaying the time of click in statistics: 2017-05-09 17:03:31. Please note that the time of a click does not match the postback time.
– Click ID – a unique user ID that is assigned upon click. The click ID format is mvueb59146efba47e4453423050.
– Transaction ID – the value that is passed in txid in a postback, or via tracking pixel set in the AdsBridge postback. The txid column will be filled in if you configured the offer as CPS and set the txid parameter. Please note that AdsBridge does not accept two conversions from a single click ID by default in the case when the offer is configured as CPA and the offer is configured as CPS, but the same combination of tid + txid has come. For instance: CPS offer, conversion1– registration, conversion2 – sale. The value that an affiliate network sends as a transaction ID for conversion1 is reg, for conversion2 – sale. That means there will come two conversions from a single click ID if postbacks are:
http://xxxxx.xxxxx.com/trackpixel/track?tid=mvueb59146efba47e4453423050&txid=reg
http://xxxxx.xxxxx.com/trackpixel/track?tid=mvueb59146efba47e4453423050&txid=sale
In the “Click ID” column you will see mvueb59146efba47e4453423050, and in the “Transaction ID” column – reg and sale values.
If such postback will be activated twice:
Http://xxxxx.xxxxx.com/trackpixel/track?tid=mvueb59146efba47e4453423050&txid=reg,
then, only one conversion will be recorded.
– Status – the value that is passed in the postback, or the AdsBridge’s tracking pixel in the “Status” parameter. In the “General report” you can view conversions only with the confirmed status (total number). In the “Conversion report” you can find the more detailed information on conversions and their statuses.
– Payout – payout per conversion (e.g., 0.50).
– Cost – cost per conversion. Note that a specific value is displayed in the column if you set CPA or RevShare as a cost model. In all other cases (CPM and CPV), the value will be 0. For example 0.30.
4) Data
– Select all – this option allows you to select or unselect all the checkboxes within a section.
– Flow group – the name of the flow group, e.g., One (includes campaigns that are in the group “One”).
– Flow – the name of the flow that is added in the campaign settings.
– Traffic source – the name of a traffic source that was created on AdsBridge and selected on the first stage of campaign creation. If you choose this checkbox for statistics’ display, and there is an empty value in the column, then the traffic source was not set for this campaign. For example, (5778) ExoClick. In the brackets near the name, you will see the traffic source’s ID in the tracker.
– Campaign group – the group campaign name, e.g., Default (includes campaigns that are in the “Default” group).
– Campaign – the campaign name, e.g., (48529) Campaign1. In the brackets near the name, you will see the campaign’s ID кампании in the tracker.
– Rule – the rule name in a campaign, to which the traffic is distributed, e.g., (679475) Default rule. In the brackets near the name, you will see the rule’s ID in the tracker.
– Path – the distribution path name in a campaign, to which the traffic goes. Example: (67912475) Default path. In the brackets neat the name you will see the path’s ID.
– Landing group – the landing group name, e.g., Group1 (includes landing pages that are included in “Group1”).
– Landing page – the landing page name, e.g., (37204) Lander1. In the brackets near the name, you will see the landing page’s ID in the tracker. Another example is a direct link, in the case when traffic goes by the path in a campaign with a direct link to the offer.
– Affiliate network – the name of an affiliate network that was added in the offer settings, and to which the traffic goes. In case you mark this checkbox and see the empty value in the statistics, then the affiliate network is not set in the offer settings for such a campaign. For example, (22044) AdCombo. In the brackets near the name, you will see the affiliate network’s ID in the tracker.
– Offer group – the offer group name, e.g., Group1 (includes offers that are included in “Group1”).
– Offer – the offer name, e.g., (66051) Offer1. In the brackets near the name, you will see the offer’s ID in the tracker.
5) Token
– Select all – this option allows you to select or unselect all the checkboxes within a section.
– Token 1 – Token 6. If to activate these checkboxes, in the Token 1- Token 6 columns you will see the information passed from the traffic source through the campaign link. Namely, the values that are passed via the parameters set in the campaign or in the traffic source settings (the one you added to this campaign).
6) GEO
– Select all – this option allows you to select or unselect all the checkboxes within a section.
– Language – the language set in the user’s browser, e.g., Chinese.
– Сountry – the full name of a country, e.g., France.
– Country ISO 2 – the two-letter country code, e.g., US.
– Country ISO 3 – the three-letter country code, e.g., USA.
– City – the city name, e.g., Odessa.
– IP – identified by IP of a mobile operator or ISP, e.g., 5.255.250.79.
– Referrer domain – a domain link, from which the user made a transition to the campaign link in the tracker. Note that some traffic sources may not pass this value and intentionally rewrite the referrer link (e.g., www.domain.com).
7) User info
– Select all – this option allows you to select or unselect all the checkboxes within a section.
– Traffic type – mobile, web, tablet, or any other traffic.
– Connection – wire, Wi-Fi, or mobile.
– OS – the name of the operation system, e.g., Windows.
– OS version – the version of the operation system, e.g., 7.
– Browser – the browser name, e.g., Firefox.
– Browser version – the version of the used browser, e.g., 47.
– ISP – Internet Service Provider, e.g., Kyivstar.
– Carrier – the name of a carrier, e.g., Kyivstar.
8) Device
– Select all – this option allows you to select or unselect all the checkboxes within a section.
– Type – the type of a device, e.g., iPhone.
– Manufacturer – the name of a manufacturer, e.g., Apple.
– Model – device model, e.g., 6S.
“Filter” icon – this button opens the side menu with statistics settings. Here you can select the appropriate time zone, period, and the object to be displayed in statistics (e.g., flow, campaign, traffic source, affiliate network, offer, landing page), along with event type (test or non-test).
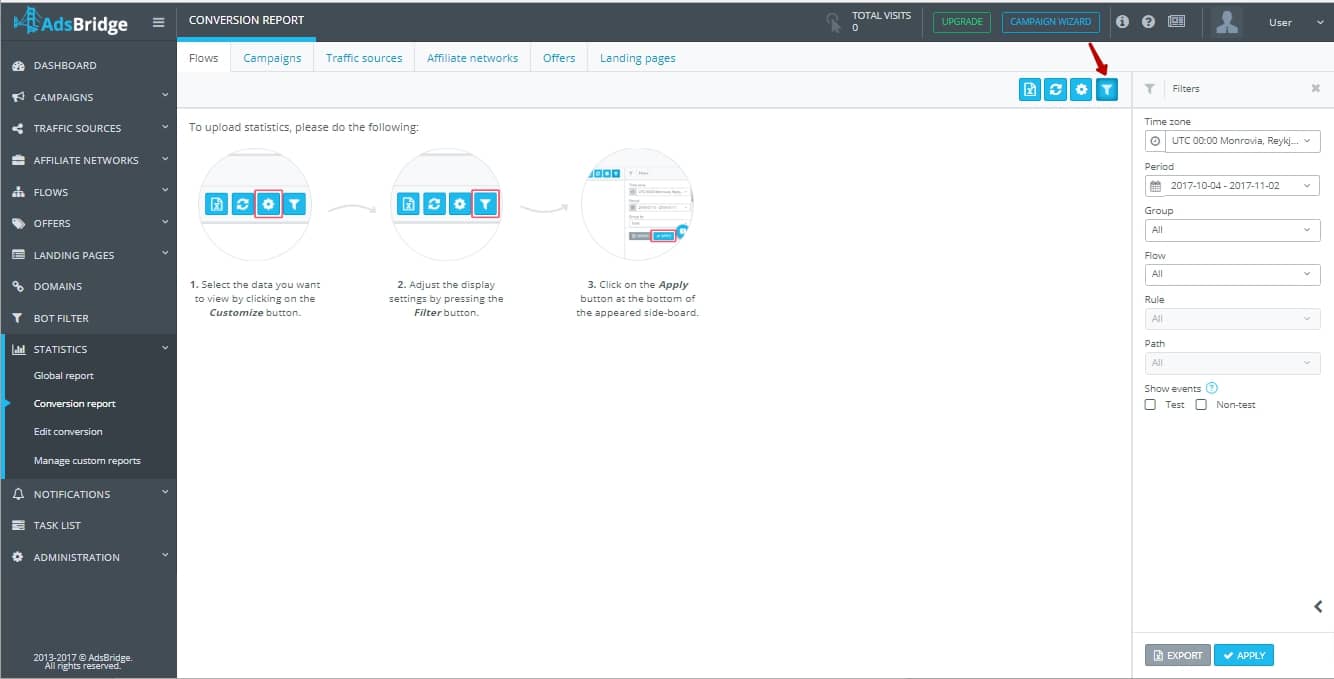
On the “Flows” tab, this menu has additional options: Rule (to view statistics by a specific rule in the flow) and Path (to view statistics by a specific path in the rule).
On the “Campaigns” tab, this menu has additional options: Group (to view statistics by a specific group of campaigns) and Path (to view statistics by a specific path).
On the “Offers” tab, this menu has an additional option, “Group” (to view statistics by a specific group of offers).
On the “Landing pages” tab, this menu has an additional option, “Group” (to view statistics by a specific group of landing pages).
To work with conversions’ statistics, you can also use such features:
1) Filtering by values in the certain columns. To do that, click on the filter icon near the column name, select value and click on “Apply”.
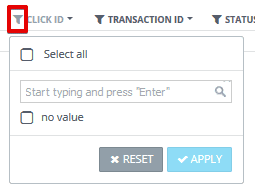
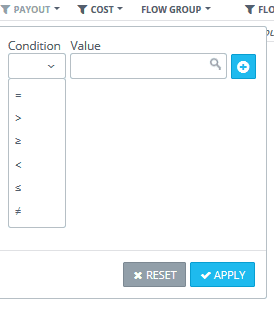
If there are too many values in the column, the system will not upload the list automatically. Though, you can find the needed values in the same way: enter value and press “Enter”. After that, you’ll see the checkbox with values. Tick it and press “Apply”. In the “Payout” and “Cost” columns, you can filter data by such conditions: equal, more, less, more or equal, less or equal, not equal.
Note that you can filter out data by several columns at a time. To cancel filtering, you need to click on the filter icon and press “Reset”.