Frequently Asked Questions
General questions
1.1 What is AdsBridge and who can use the tracker?
AdsBridge is a premium class tracking software for affiliate industry sharks. It is a stable and trustworthy product with first-class assistance, an intuitive interface, an anti-fraud guard, a landing page editor, and a complete set of features that allow you to optimize ad campaigns.
AdsBridge is aimed at assisting beginner-level affiliates, experienced marketing gurus, media buying teams within affiliate agencies, as well as users who wish to explore the attendance of their site or portals.
1.2 What are the features and benefits that you’ll receive with AdsBridge?
AdsBridge is a SaaS tracker that provides quick redirects and allows you to save money on hosting and servers. The main benefits of our tracker are:
- Precise targeting – a traffic distribution system that sends traffic through 18 parameters. You are able to purchase targeted and non-targeted traffic, set up precise targeting, analyze this traffic, receive detailed statistics, as well as monetize it.
- Split-testing – with AdsBridge, it is very easy to discover which offer or landing page is working better. In the case of having one offer on several CPA networks, you will be able to see which network is producing more conversions as well as how many redirects are happening before a user arrives at the offer.
- Campaign auto-optimization – This function helps differentiate profitable landing pages and offers that have the best indicators of EPV/EPC in real time and then proceeds to send traffic to those landing pages/offers.
- Built-in landing page editor (visual and HTML) – it is possible to create, customize, and then test the landing pages. All landing pages are hosted on our side and all the graphic content works through a CDN provider with whom we cooperate.
- ‘Hide referrer’ function – this function allows you to redirect undesirable traffic onto a neutral domain. AdsBridge provides a default domain for that, but it is possible to add your own.
- Multi-user access – media buys teams can work on AdsBridge under one account. This will allow you to track and monitor the performance of each manager, as well as limit permission for beginners.
- Manual bot filter – With AdsBridge it is possible to set up a bot filter to protect landing pages and offers while discarding bot traffic.
- Redirect domains – there is a possibility to connect an unlimited amount of redirect domains.
- First-class support – AdsBridge provides an individual approach to each client. Our team is prepared to improve the platform and find a solution to any issue that may occur.
- Flexible pricing policy – You can choose a pricing plan suitable to you, depending on your budget and traffic volume.
1.3 How does tracking work?
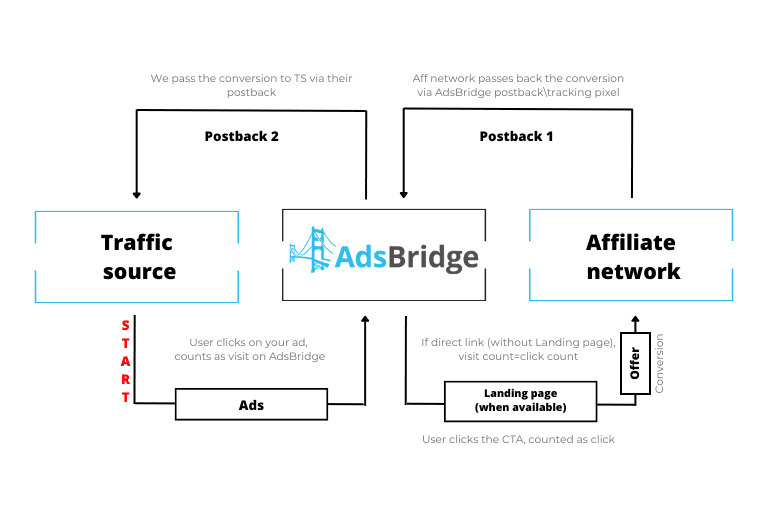
The overall scheme looks like this: Traffic Source -> Tracker -> Affiliate Network’s Offer
- A user visits a site with your advertisement, clicks on it, and is redirected through your ad campaign’s link. This will be counted as a ‘visit’ in our tracker.
- If you use a landing page, then the user will be redirected to it. Upon clicking the CTA button on your landing page, the user will be sent to your offer, which will be counted in our tracker as a ‘click’. If a landing page is not used, upon click the user will be redirected to an offer. In this case, the amount of ‘visits’ and ‘clicks’ will be the same.
- A user arrives at your offer and is now a possible ‘conversion’.
- Correctly set post-back, which has already been placed in the affiliate network, sends us the information about the conversion, and we record it in the statistics.
- If desired, you can place traffic sources’ post-back into our tracker’s interface, allowing information relating to conversions to be directed to the traffic source.
1.4 AdsBridge infrastructure
Our tracker provides fast redirects to your campaigns. We use an advanced CDN service (https://www.cdn77.com/).
AdsBridge servers are located on all continents, and the geo-balancing ensures a high speed of redirects. Moreover, the system is able to scale practically under any amount of traffic automatically 😉
1.5 Does AdsBridge work for mobile tracking?
You can set the tracking of mobile and web traffic on AdsBridge. More to it, our system can track such specific parameters of mobile traffic as a type of connection (3g, Wi-Fi) and mobile operator.
1.6 How is information encrypted, and does AdsBridge have access to it?
We care greatly about our clients’ information and respect intellectual property, therefore all information is thoroughly and reliably encrypted, and we do not have any access to it. Only our support team has the limited ability to access clients’ accounts for issues related to setup or tracking problems.
1.7 How does AdsBridge differ from Google Analytics?
Google Analytics is a platform that works for tracking users’ behavior on the site and tracking general information on traffic channels.
AdsBridge allows to analyze traffic. It provides data on passes through links as well as information on conversions that occur after these passes.
Unlike Google Analytics, we provide the distribution of traffic which arrives on the tracker through our links. However, there are more advantages when using both platforms together. It will provide you with more information, i.e. you can place the GA code on a landing page on the tracker.
1.8 Can I buy traffic from AdsBridge?
We as a traffic tracker do not engage in the sale of traffic, but among our trusted traffic sources there is sure to be that option.
1.9 Is it required to set up the tracker on self-hosted platforms?
No. AdsBridge tracker provides its own hosting. Moreover, you can use our LP editor to create custom landing pages. Those would be hosted on our side as well.
1.10 What needs to be done in order to begin work with the system?
You should register and set up everything for a traffic source and affiliate network. Please refer to our support team, and we will help you set everything up.
1.11 Is payment required right away, or is it possible to test the product before payment?
You may test out the basic functionality of our tracker completely free for 14 days. After this period, you will have the choice of paid continued usage. If more information is necessary or you would like to test a specific feature, please contact our support team.
1.12 Can I track conversions and statistics from my own sites?
Yes, of course. AdsBridge will help you track the necessary statistics + conversions by placing our tracking pixel on the “Thank you” page of your site
Campaign creation
2.1 How to set up AdsBridge tracking quickly?
To set up a campaign, we recommend reading our manual https://www.adsbridge.com/how-to-set-up-adsbridge-tracking-quickly/
If you have any questions after reading it, please contact your support manager)!
2.2 What is the ‘hide referrer’ option?
This feature allows you to hide your landing pages from representatives of an affiliate network. When this function is activated, at the moment of redirect to your offer, there will be another redirect to another page. This means that from the view of the affiliate network, the only thing that will be visible is the address of the last site that the user visited.
Our tracker also offers a Meta Refresh function, which completely clears the referrer if the user’s browser supports such an option. This function does have some disadvantages however, i.e. affiliate networks pay close attention to large amounts of blank referrers. In addition, the redirect speed will fall due to the extra step, and that can affect traffic, especially mobile.
2.3 Why use your own domain?
AdsBridge’s system domains are available for all of our users. There are situations when one of our system domains gets placed on an antivirus’s black list due to the fact that any user decided to put banned content or fraudulent text on their landing page. In order to avoid such a situation, we advise our users to use their own domains, the reputation of which relies solely on them.
You may read more on this here: https://www.adsbridge.com/add-domain/
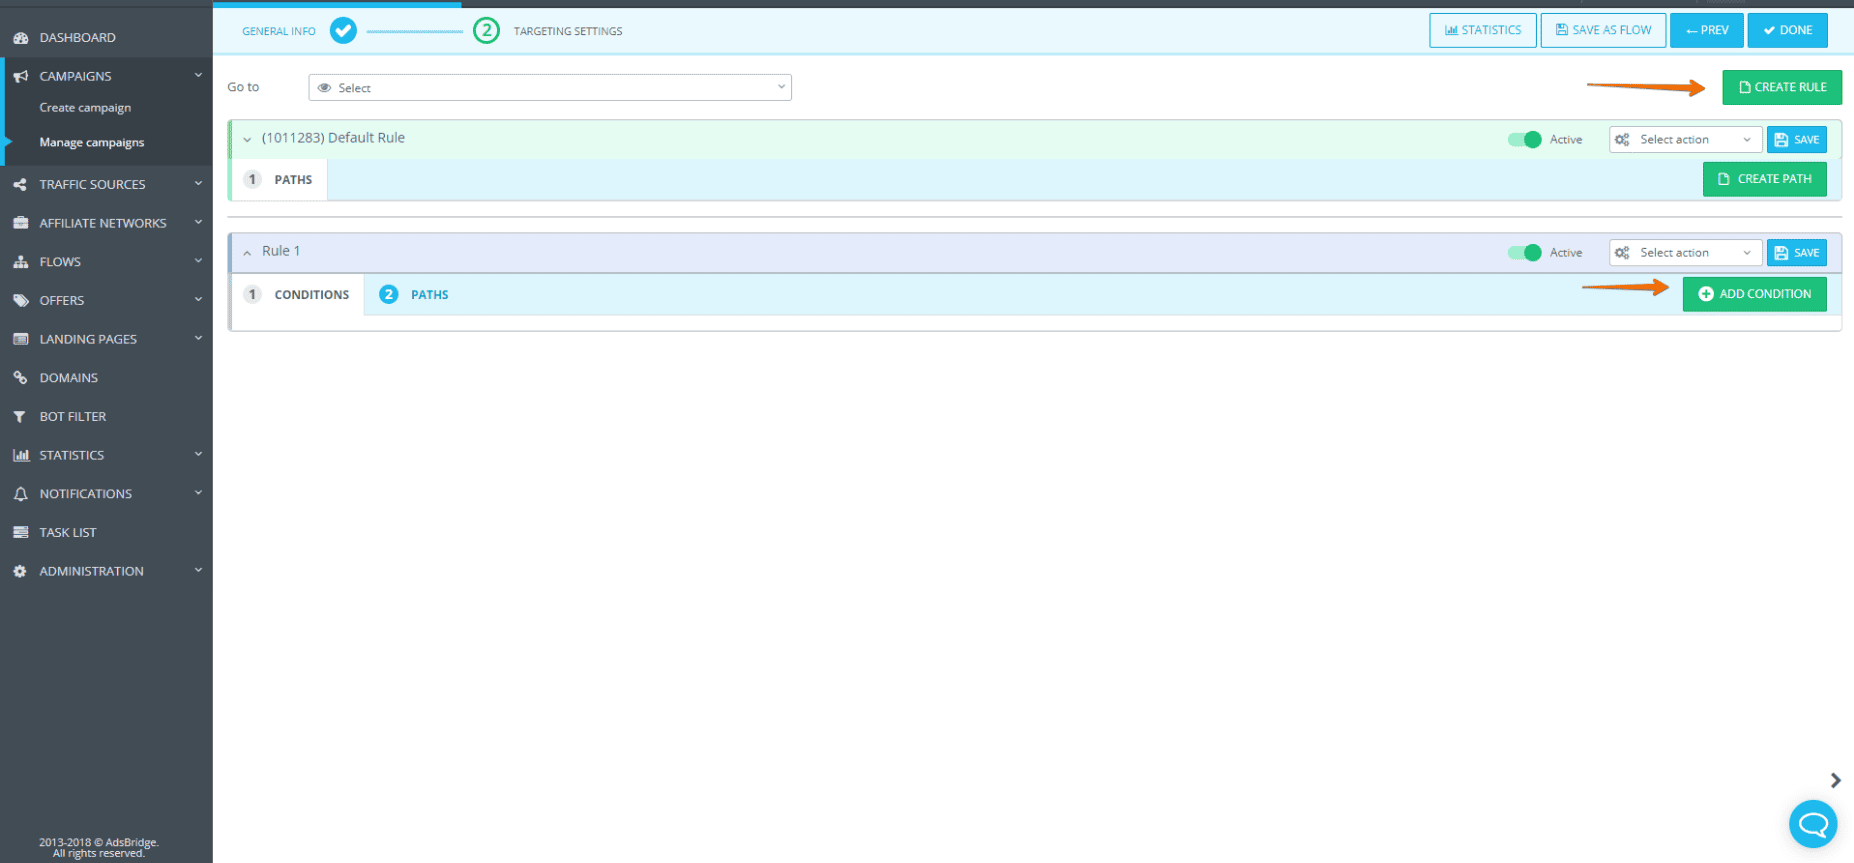
2.4 Instructions on traffic distribution and redirect rules
Traffic distribution system that you will be able to see on the second step of your campaign creation will allow you to distribute traffic according to a set of 18 existing rules:
- Country
- State/Region
- City
- Token
- Language
- Traffic type
- IP address
- OS
- ISP
- Carrier
- Connection type
- Device type
- Device manufacturer
- Device model
- Referrer
- Browser
- Day of week
- Time of day
- Useragent
- Uniqueness
Use these rules when there are offers with different requirements for incoming traffic in your campaign . It is also necessary when you want to set more precise targeting for you traffic, using rules mentioned above. In one distribution rule, you can add a couple more rules for a more exact targeting. In the redirect rules you can specify the conditions “equal to” or “not equal”.
For some rules, (i.e. tokens, referrers, useragent) the options like “contains” or “does not contain” are available, that verify the satisfaction of the rules for partial matches.If individual rules of different distribution rules will be crossed, the distribution rule with great coincidence of parameters will work first. And if the number the parameters’ matches will be the same, then rule that is higher on the list will work first, as a priority.
2.5 What is auto-optimization?
Campaign auto-optimization is a function that automatically determines and redistributes a percent of split-tests, based on mathematical predictive algorithms. By doing so, the best performing landing pages and offers receive more traffic. This system is great because while you’re sleeping in or relax on the weekends, our system optimizes your traffic in real time.
In order to allow the system to work at its best, it is unavoidable to do the following:
- Correctly set up tracking of both conversions and payments on you offers.
- Add a few landing pages and a few offers (minimum of three) into the distribution rule.
- Put the adequate optimization step. The optimal optimization step with the optimization of 1-2 times a day.
You may find more information on the functionality of automatic-optimization here: https://www.adsbridge.com/adsbridges-automatic-campaign-optimization-can-help-affiliate-marketers-increase-profits-fast/
2.6 How does auto-optimization work?
Auto-optimization helps differentiate profitable landing pages and offers that have the best indicators of EPV/EPC in real time and then proceeds to send traffic to those landing pages / offers.
You set up the condition for conversions (required) and Clicks/Time range (optional) –>
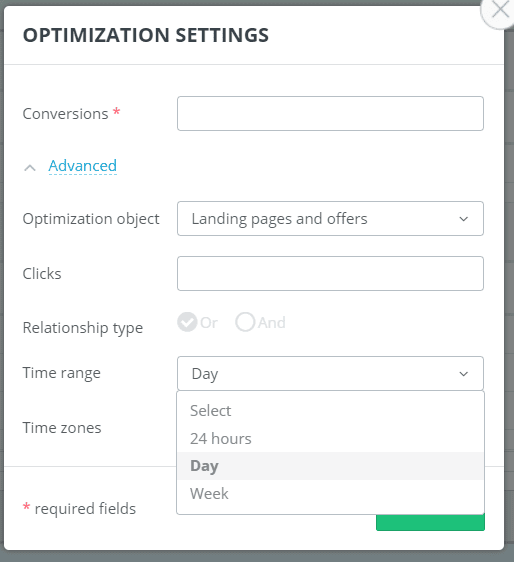
These conditions are applied for all offers in the Rule or Path (depends on where you activated it).
So, let’s assume you set up 100 conversions per day for all offers. If they reach this number, the system will calculate EPC per each offer and decide which one was better.
The step of optimization is fulfilled and the % of traffic is changed for the next step. If the next day all offers don’t reach 100, the step isn’t completed and the % of traffic for each offer stays the same. And so on.
You can check optimization logs to see how system works for your offers.
2.7 A detailed explanation of different cost models
AdsBridge supports various cost models.
- CPV – (Cost Per Visit) the value you enter into the field, will be recorded as the cost of each redirect on a link (within your campaign). This cost model supports dynamic tracking. Thus you can transmit the cost of each redirect in the “Cost value” parameter.
- CPA – (Cost Per Action) this is the value entered into the statistics as the cost per conversion.
- CPM – (Cost Per Mille) this model is based on the price per thousand impressions of your advertisement. Impressions does not mean visits, but means that the advertisement was shown or displayed to the user. In order to track the cost of this model, it is necessary for you to set up impression tracking, using the settings within the respective FAQ section. This model also supports dynamic tracking. To do so, it is necessary to transmit the cost of CPM in the “Costs” parameter.
- RevShare – these costs are calculated as a percentage of cost-per-conversion for each conversion.
2.8 Is it possible to conduct A/B testing on Landing Pages and Offers?
It is possible to conduct A/B split testing on Landing Pages and Offers separately. As of right now it is not possible to split test LP and offers pairs simultaneously.
If you need more info, feel free to contact us: support@adsbridge.com.
2.9 Does AdsBridge have a cloaking feature?
For cloak, we have detailed manuals on cloak setup between AdsBridge and the IMKLO cloak service and No-Ip-Fraud.
In addition to this feature, we offer a built-in anti-fraud and manual bot filter.
On AdsBridge, it’s possible to set up expansion rules or a bot filter function to weed out bots on third pages. You can use any available allocation rule. Our jumps are closed from Google indexing by default and in the visual and HTML editors you can add scripts which will help you to set up additional protection for your webpages.
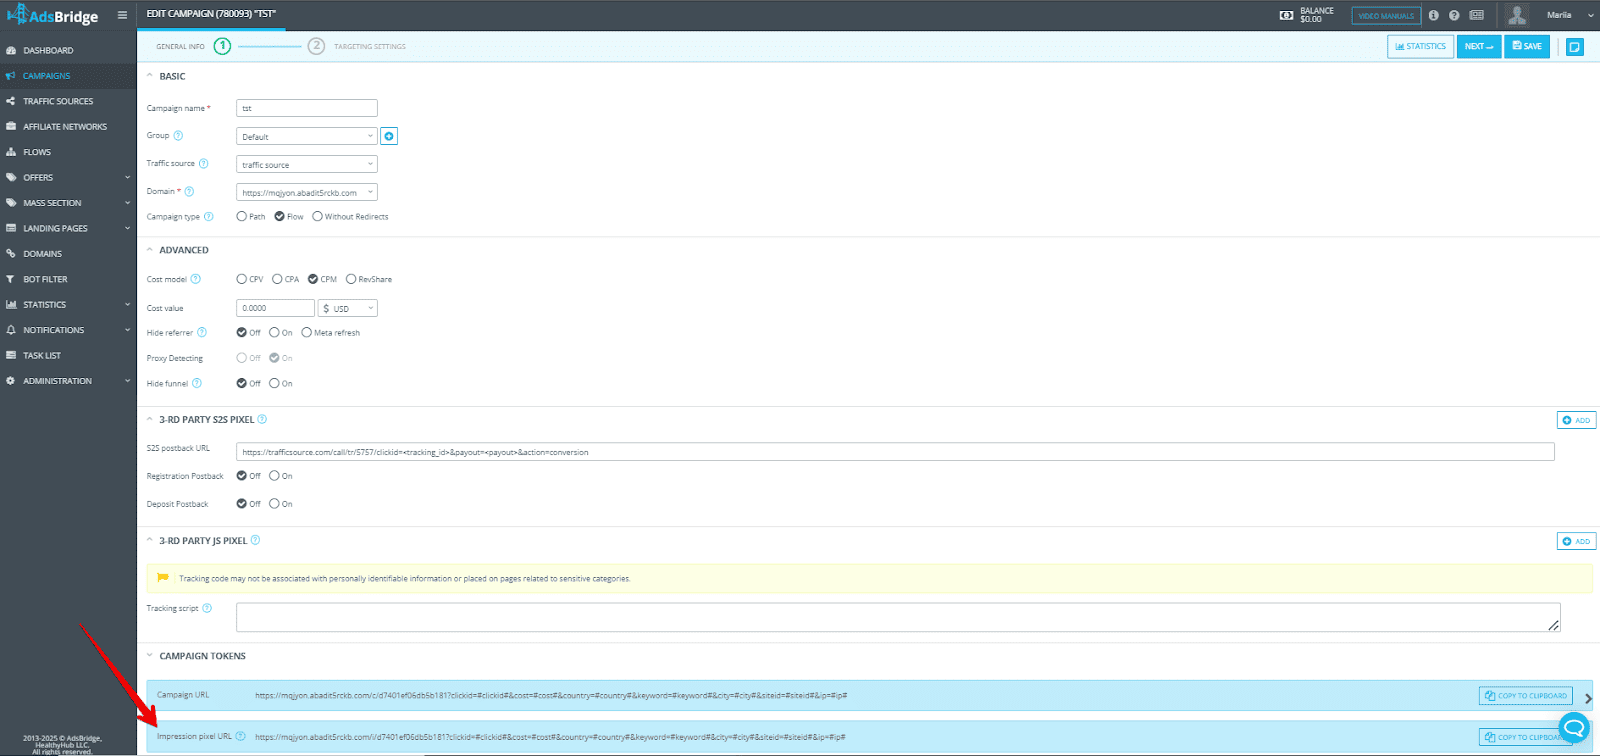
2.10 I chose the CPM model, but my Spend column is blank. Why is that?
For the CPM model to function properly, you should first set it up correctly:
- Mark the checkbox “Track impressions” in the traffic source settings. Shown on the screenshot.
- Choose your traffic source in Campaign Settings.
- Scroll down to the screen on the first step of setting up a campaign.
- Copy the link for impression pixel.
- Go to the Tracking pixel section and choose the appropriate pixel.
- Replace the link in this section with the pixel display link.
- Place the pixel displays into your advertisement.

A pixel will light up every time your advertisement is displayed. Based on this data, we are able to calculate the cost. Some traffic sources, however, do not support this feature. Before using this feature, it is advised to get in contact with a representative of your traffic source.
2.11 How to create a short link in AdsBridge
To create a short link, go to the Domains section, where your domain should already be added, then right-click on the domain – Edit
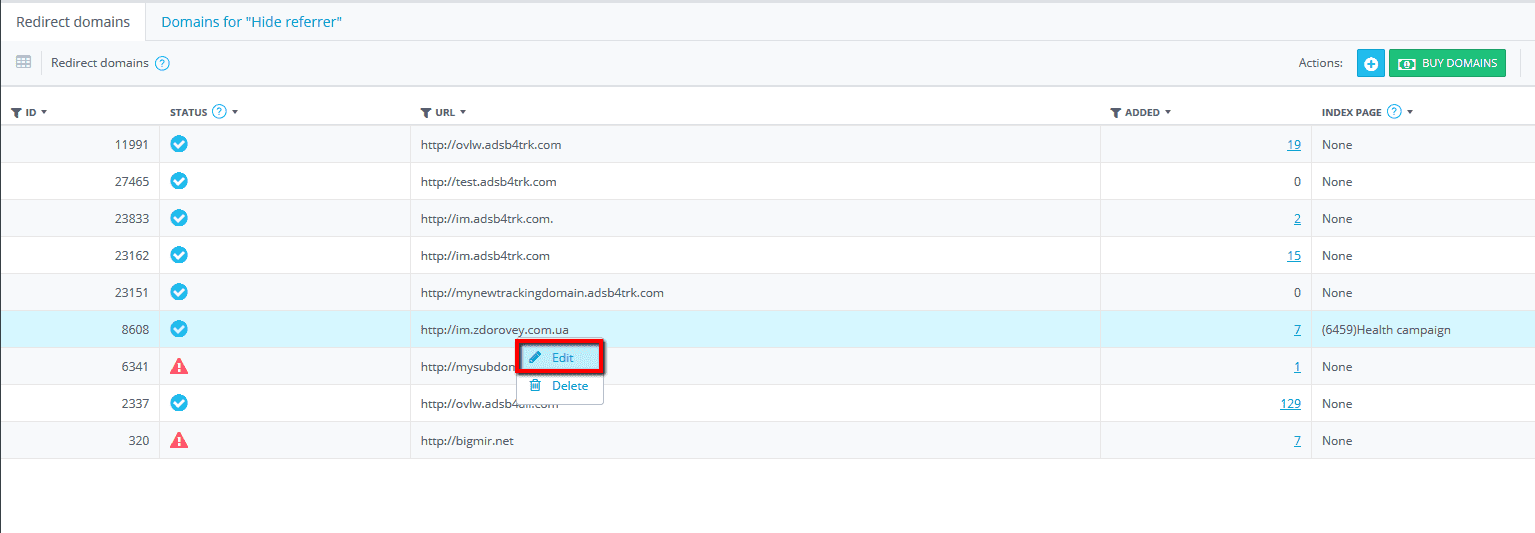
Then select the campaign you want and click “Apply”. The campaign short link is ready!
2.12 Choosing the campaign type: difference between “Path” and “Flow”
In AdsBridge, there are two types available when creating a campaign: “Path” and “Flow”.
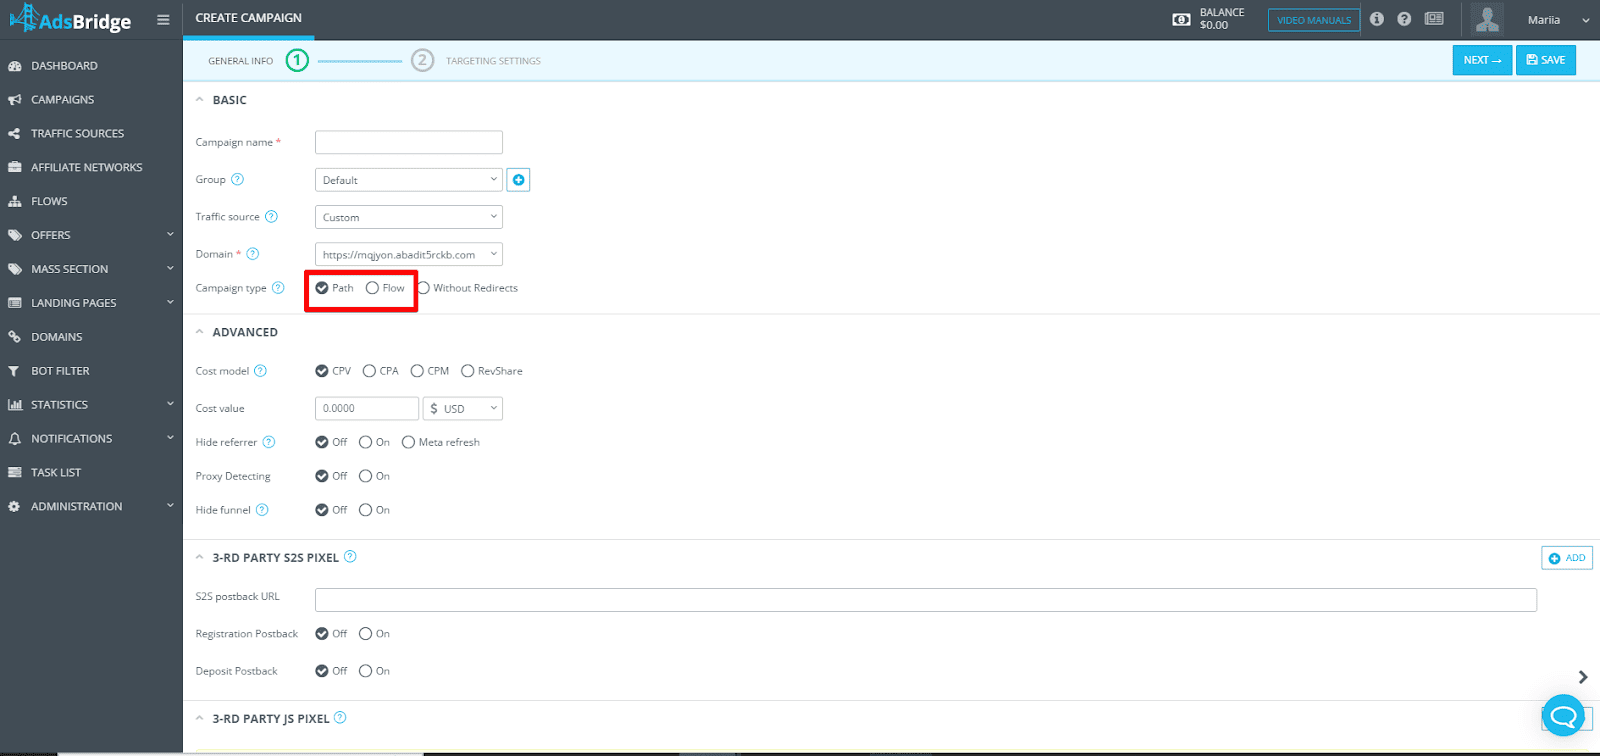
The difference between them:
- Path – a static route for traffic. You manually set the conditions for where to direct users.
- Flow – a pre-configured set of rules for traffic distribution that can be used across multiple campaigns without needing to set it up again.
If you have several campaigns with the same traffic distribution settings, it’s more convenient to use a Flow, as it can be applied to multiple campaigns at once. This way, you don’t have to repeat the setup in each campaign.
How to create a flow in AdsBridge:
1. Go to the “Flows” section
- In the Flows section click “Create Flow”.
2. Set up the flow
- Add traffic distribution rules (by geo, device, browser, and other parameters).
- Specify the paths where traffic will be directed.
- Add landing pages and offers for each path.

1. Save and apply the Flow
- After creating the Flow, you can use it across different campaigns.
- When creating a new campaign, select “Flow” as the campaign type and choose the desired flow from the list.
2.13 Why does the campaign link redirect to Google instead of the affiliate link?
You need to check if there are any geo restrictions on the offer. If you don’t meet the required geo, the system may automatically redirect the traffic to Google. This is an internal setting of the affiliate network, which we have no control over.
We recommend checking the geo restrictions on the affiliate network side and ensuring you meet the required parameters.
Domains
3.1 Why do I need a custom domain and how do I add one?
Our system’s domains (adsb4trk.com , track4ref.com , etc.) were created in order to conduct testing. We strongly recommend using your own domains to track your campaigns.
You can find information on sub-domain setup here: https://www.adsbridge.com/add-domain/
3.2 How do I ensure that my domain is connected?
If you doubt whether or not your domain is connected correctly, you can click on its link. If you see a page where the words “Site is under construction” are written, it is a sign that everything is working correctly.
If this is not the case, please refer to our support team. Also, in the “Domain” section, there is an indicator that shows whether or not the domain has been properly set up. If you see a blue circle in the domain field, your domain has been properly connected to our system. If the circle is red, it means that your domain is not connected and is unavailable for usage.
3.3 Why doesn’t the indicator in front of my domain change?
Usually, the domain’s status changes only after we receive a response from the hosting service. This process may take up to 48 hours, but in reality, this process happens much quicker. We ping domains every hour, and if all settings are quickly applied, then the indicator status will change within one hour.
3.4 How do I shorten a long link?
With the “Index Page” function on AdsBridge, it is possible to shorten long links. Once a shortened link is connected to your campaign through means of a subdomain, any user who clicks on the subdomain will be directed to your campaign link, but in the web address bar, the user will see the subdomain link. This creates an image that there are no additional redirects through the tracker. The function is useful for:
- Moderation of various advertising platforms.
- Shortening campaign links within posts, emails, etc.
- Tracking organic traffic on your self-hosted landing pages.
For more information about this function, refer to this link: https://www.adsbridge.com/link-shortener-2/
3.5 How do I hide a referrer link?
With the help of our “Hide referrer” function, you are able to hide traffic information from affiliate network representatives for example. If you engage this function in your campaign settings, the only thing affiliate network representatives will be able to see is our system subdomain which hides referrers (www.track4ref.com).
In the “Hide referrer domains” section, you are able to add your own personal domains, in order to hide the referrer. Use our instructions here: https://www.adsbridge.com/domain-for-hide-referrer/
3.6 What should I do if a program blocks my subdomain?
We recommend you use a custom domain in this case. If a program blocks your custom domain, then connect another one. You can also contact the support team at the advertising network, to better understand what caused the ban (as well as avoid similar problems in the future).
3.7 If I stop using the tracker for a while, what happens to my domains?
They will be saved in your account, as well as all the settings you created in the account.
3.8 Are there any limits to the number of domains I can add?
We do not have any limits on the number of domains. You can add as many as you wish.
3.9 Is there any protection from a domain ban?
The domains are protected from a ban because each user has their own personal subdomain given for use of the tracker. In case of issues with its campaigns, the ban will only affect the subdomain. In order to fully protect yourself, we recommend that you use your own domain for advertising campaigns and for hiding referrer links.
3.10 Facebook domain verification
Domain verification is aimed at confirmation of the security rules of a certain brand. This change doesn’t concern publishers as much as it does affiliates and their partners on the market.
👉There are 3 main ways how you can verify your domain:
- Adding meta-tag to the index of the site (meta-tag verification);
- Uploading of HTML-file;
- DNS-confirmation
AdsBridge offers the possibility to pass domain verification with meta-tag verification. In order to do it, you need:
1. Purchase a domain through our platform. You can do it in the section Domain – Buy domains.
You also get a free SSL certificate for this domain.
2.Enter your Facebook business account and go to “Brand security → domains”
3.Click “Add” and indicate the name of the domain bought in AdsBridge.

4. After that, the domain will appear in the Domains section waiting for confirmation.
5. Select the domain and confirmation method as meta-tag verification.
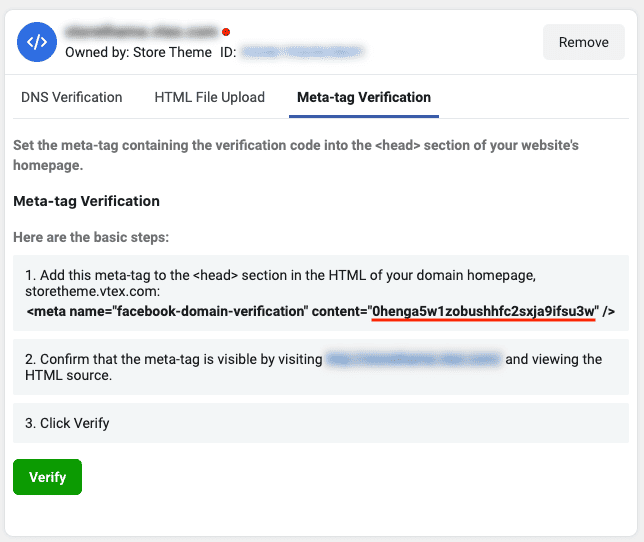
6. Copy the meta-tag from Step 1
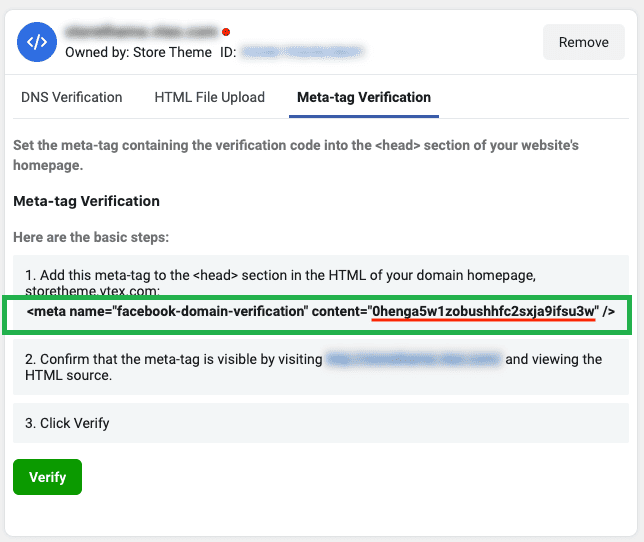
7. Return to AdsBridge. In the landing page editor create a new landing page. It can be a clear landing page or a landing page with necessary content.
On the right-side panel in the Meta tags add the previously copied meta-tag from Facebook.
8. Create a campaign in the tracker with this landing page and the domain. Save it.
9. Go to the Domains section in the tracker. Select the domain, click Edit button and assign the campaign for the Index page.

10. After that go back to Facebook and click the confirmation button. The domain indicator will change from red to green.
It means that you can start your work and launch your ad campaign😊
We hope that this guide was useful and helped you pass domain verification. If you have any questions, contact support@adsbridge.com. We are always ready to help you!😉
3.11 Connected a domain through Cloudflare, but it does not work in the tracker, what could be the reason?
Typically, the main reason is that Cloudflare automatically turns on proxying, both on the primary domain and on the domain created to be added to AdsBridge. The enabled proxy status in Cloudflare affects the stability of the domain and technically makes it impossible to keep everything under control when adding a domain to AdsBridge. For this reason, in order for the added domain to work correctly in AdsBridge, you must deactivate Proxy status. An example of what the setup should look like:
Type: CNAME
Name: subdomain name (e.g. www). It is important!
Content: system domain from the tracker, located in the Section Domains. Typed without https
Proxy status: DNS only
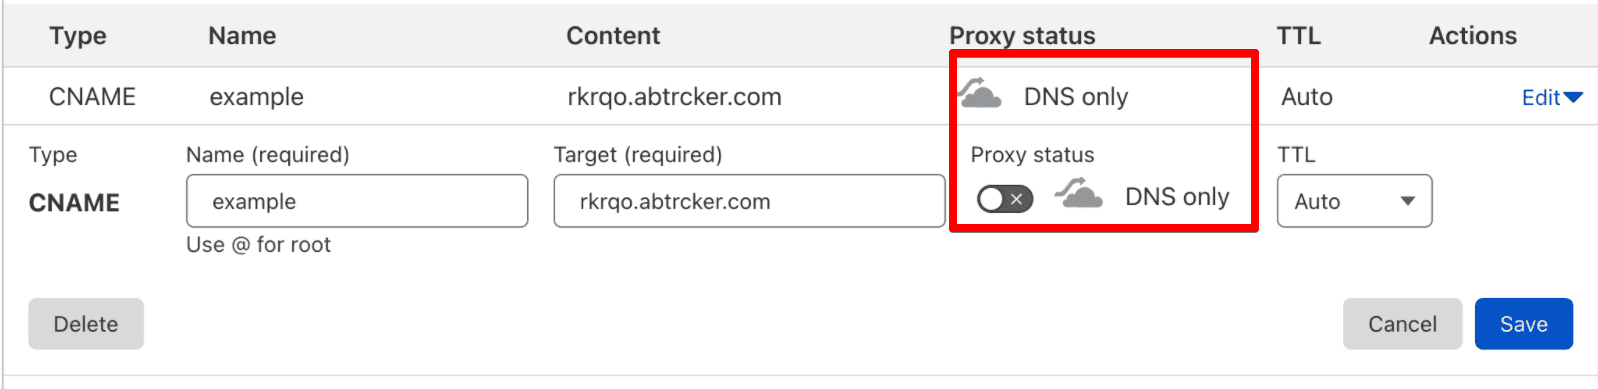
Next, in the Domains section of the tracker you add the domain from the record in the following form: example, www.domain.com
Landing pages
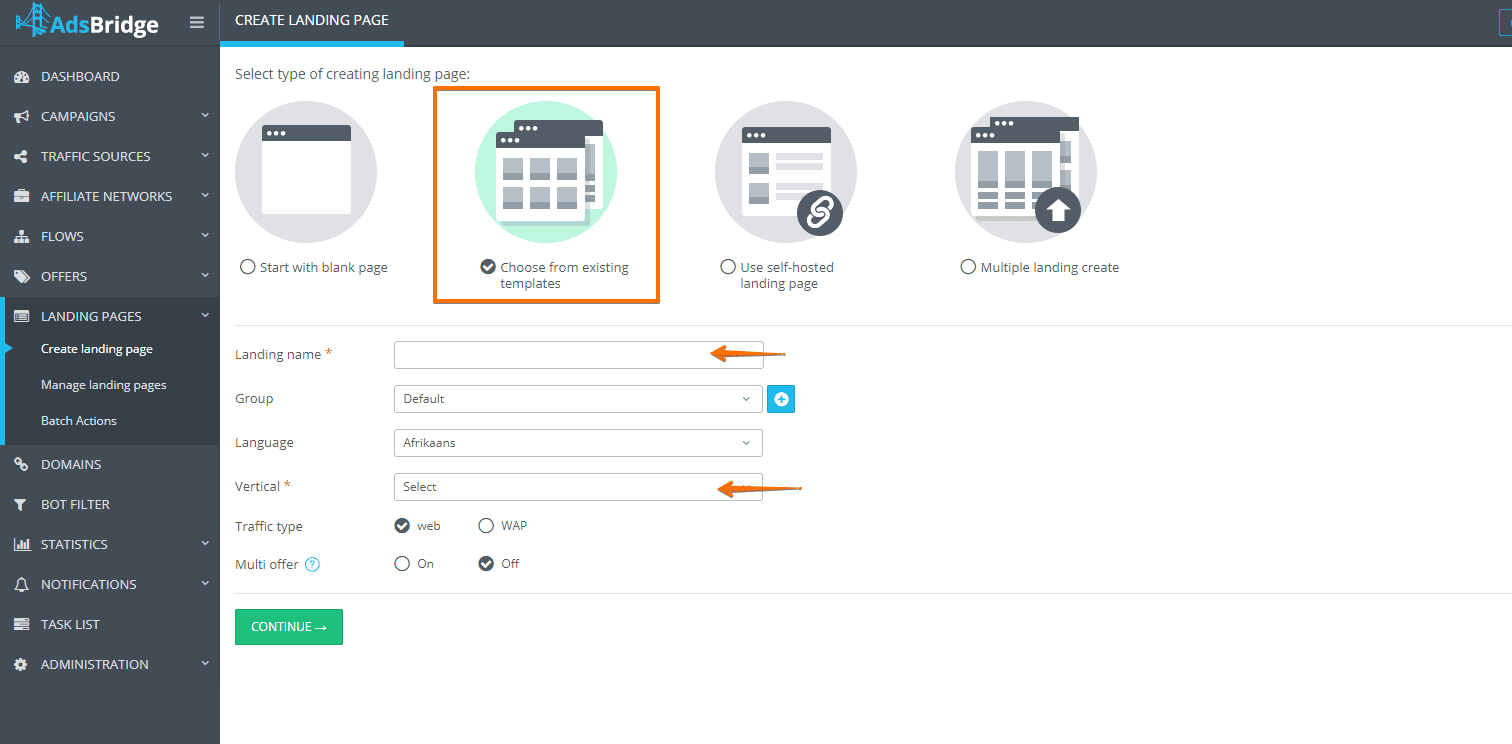
4.1 What options for creating landing pages are available in AdsBridge?
There are several options for creating landing pages:
- Visual editor
- HTML editor
- Landing page from templates
- Self-hosted landing page
- LP upload
To learn more about setting up each option see the User Guide: https://www.adsbridge.com/guide/create-landing-page/
4.2 Can I use my own self-hosted landing pages?
You’ll have to add your landing page to the appropriate section, paste its link and fill out any other needed fields.

After that, you will need to place the click URL (or CTA code) onto the CTA button in order to connect your landing page with our tracker.
Note: After inserting the click URL on the landing page buttons, all redirects, which will not come through our links will not work. To track organic traffic, passed through your web page, you can use one of your campaigns as an index for the domain of the click URL placed in the button on the web page. You can find these settings in domain section, in the settings of each particular domain.
4.3 How to direct the user from the landing page to the offer (Click URL and CTA code)?
To send users from a landing page to an offer, it is necessary for you to create both a landing page and offer and add them to a campaign. After this, upon transfer by your campaign link, the system will automatically determine to which landing page, as well as offer, the user will be sent. One of the most common mistakes of our users is that they put a direct link to an offer on their self-hosted landing page button. In this case, the redirect to the offer will work, but the system may not count this as a click, and therefore it will not show as a click in the statistics.
To properly set up click URL or CTA codes, visit the “Tracking Pixels” section and choose a campaign. After that, click the button “Apply” and the elements will change based on the settings of your campaign.
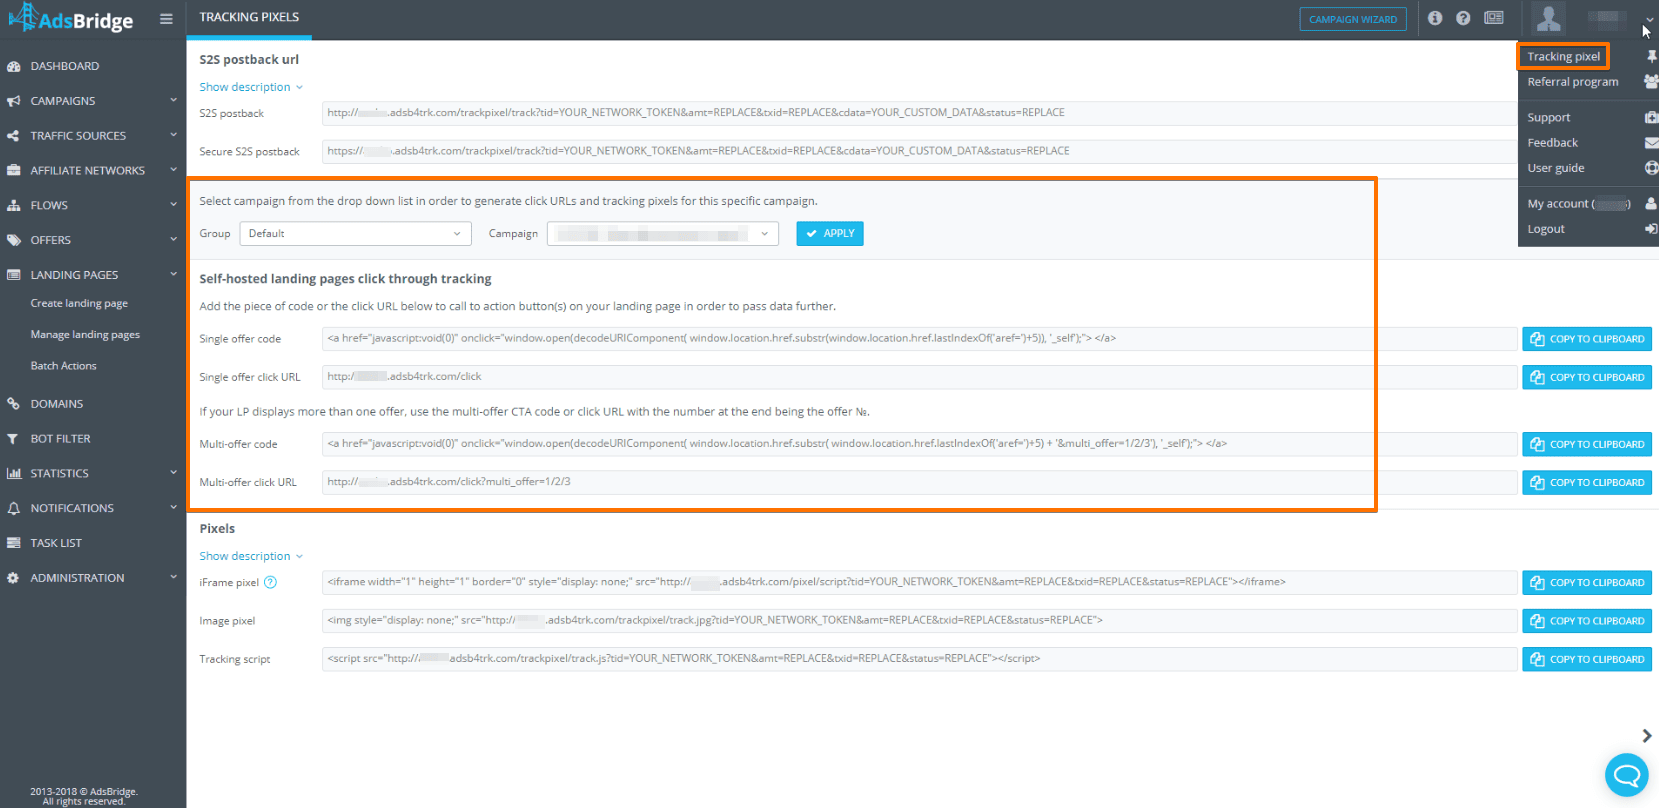
Then you need to correctly place them onto your landing page. Here is an example of a correctly configured Click URL:
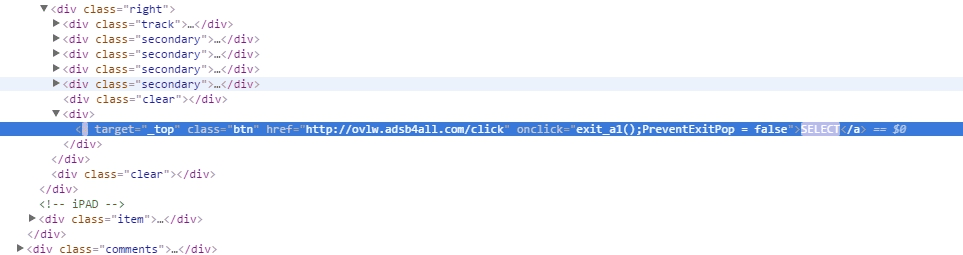
Please note that the Click URL MUST be on the same domain as the campaign link in which you are using this landing page.
A common mistake made by our users is installing a direct link to the offer on the buttons of self-hosted landing pages. In this case, redirection to the offer will work, but the system will not be able to count clicks on this button and, accordingly, show statistics on clicks.
4.4 Is it possible to show the user’s data, which was detected by the tracker, on the landing page?
For self-hosted landing pages, you need to use the following script:
<html>
<head>
  <script>
    function getURLParameter(name) {
      return decodeURIComponent(
        (RegExp(name + '=' + '(.+?)(&|$)').exec(location.search) || [, null])[1] || ''
      );
    }
  </script>
</head>
<body>
  Hello <script>document.write(getURLParameter('model'))</script> Caution! Your OS version is not up-to-date enough to visit that site. Press the button to update!
</body>
</html>
You can change the text of the script. In order for it to work correctly, you have to add the placeholder you are interested in to the landing’s link in landing page settings to pass the information on the landing page for its further placing on it (for example, the script is configured to display a user’s device model, then we need to add to the end of the landing page’s link the following & model =<model> . Thus, the link will look like http://mylandingpage.com?model=<model> ).
The script will pull the name of the parameter and display it on the landing.
For landing pages created in our editor, you will need to place the following placeholders onto the landing page:

4.5 On which subscriptions do the templates become available?
You can use our ready-to-use template, which takes the least amount of editing on each subscription plan:
There is a complete list which can be viewed in the respective section.
4.6 Is CDN used for landing pages?
We use a CDN service to support the loading speed of our web pages. Our choice is https://www.akamai.com/
4.7 Do landing pages work with tablets and mobile phones?
Our landing page templates are adapted to both, thanks to the addition of responsive.css for each of them. You can add the same file to your own landing pages and change its configuration depending on your needs.
4.8 Can I use an outside script on AdsBridge landing pages?
You can download JS and CSS files on our landing pages. Any other options are not supported.
4.9 What are multi-offer landing pages and why are they important?
Multi-offer landing pages allow to send user on several offers, depending on the offer button that is clicked. For example, if the user clicks on button one, they will be sent to offer one, button 2 – offer 2, etc.
4.10 Is it possible to create multi-step landing pages?
Multi-step landing pages are possible to create in the visual editor. To do so you need:
Add a page:
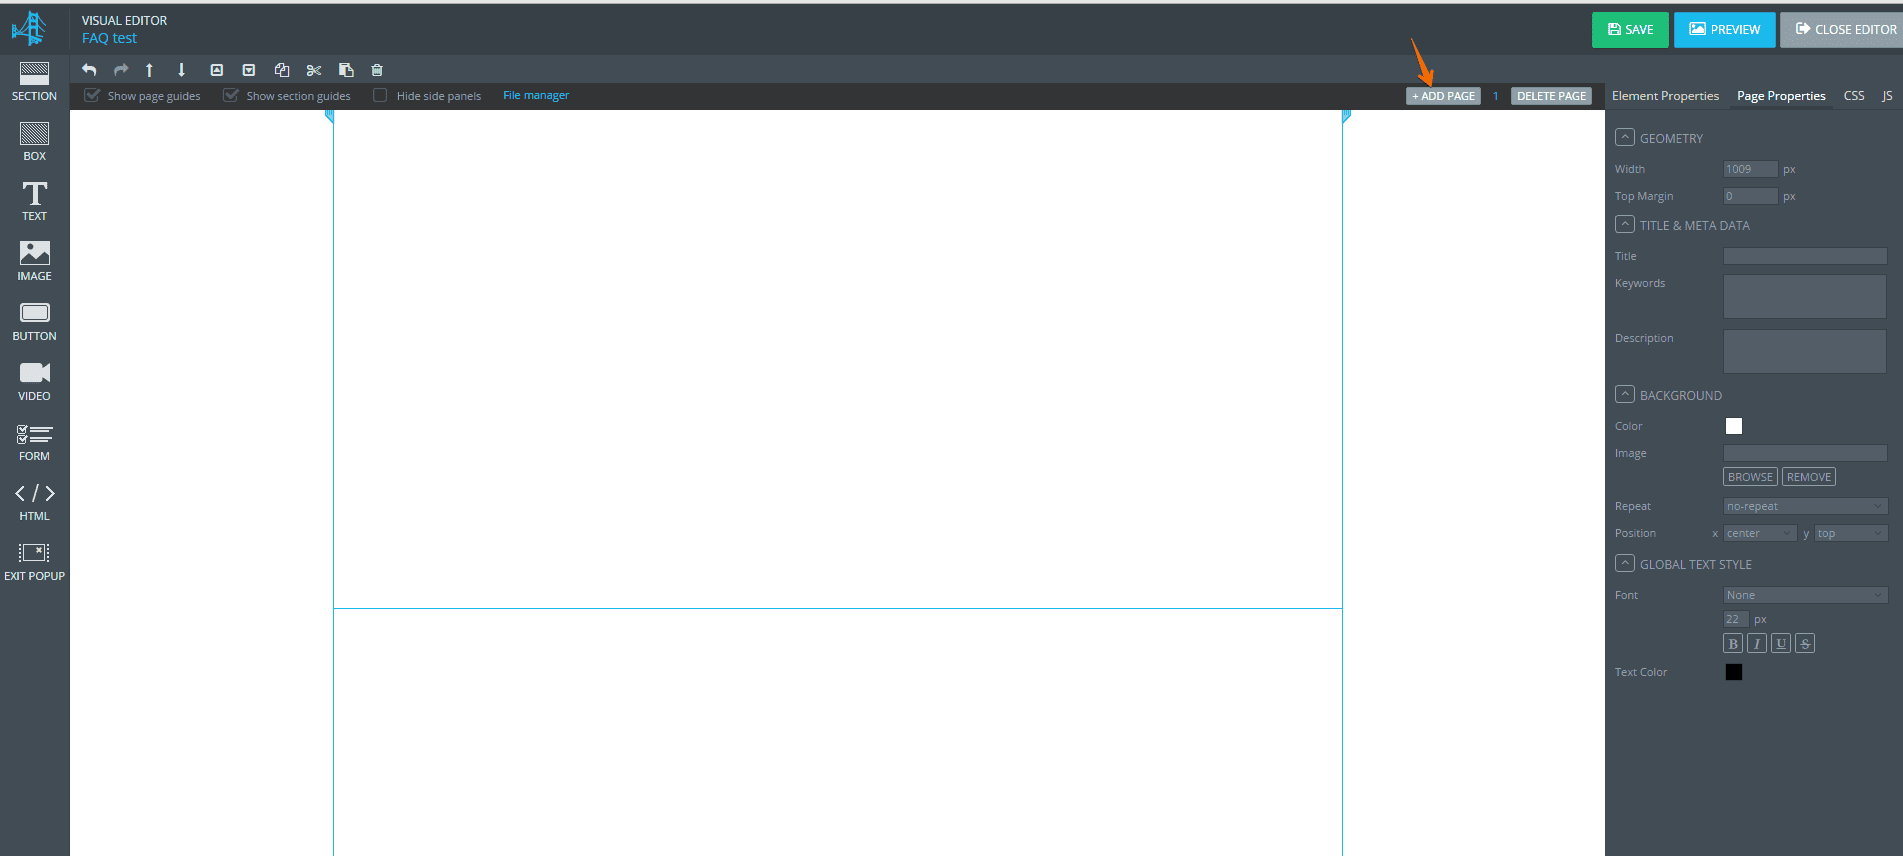
2. Set up a redirect from one page to a next through a landing page button:
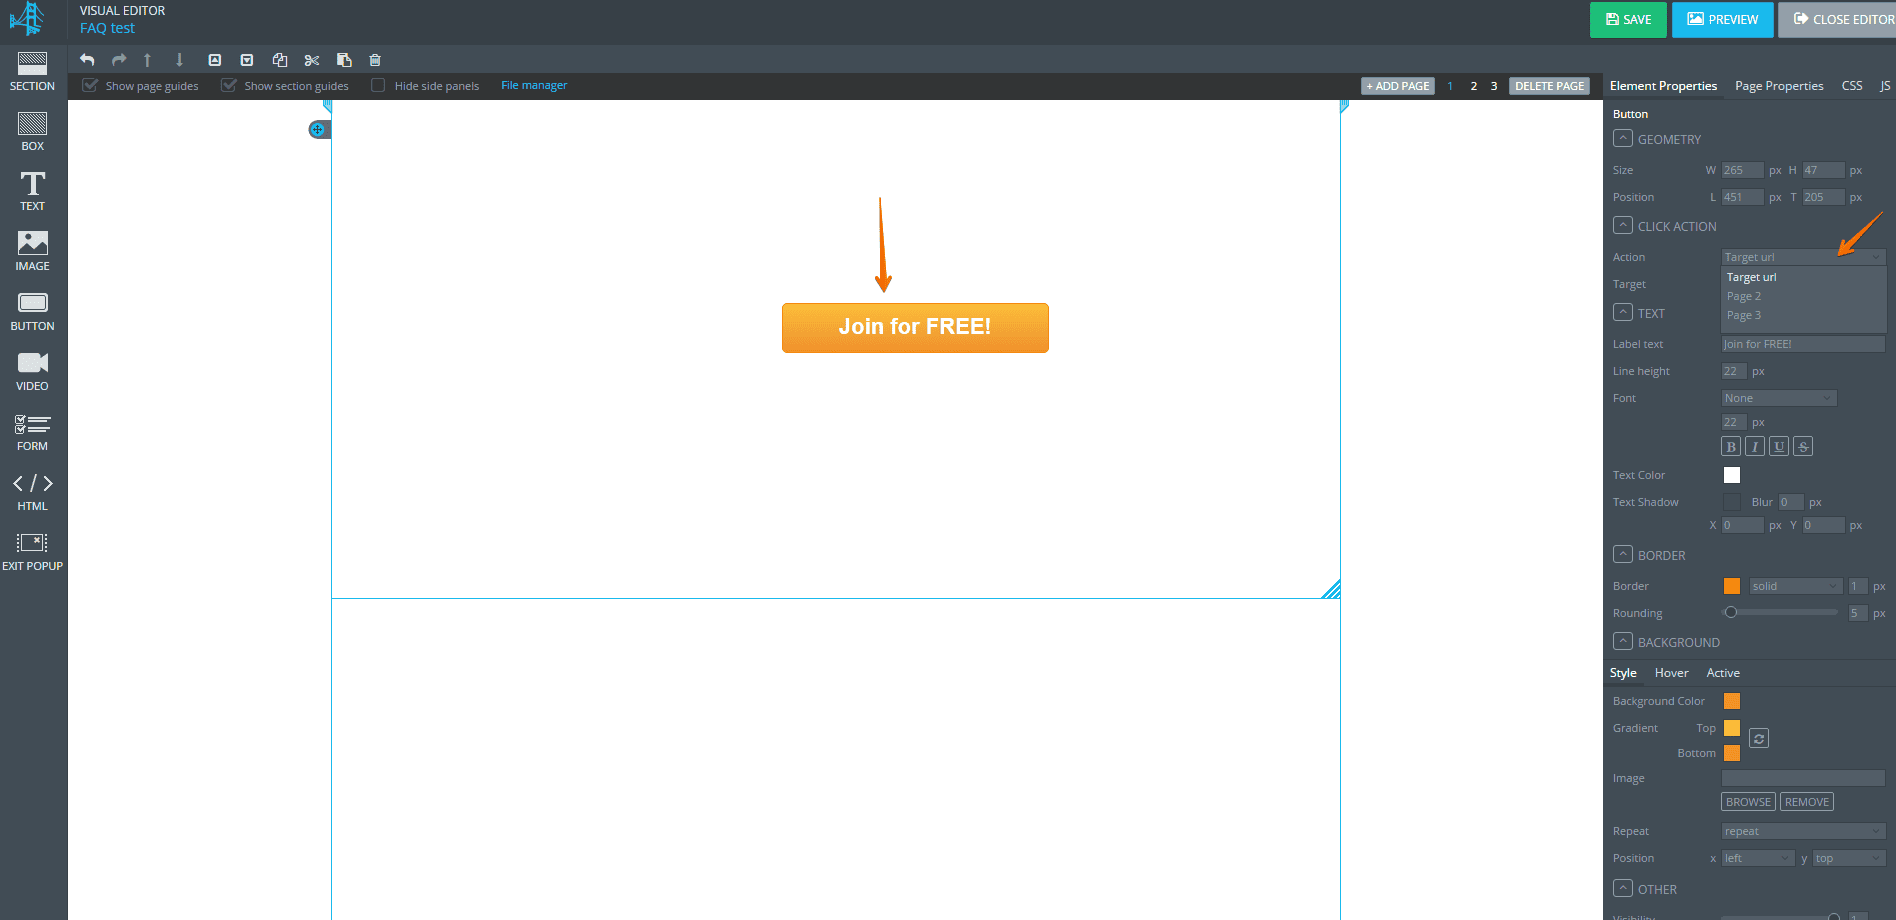
It is recommended that the button on the last page leads to the offer.
Please mention: we do not track the redirects between landing pages. In order to keep track of each step, you can configure the scheme to redirect from one campaign to another, but then the number of visits will be multiplied by the number of steps.
4.11 Where are the created landing pages hosted and is it possible to download them?
Landing pages created with the help of our editors are hosted exclusively on our servers, and can only be used in our campaigns.
No, you can not download Lp. This is against our terms of use. https://www.adsbridge.com/terms-and-conditions/. These landing pages can only be used exclusively within our campaigns.
4.12 Unique Landing Page
We have great news! A new feature is now available on AdsBridge – LP rotation by repeated user visits.
Now the system will send users who repeatedly clicked on the campaign link to the subsequent landing pages in the rule so that the user won’t get to the same landing page again. If the user has clicked through all of the landing pages, the next time he clicks through, the circle starts over again.
Note. Cookies are stored for 30 days.
What’s the advantage?
When using landing pages without unique-rotating, users get to the same landing page multiple times when they click on the link again. The uniqueness rotator allows different content to be shown when a user revisits a landing page, thereby increasing the chance of a higher CTR.
How to activate the Landing Page Rotator?
- Create a Campaign.
- In Step 2 of the settings activate the check box Only unique LP (works with all the rules)
- Add the necessary number of landings.
- Save settings. Done!
Note. The function is only available upon request. To get access contact your support manager.
Have successful conversions!
AdsBridge Team
4.13 Can I connect monetization to the pre-landing page?
Yes, you can connect monetization to the pre-landing page if the affiliate network provides a push collection code. In that case, you can insert it into the landing page code. However, we only support two code formats: JS and CSS.
Offer creation
5.1 How do I set up an offer?
You can find instructions on offer setup here: https://www.adsbridge.com/createoffer/
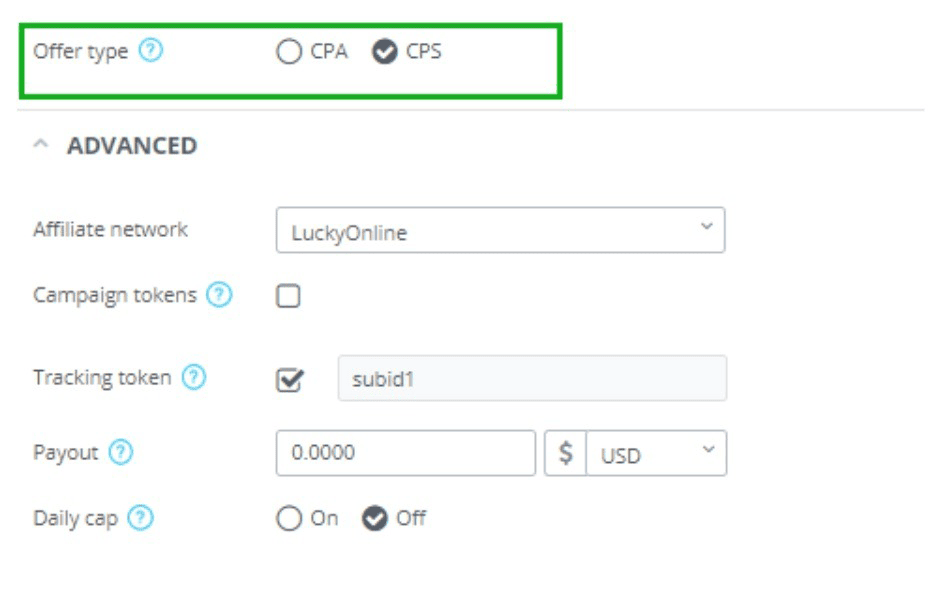
5.2 What is the difference between CPA and CPS-type offers?
The difference between CPA and CPS offers is that CPS offers can have several conversions per user click ID.
In typical configuration (CPA offers), through the same user click ID, only one conversion is possible (i.e. if a conversion has been made, even if the postback will be fired, another conversion will not be recorded).
In order to count the number of consecutive conversions on an CPS offer (where the conversion of a user is counted as: registration, then, ordering of a product and a payment, for example), you need to choose the CPS offer type, and add the parameter txid to the postback. In this case, the conversion will be counted at a unique combination of tid + txid.
In the “Conversion report” section, you can see the value of conversions made through tid+txid.
5.3 Why are the checkboxes “campaign tokens” and “tracking tokens” needed?
With the function “Campaign tokens” switched on, every time users navigate to your offer’s link, the campaign tokens will be attached to that link. This function is helpful in the instance when the offer’s link is in the standard format. For example: http://offerurl.com?s1=<token1>&s2=<token2> (meaning that the parameters are separated by the ‘&’ sign and transmitted in the format ‘name of parameter=value of parameter).
Tracking token: a very important parameter in setting up conversion tracking. If you have already configured this within the affiliate network settings, and have chosen an appropriate affiliate network, then this parameter will be filled automatically in this field. This field is useful for transferring unique click identifier onto networks which have links in standard format.
For example: by noting the checkbox and entering a value of s3, the offer’s link will look like this – http://offerrl.com?s3=<tid>.
5.4 Why are placeholders needed?
This list includes all the parameters, which you are able to add to an offer link in order to transmit information onto an affiliate network.
Keep in mind that by adding parameters <parameter1><parameter2><parameter3> – is not correct way, and your offer link will not function under such a setup. You need to write out the name of the parameter within the link so that the affiliate network will be able to receive the required values and then add our macros.
For example: ¶meter1=<parameter1>¶meter2=<parameter2> (Some formats may be different, and some affiliate networks can provide links that will transfer parameters through symbols such as ; / , etc.)
5.5 If I work with my own site, do I need to fill out the Advanced Settings?
No, since you are working without an Affiliate Network, the Advanced Settings should be left with the default setting
Traffic source settings
What is a traffic source within AdsBridge?
Within our system, a traffic source is a set of tokens and S2S postback connected under a name by which you can later view the statistics.
My statistics doesn’t collaborate with my traffic source. Why?
This is a possible situation. Traffic sources may have different mechanism of our banner-click-counter (such as counting unique clicks only).
Another reason for the differences is that the traffic source and tracker may be in different time zones. In order we will be able to check, please inform us about what traffic source you are using, your campaign ID, and the period of time for which you view the statistics. It will also be necessary for you to indicate the number of visits in the traffic source and AdsBridge, as well as providing other statistics from your traffic source at the request of one of our support managers.
My conversions are not being transferred to their traffic source. What should I do?
Please send a screenshot of your traffic source settings (where the link that is placed in the traffic source is visible), as well as a screenshot of ALL setting from the first step of campaign setup along with your campaign ID. With this information, we will be able to assist you.
What is a cdata parameter in a 3rd party pixel?
The cdata parameter is meant to be added to postback, but only if you set up its transmission in your affiliate network’s postback. This parameter serves the purpose of transmitting information from an affiliate network directly to a traffic source, without recording it within our system.
Are there any limitations pertaining to the volume of information which can be transmitted in tokens?
Yes there is a limit of symbols for each of our six general tokens:
I: 255
II: 255
III: 255
IV: 255
V: 255
VI: 255
Why are tokens needed?
Tokens are specific values, which may be added to your campaign link, so that their values can be sent from the respective traffic sources to AdsBridge. Tokens are added into the campaign link in the name_parameter=macros format (macros will be substituted by the traffic source to a determined value). Refer to your traffic source representative to receive macros, and they will assist you in receiving the values.
Examples of Macros: #s2#, {cost}, %campaignid%, [PLATFORM] .
How many tokens can I use?
You can add the six primary tokens, and as many additional ones as you wish.
How do the general and additional tokens differ?
There are only 6 general tokens, and only they will be represented in our tracker’s statistics, additional won’t be saved in our statistics, but can be transferred to an affiliate network, and you will be able to view their values there.
Why do I need the Tracking ID parameter?
The Tracking ID parameter serves the purpose of transmitting a unique click identifier of your advertisement from a traffic source. This setting does not affect tracking within our platform, but if you need to transmit conversions back to your traffic source, this setting is necessary. Tracking ID consists of the name and macros provided by a representative of your traffic source.
Why is the Cost parameter needed?
This token exists to transmit dynamic cost values from your traffic source. In your campaign setting you can indicate statistical values and, if the dynamic values differ from previously given statistics, then the dynamic value will be chosen for counting statistics based on its relevance. This function is available for the CPV and CPM models (for CPM models, the cost for 1000 impressions will need to be transmitted in the link. This value will be divided by 1000, assigned to each impression).
How do I set up a traffic source?
You can find instructions on traffic source setup here: https://www.adsbridge.com/traffic-source-creation/
How can I send payment information to my traffic source on the RevShare model?
For starting with the RevShare model, you will need indicate the percent of payment you will be giving to your traffic source. Then add a placeholder <cost> to the traffic source postback. Our tracker will send the percentage of each payment, in accordance with your settings.
Is it possible to assign names to tokens, under which they will appear in the statistics?
We do not support tokens with independently-created names because we offer the option of viewing the statistics by campaigns groups, and these campaigns may have different traffic sources and each one will have its own tokens. This can create confusion when looking at statistics, and therefore we decided not to support this function.
My traffic source is not available in the templates. What should I do?
You can set it up independently using these instructions: https://www.adsbridge.com/traffic-source-creation/
How to track impressions? Setting up CPM models.
For the CPM model to function properly, you should first set it up correctly:
- Mark the checkbox “Track impressions” in the traffic source settings. Shown on the screenshot.
- Choose your traffic source in Campaign Settings.
- Scroll down to the screen on the first step of setting up a campaign.
- Copy the link for impression pixel.
- Go to the Tracking pixel section and choose the appropriate pixel.
- Replace the link in this section with the pixel display link.
- Place the pixel displays into your advertisement.

A pixel will light up every time your advertisement is displayed. Based on this data, we are able to calculate the cost. Some traffic sources, however, do not support this feature. Before using this feature, it is advised to get in contact with a representative of your traffic source.
Do you have preset traffic sources?
You can use any traffic source and can even independently set one up. We have provided a list of ready-to-go traffic sources. This lists contains trusted traffic sources, represented by our partners.
- ExoClick
- TrafficHunt
- MediaHub
- PropellerAds
Aside from our trusted traffic sources, here is a list of other popular sources:
- 50onRed (Intext, Pop, Search)
- AirPush
- BuzzCity
- Decisive
- Go2mobi
- Google Adwords
- InMobi
- LeadBolt
- MobFox
- PlugRush
- PopAds
- Reporo
- TrafficFactory
- TrafficForce
- TrafficJunky
Choose a traffic source, and all the settings will be automatically set up. If you cannot find your required source then you must set it up independently.
To accommodate any traffic source in the templates, please visit support@adsbridge.com.
What is a 3rd party pixel, how does it work, and why is it needed?
In this field you need to enter in the postback link of your traffic source in case you need to send conversions or other values from tracker to your traffic source. Otherwise you can leave this field blank. When using traffic source templates, pay attention to the link itself. If there are parts of it that include “REPLACE”

then you should place the correct ID value (from your traffic source) in its place. You may refer to a manager of your traffic source in order to receive postback links for AdsBridge.
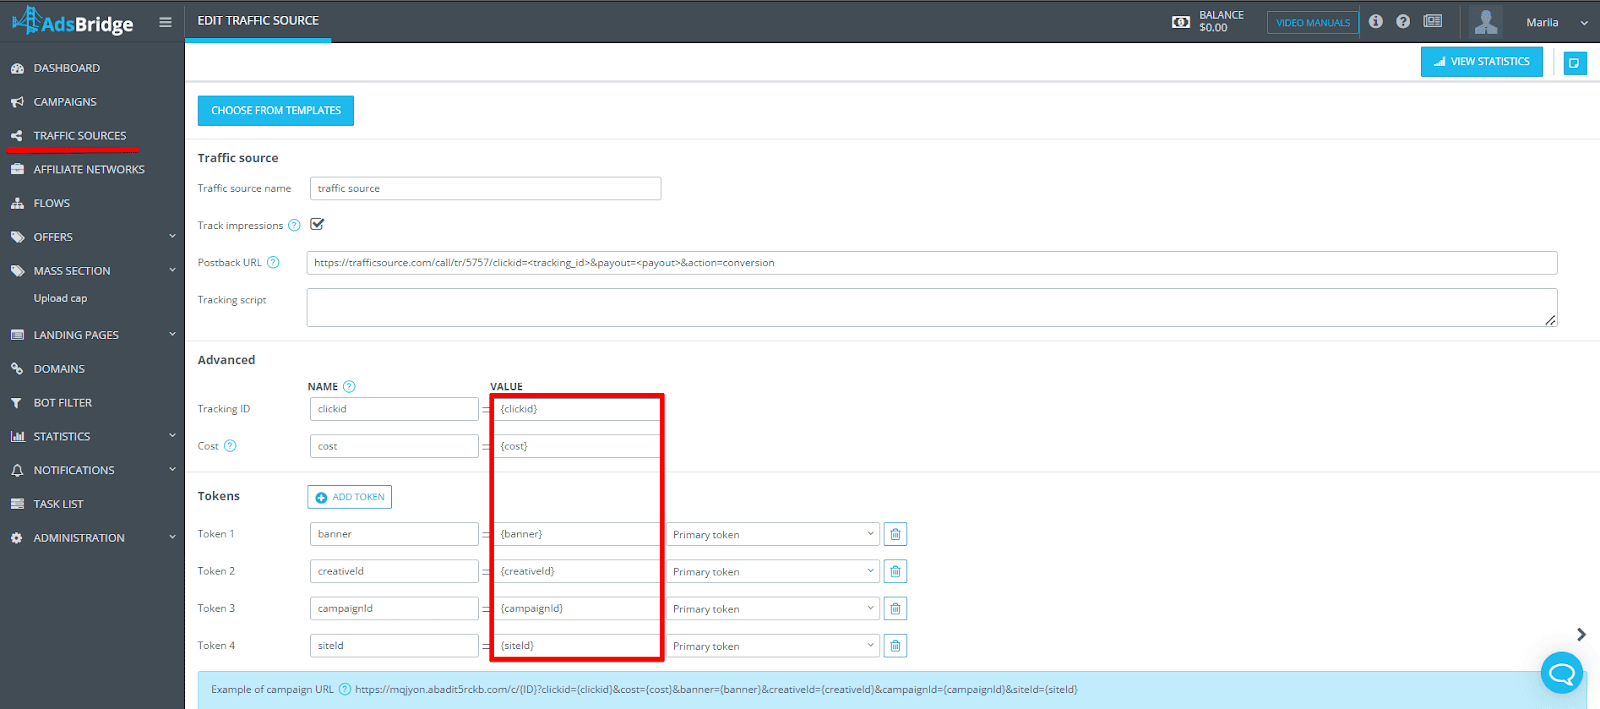
How to set up correct data transmission from the traffic source to the affiliate network
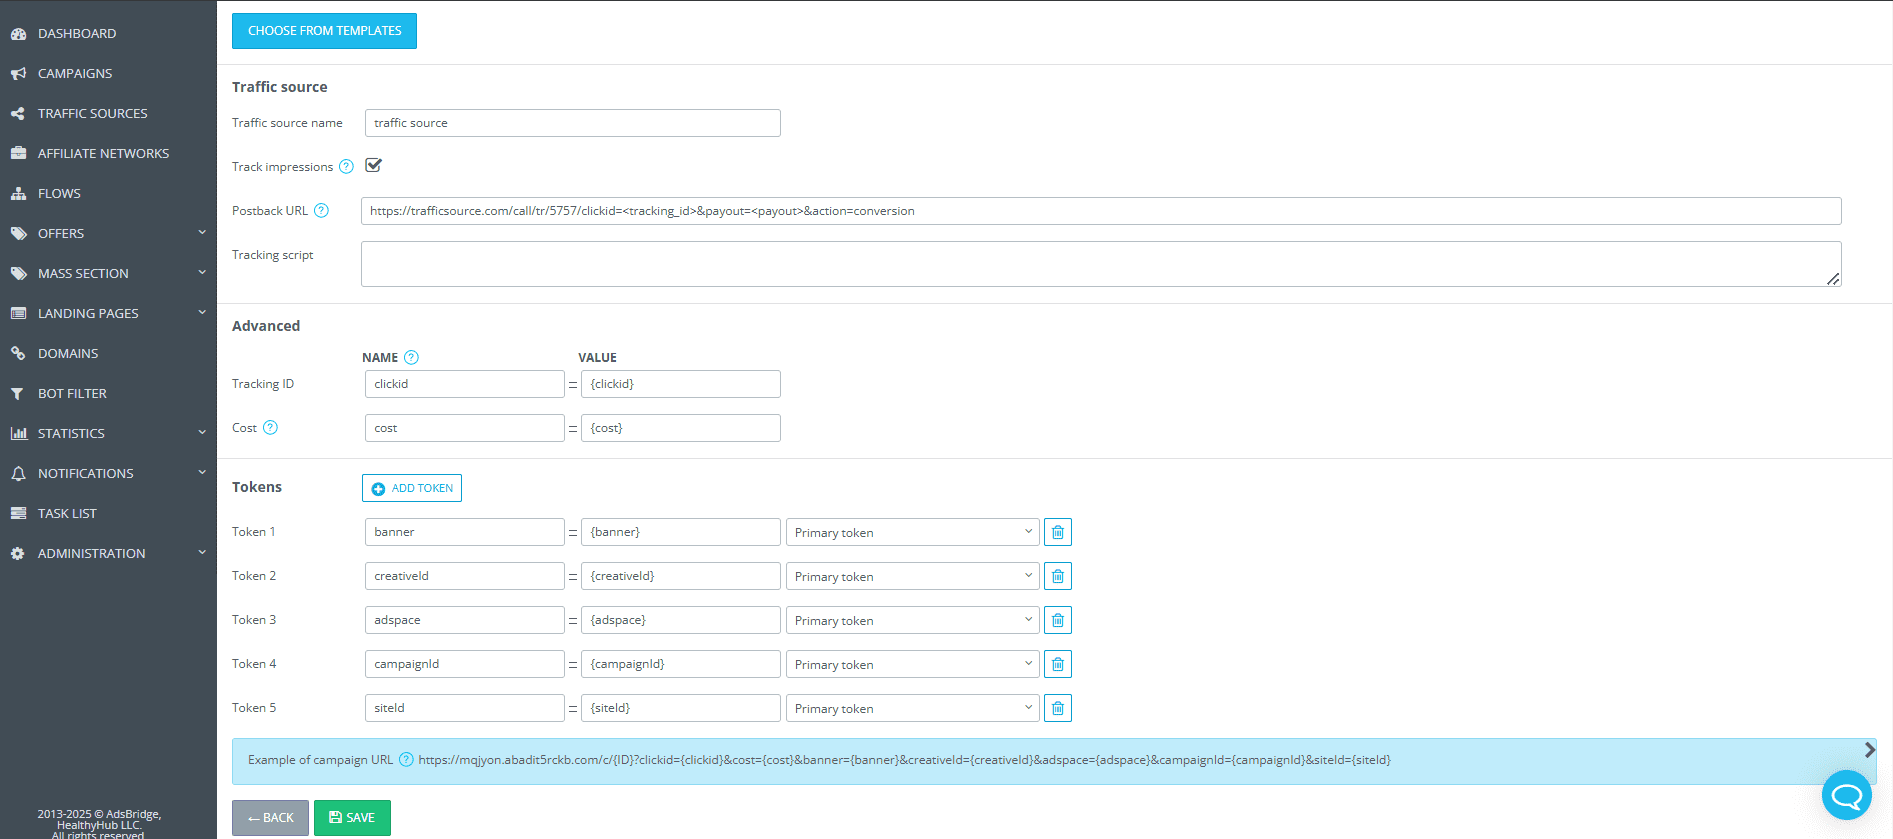
Follow these steps to correctly set up data transmission from your traffic source to the affiliate network:
1. Add a traffic source
Go to the “Traffic sources” section and create a new source.
(If your traffic source is available in the template list, simply select it and save.)
Specify the tokens provided by the traffic source for data transmission (e.g., {clickid}, {cost}, {banner}, {creativeId}, {campaignId}, {siteId}).
2. Add an affiliate network
Go to the “Affiliate networks” section and create a new affiliate network.
(If your affiliate network is available in the template list, simply select it and save.)
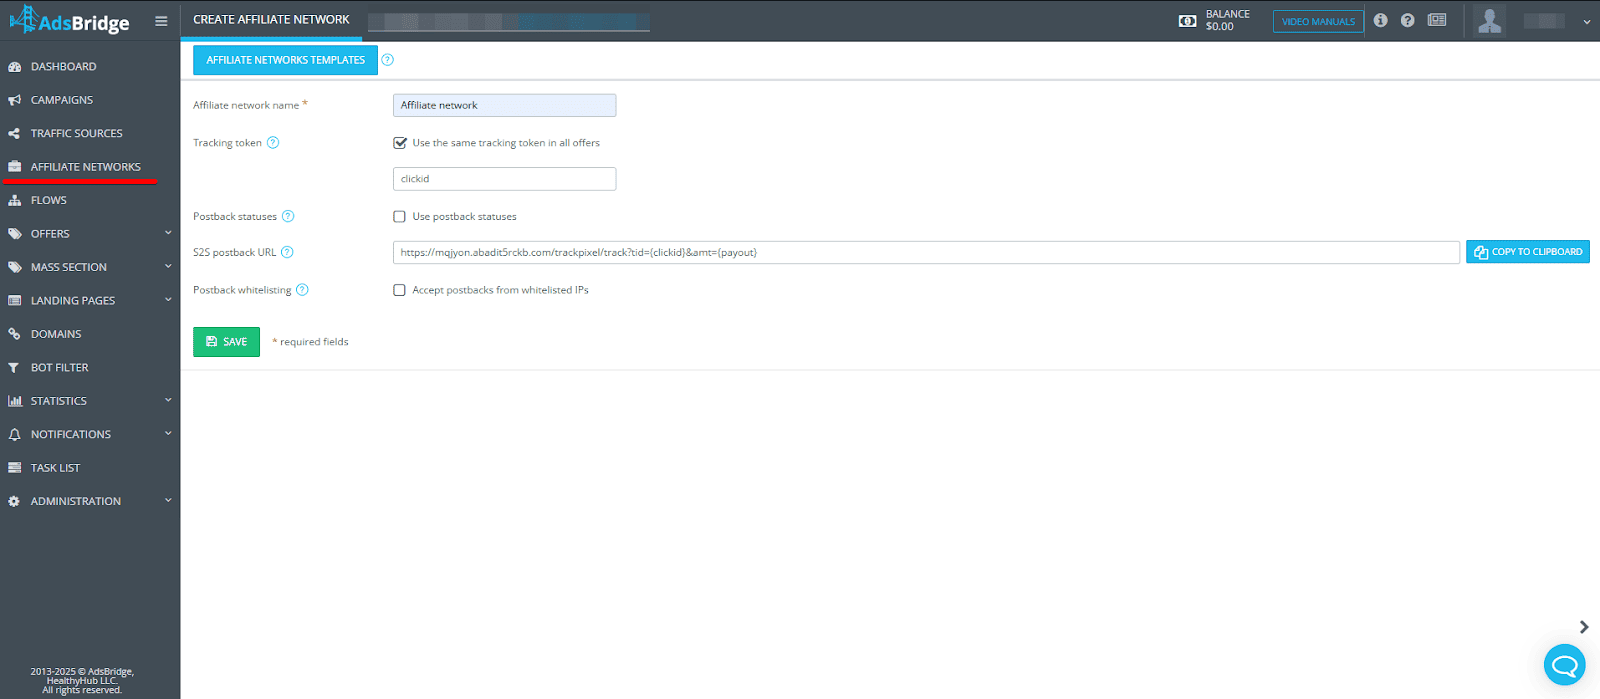
To properly configure an affiliate network, you can read more here:
How to Set Up S2S Postback with an Affiliate Network?
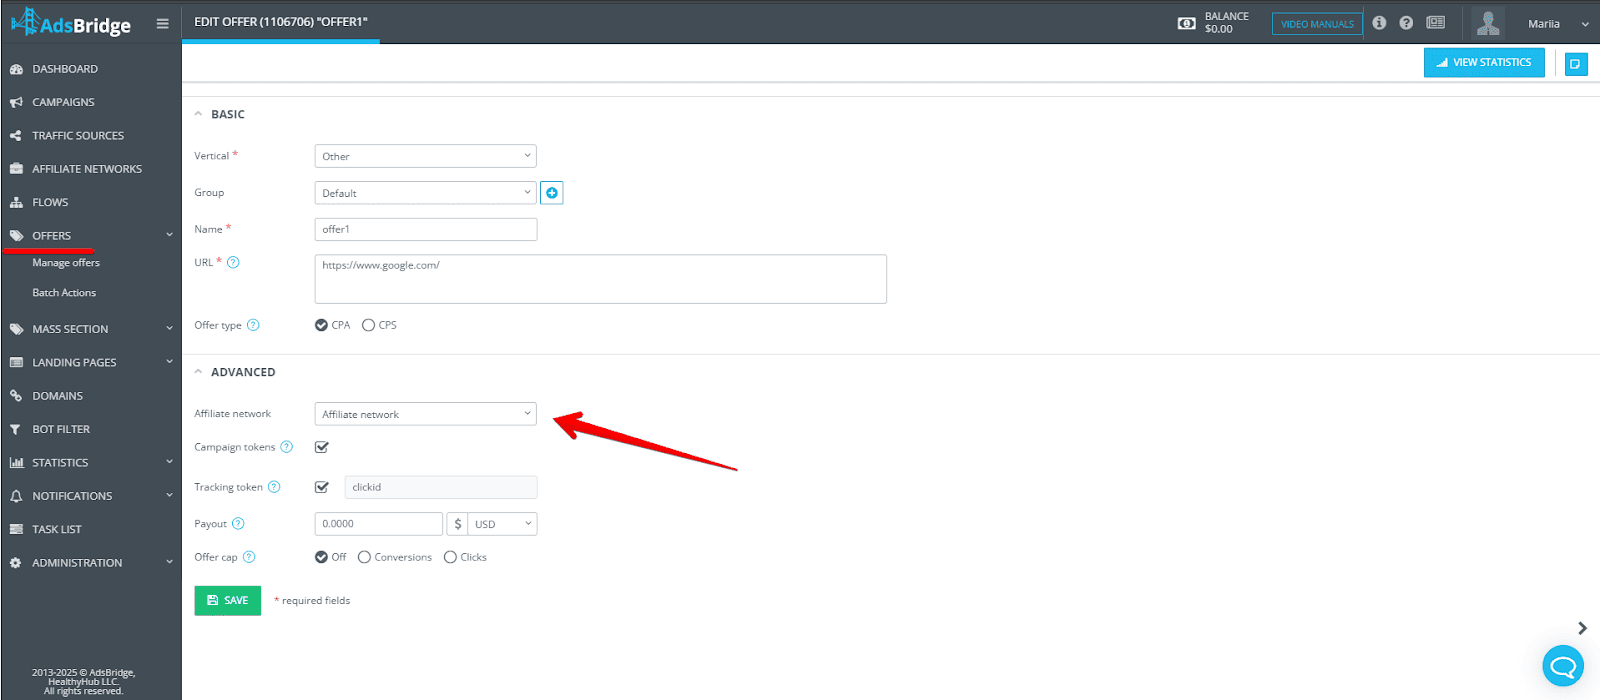
3. Add an affiliate network offer
In the “Offers” section, add a new offer and select an affiliate network from the ones previously added in the “Affiliate networks” section.
4. Create a campaign
Step 1: Select your traffic source.
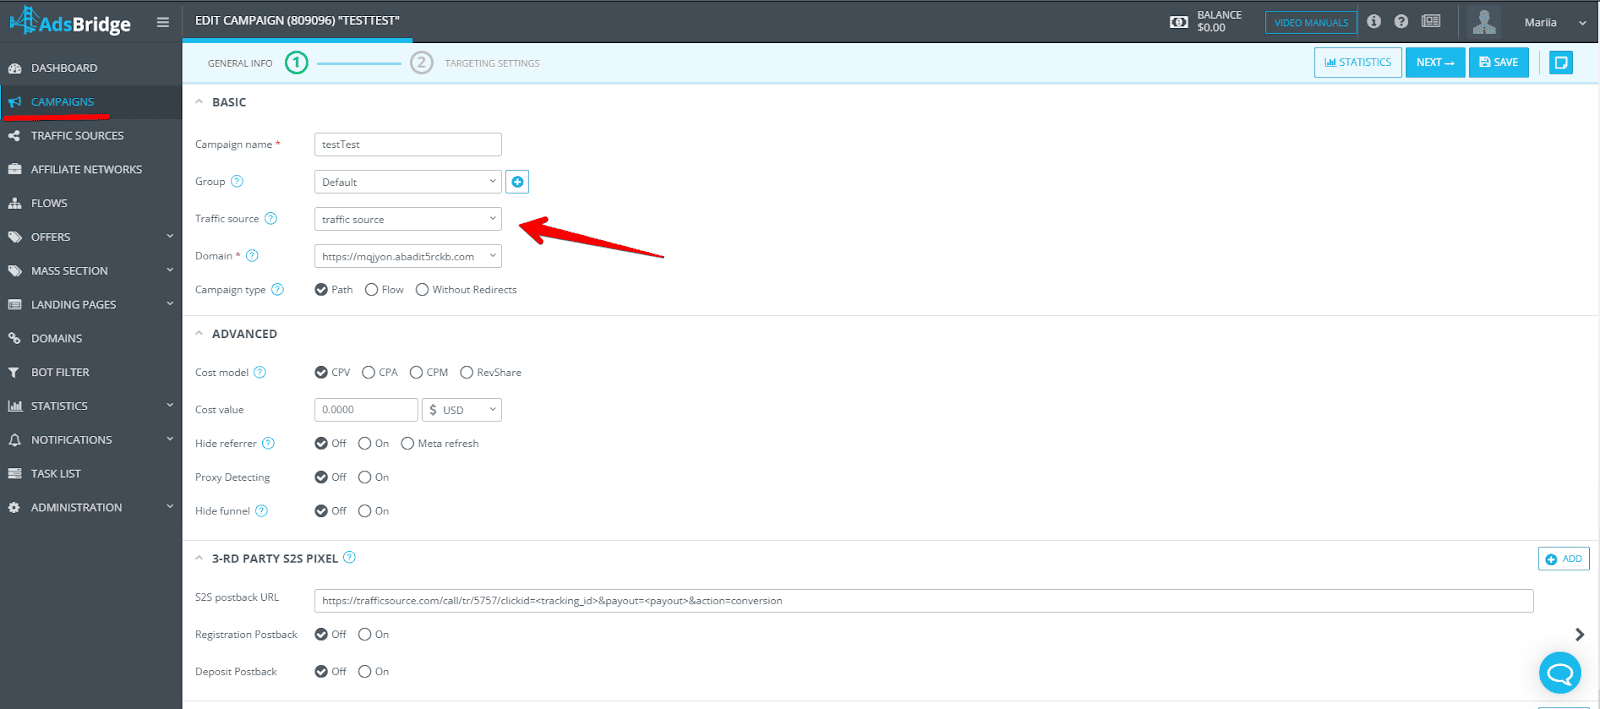
Step 2: Add your offer.
By default, the “Campaign tokens” checkbox is enabled in the offer settings.
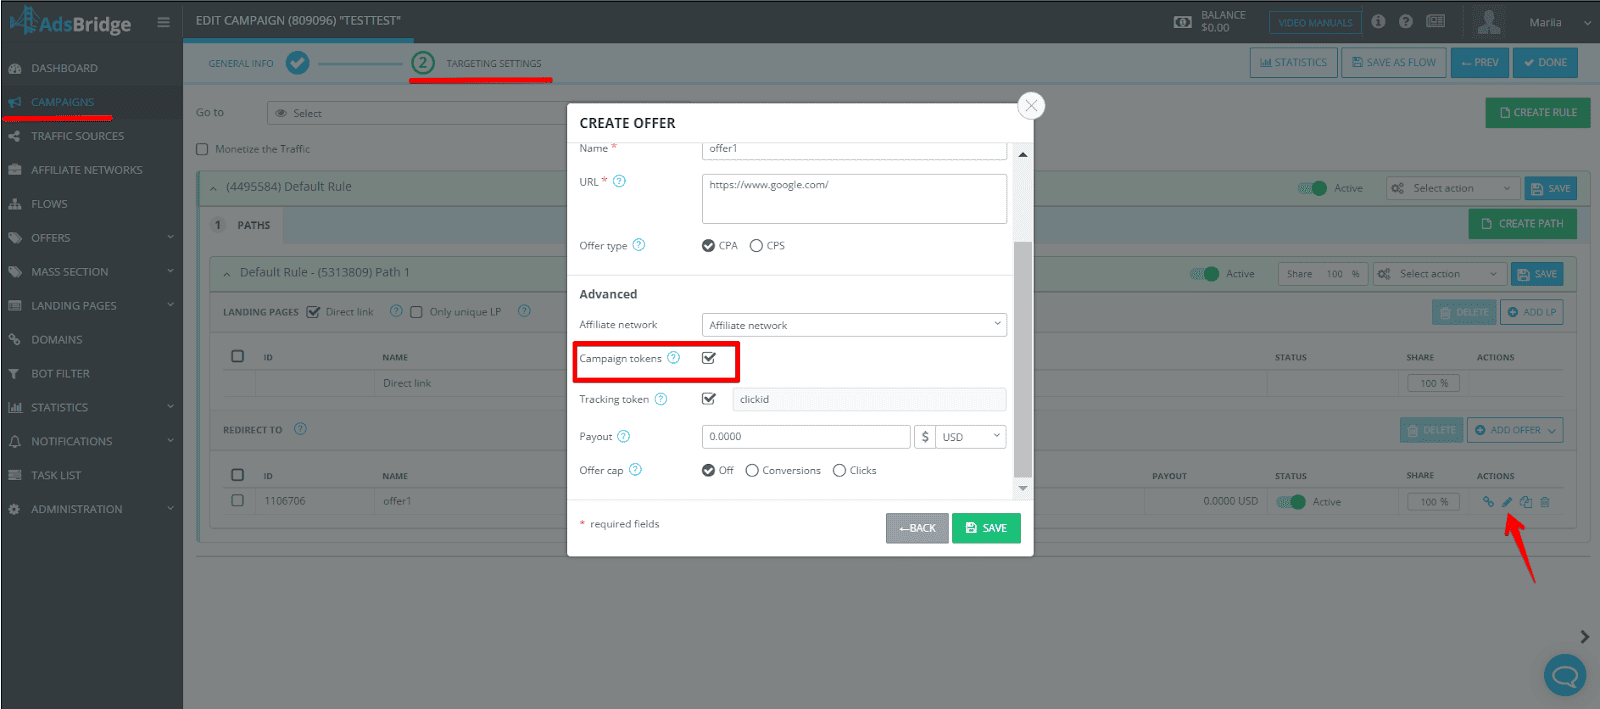
This option ensures the transmission of additional traffic information to the affiliate network. When the “Campaign tokens” option is enabled, all tokens added in the traffic source settings will be automatically included in the offer URL and sent to the affiliate network.
If you need to selectively transmit campaign tokens from the traffic source to the affiliate network, disable the “Campaign tokens” checkbox and manually add the necessary parameters to the offer URL.
For example, if you only need to pass Creative ID, which you previously assigned to Token 2:
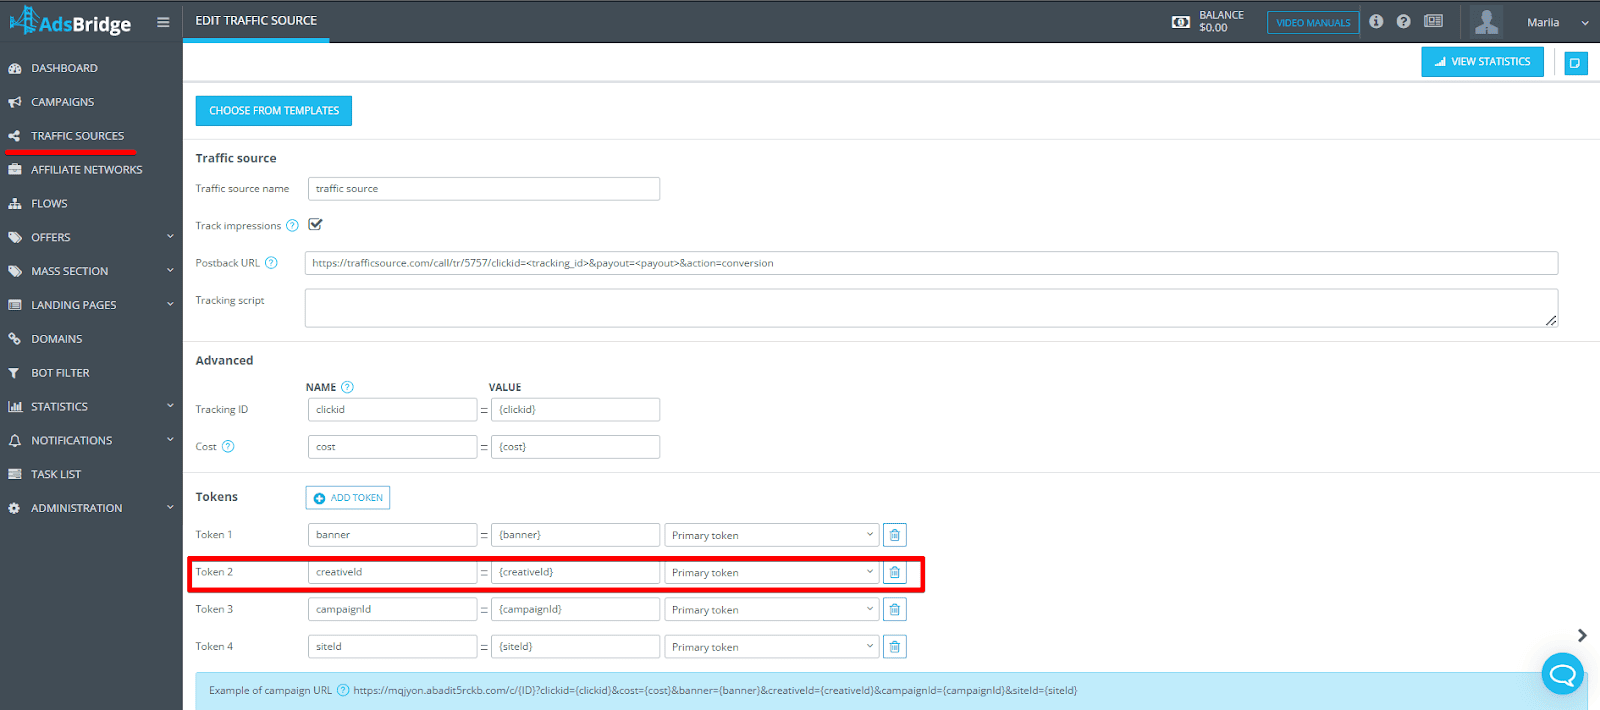
In the offer URL, specify the parameter that the affiliate network uses to receive Creative ID (e.g., s1).
Then, select the corresponding tracker macros from the list: <token2>.
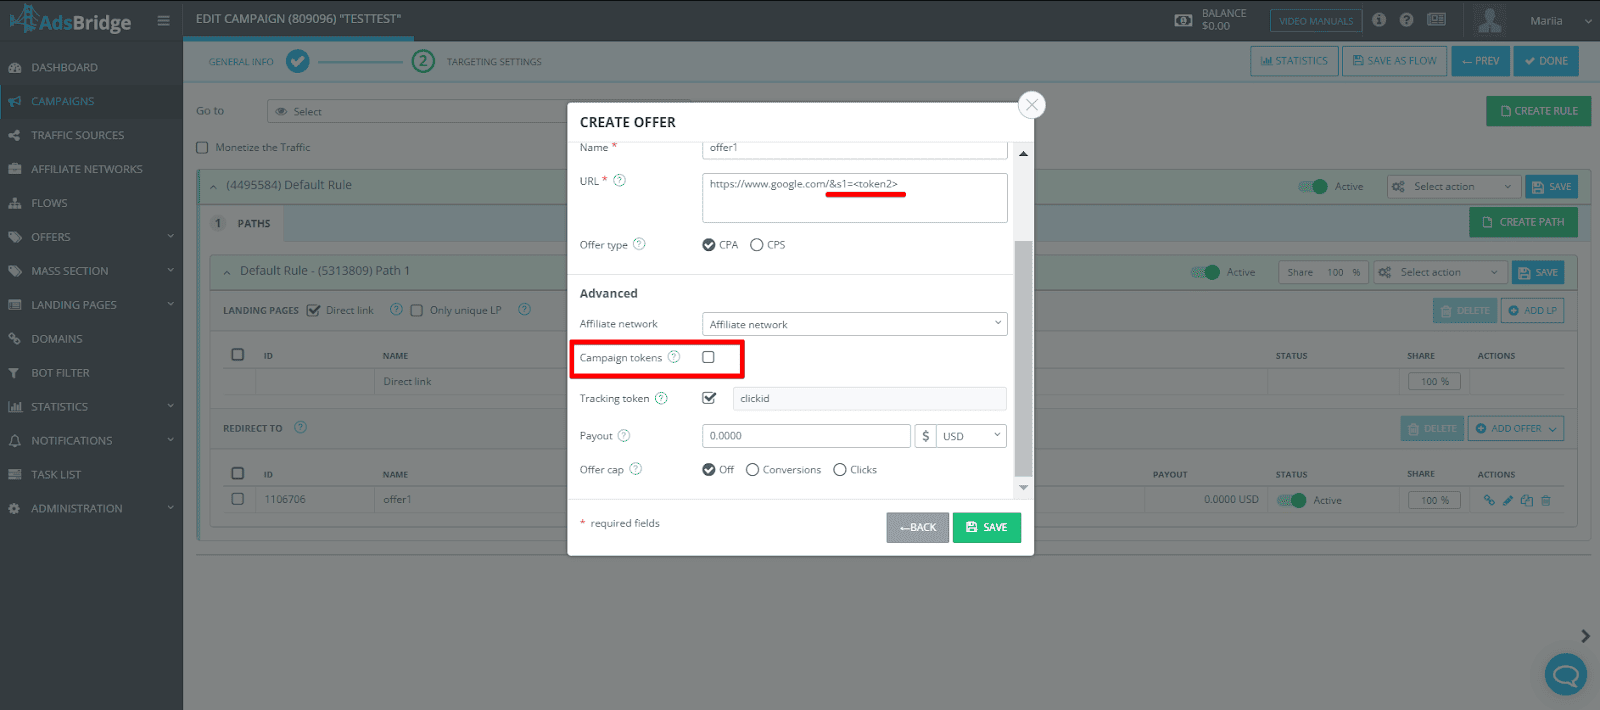
This way, you can transmit only the required traffic information from your source to the affiliate network.
Tracking
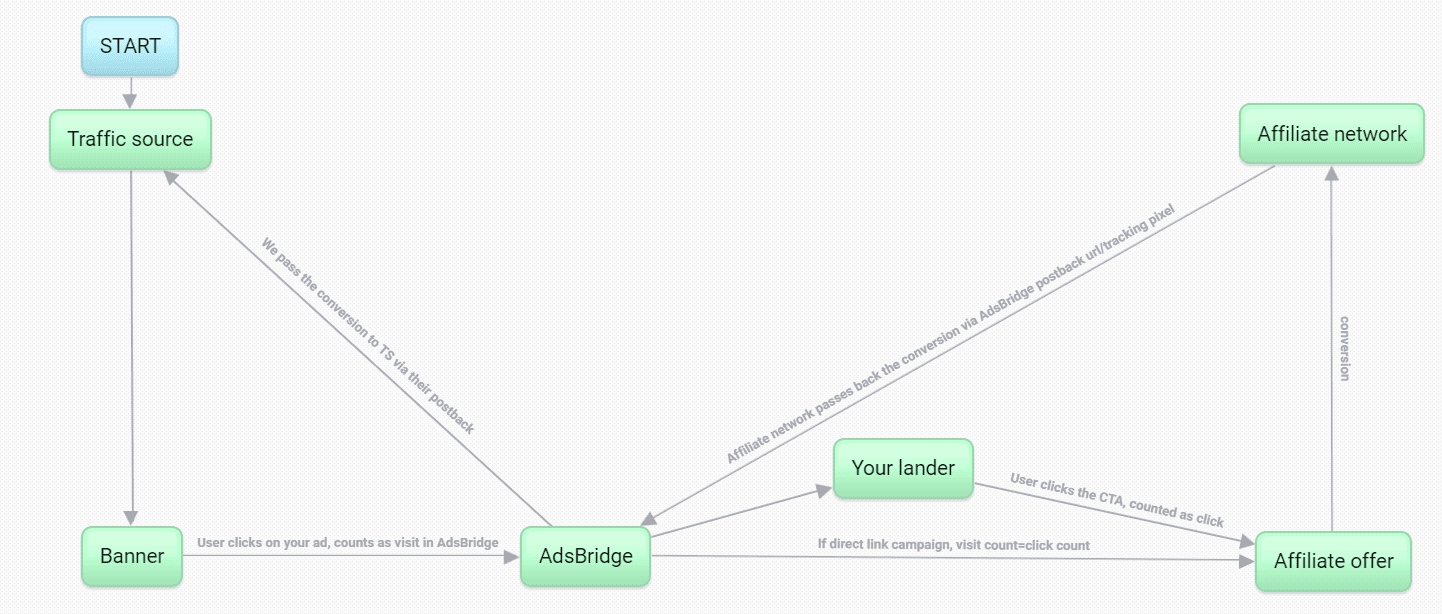
The overall scheme of tracking between a traffic source, AdsBridge and affiliate network.
The overall scheme looks like this
Traffic Source -> Tracker -> Affiliate Network’s Offer
- A user visits a site with your advertisement, clicks on it, and is redirected through your ad campaign’s link. This will be counted as a ‘visit’ in our tracker.
- If you use a landing page, then the user will be redirected to it. Upon clicking the CTA button located on your landing page, the user will be sent to your offer, and it will be counted in our tracker as a ‘click’. If a landing page is not used, upon click the user will be redirected to an offer. In this case, the amount of ‘visits’ and ‘clicks’ will be the same.
- A user arrives to your offer and is now a possible ‘conversion’.
- Properly set post-back, which has already been placed in the affiliate network, sends us the information about the conversion, and we record it in the statistics.
- If desired, you can place traffic sources’ post-back into our tracker’s interface, and therefore allowing for information relating to conversions to be directed to the traffic source.
Tracking Without Redirects
We know that users are constantly faced with bans from AdWords, Facebook, myTarget, etc because of several redirects from one traffic source. We already solved this issue and now you can set up campaigns and work with traffic sources that aren’t allowed to apply redirects in your ad campaigns.
AdsBridge applied the easiest way to set up organic traffic tracking which will help to:
- avoid redirects,
- apply direct access to the landing page
- set up every step easily
- see the result in real-time statistics
- rise CTR and number of ads conversions
- spread incoming traffic in the tracker
- share required info via tokens
- and much much more
Moreover. Organic traffic tracking is available for users with self-hosted landing pages
Let’s go over settings:
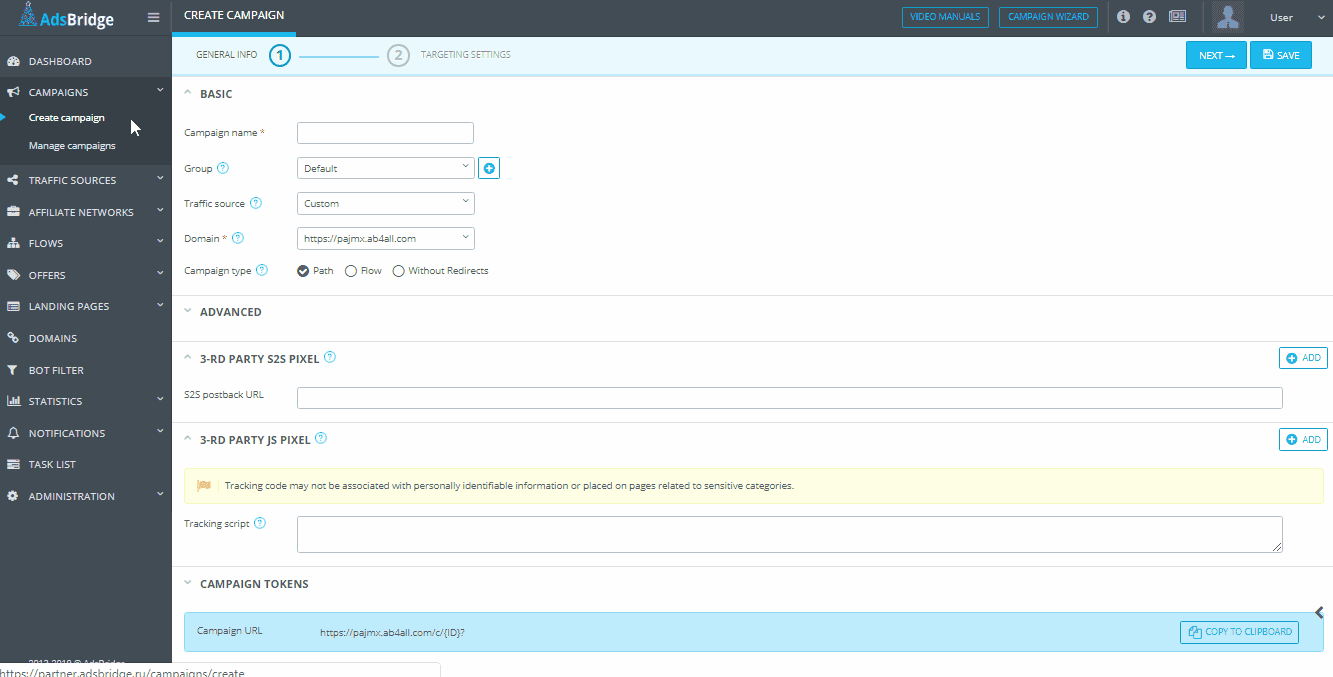
In the Section “Create campaign” on the first step, it is necessary to fill out the following fields:
1. Campaign name
2. Select a traffic source you have previously configured and added to the Traffic Sources section. Read more about setting up
3. Domain. For the campaign to work correctly, you need to add a subdomain to AdsBridge with domains like your site (the subdomain may be different) and select it in the campaign settings. The system domain is not suitable for this type of setup. Read more here.
4. Select “Without redirect” campaign type. Enter the basic settings and add in the “URL of the landing page” – the address of your landing page.
In case you need additional info about spends, then please choose required cost model and write required cost value (this setting isn’t optional).
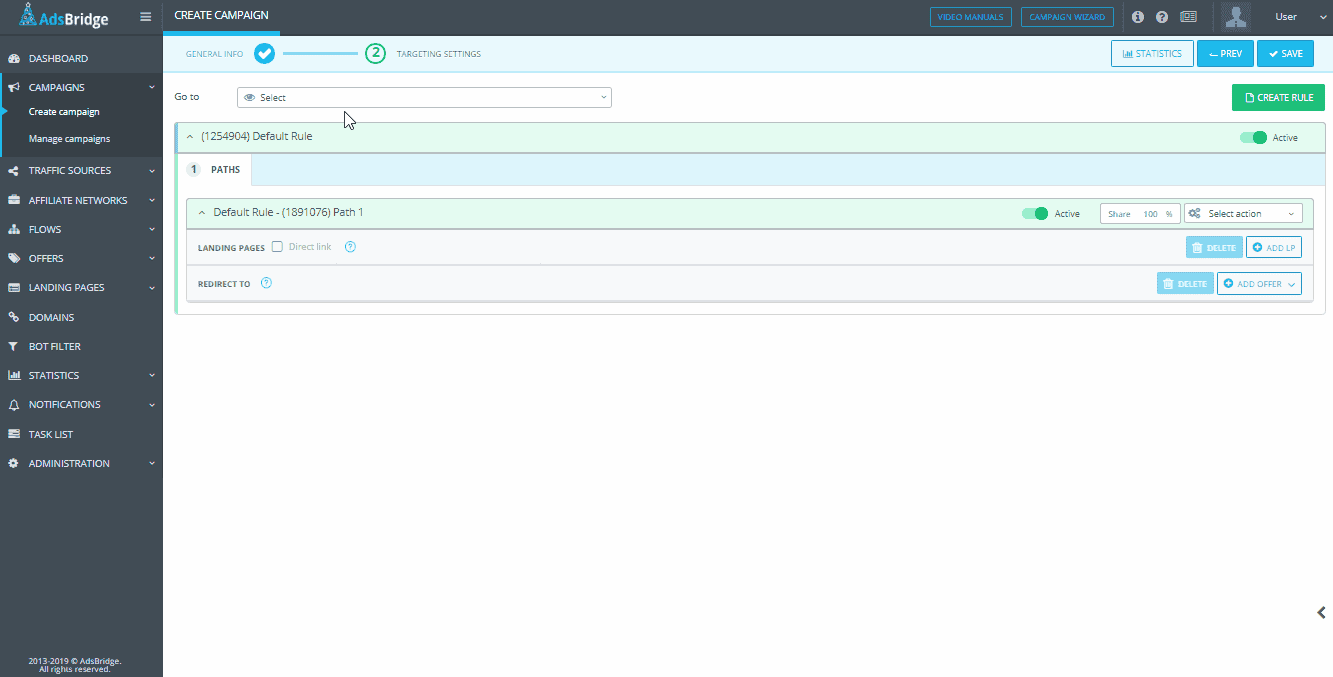
5. Go to the 2nd step of campaign creation.
- add your landing page
- add required offers.
Please note! It is not necessary to add your landing page as a landing page, you can create an empty page in our Page Editor, which will be the starting point for recording statistics on visits and clicks. When clicking on the campaign link, this page will not be displayed, instead, it will be the Landing page specified in the “URL of the landing page” field, set up earlier (see point 3)
Section Landing Page – Create – Start with blank page
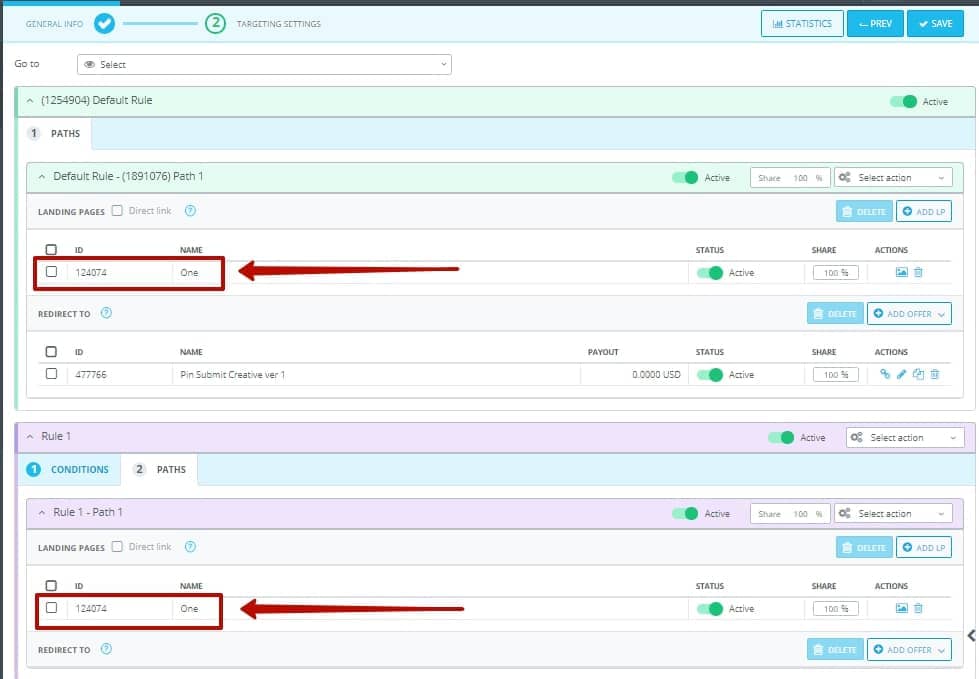
You may set up split testing between offers. In order to apply split testing you need add several offers to the distribution rule and spread the percentage among it.
In the distribution rule settings you may add extra rule and set up additional conditions and distribution path.
Note! Campaign type ‘Without Redirects” you may apply only for one landing page. That’s why if you use several distribution rules with different conditions, it should be related only for one landing page mentioned on the first step.
And the last steps before the finishing setting up process:
After you’ve saved the setting there will be a popup window with optional scripts to use. Let’s move over each line:
- Script to apply tracking without redirect – copy this script and past to the HTML-source code of your self-hosted landing page between
<body></body>. - Click URL – add this link to the CTA button on your landing page that leads to the offer. This link provides a transition to the specified offer in the extension and the calculation of jumps (clicks) on this button from the landing on the offer. !Link offer on the button does not need to prescribe!
- URL landing page – this is the final landing page URL. You need to copy this link and paste it to your traffic source.
- Multi-offer click URL – a link for multiple CTA – buttons placed on your landing page. Each button is assigned an ordinal number at the end of the link.
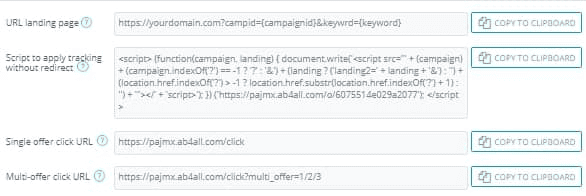
Please note! Placement of all scripts is a prerequisite for customization. Skipping this step, you will not be able to see detailed information on conversions.
To track conversions in this case you will need to use the AdsBridge pixel.
For correct work, the pixel has to be placed on the Thank you page after your offer.
Please note! The domain of the pixel and your campaign domain should coincide.
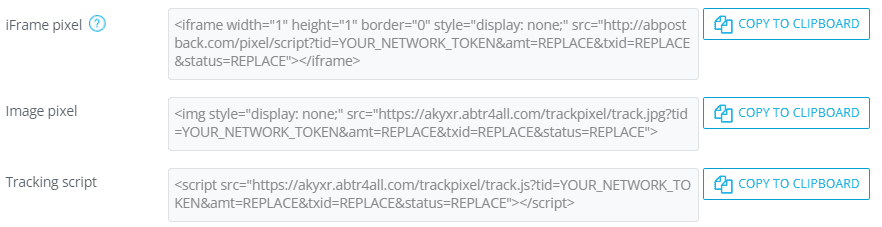
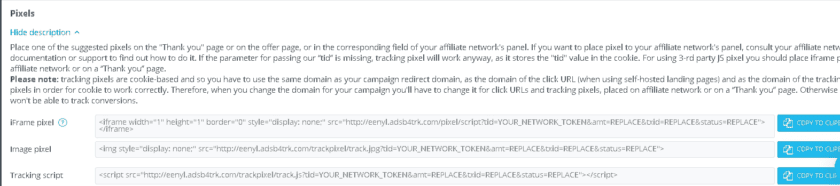
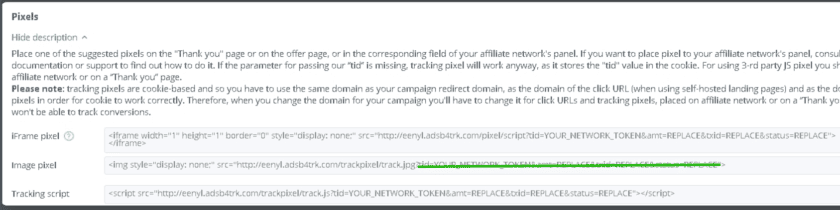
AdsBridge offers 3 different pixels – Image, Iframe and Tracking script. In most cases you can use any of the listed ones (but when working with Facebook and sending back information back, use the Iframe type at the side of the offer)
In case you use a pixel, information about click id (tid) is taken from cookies, therefore unused parameters can be removed from the pixel accordingly. For example, Image pixel <img style="display: none;" src="https://your.domain.com/trackpixel/track.jpg?tid=YOUR_NETWORK_TOKEN&amt=REPLACE&txid=REPLACE&status=REPLACE">
All data from your landing page will be passed to the AdsBridge tracker. Real-time detailed statistics data you will be able to check-in “Statistics” menu. There you will be able to analyze, compare and optimize your traffic sources, campaigns and offers.
Use all possible opportunities from AdsBridge tracker.
Track and optimize your traffic wisely!
What parameters can I use for passing values in S2S postback URL to the traffic source?
In order to pass parameters in the S2S postback URL of a traffic source, you can use such macros:
<payout> – payout value for a conversion;
<tid> – value of tracker’s Click ID;
<txid> – value of transaction ID;
<tracking_id> – parameter that is used to transmit the Click ID of a traffic source to the side of the mentioned traffic source through a postback;
<cost> – cost value;
<campaign_id> – campaign ID in the AdsBridge system;
<trafficsource_id> – traffic source ID in the AdsBridge system;
<trafficsource_name> – name of a traffic source in the AdsBridge system;
<lp_id> – landing page ID in the AdsBridge system;
<offer_id> – offer ID in the AdsBridge system;
<country> – country;
<language> – language of a browser;
<city> – city;
<traffic_type> – type of traffic (desktop, tablet, mobile, other);
<connection_type> – type of connection (wired, wi-fi, mobile, other);
<device> – device from which the conversion was made;
<manufacturer> – device manufacturer;
<model> – device model;
<browser> – browser;
<browserversion> – browser version;
<os> – operating system;
<osversion> – version of an operating system;
<isp> – Internet provider;
<carrier> – mobile network operator (for mobile traffic only);
<useragent> – user agent;
<ip> – IP address of a user;
<referrer_domain> – referrer domain;
<current_date> – today’s date;
<day_of_week> – the actual day of week;
<timestamp> – current time;
<token1>…<token6> – values that are transmitted through the primary campaign tokens;
<cdata>…<cdataN> – values that are transmitted from the side of affiliate network by means of CDATA parameters of the AdsBridge postback.
Conversions do not track when using pixels. What to do?
First of all make sure that the domain of your pixel is the same as redirect domain of your campaign link. After that please send us your campaign URL and pixel that you placed on the “Thank you” page. We will assist you.
Do you track only unique events or all events?
We track all events. The division by uniqueness in the statistics is possible on each subscription plan.
Conversions are added successfully, but I can’t see them in statistics.
The manually uploaded conversions appear in the statistics on the same day you add them. Please check the statistics for the date of uploading these conversions.
Where can I get macroses for a postback?
Please contact a representative manager of your affiliate network. They should provide you with this information.
When will conversions appear in statistics?
Conversions appear in statistics right after an affiliate network fires a postback, in real time. Sometimes there may be delays (up to 30 sec). Otherwise, please contact our customer support.
How to set up tracking of costs?
The costs by the campaign are set in the “Create a traffic source” section (for passing dynamic costs) and on the first step of campaign creation. In the “Create a traffic source” section, the Token of campaign costs is used for passing the dynamic value of costs from your traffic source. In the campaign settings, you can specify the static value or if the dynamic value will be different from the pre-set static one, the dynamic value will be selected for counting statistics as more actual at the moment. This option is available for CPV, CPM models (if the CPM model is used, you must pass the cost of 1000 displays in the link, because this value will be divided by 1000 and assigned to each display).
Can I manually upload conversions with txid?
Yes. You can do this in the “Download conversions” section. Enter the click ID in the following format, separated by commas without spaces: clickID, payout, txid, status
Do you have status in S2S postback setting? How to receive conversions with the ‘accepted’ status?
You can find detailed information about statuses here: https://www.adsbridge.com/s2s-postback/
How to track clicks?
Clicks are the pass from a landing page to offer. It is enough to properly set a landing page for this pass to be possible, and clicks will appear in statistics. If you don’t use a landing page, then the number of clicks will be equal to the number of visits.
What is the difference between Tracking pixels and S2S postback URL?
S2S (Server-to-server) postback URL works on the principle of passing information about the conversion between the server of an affiliate network and the tracker through this link, i.e. GET method. Pixels on the other hand, even though they include the URL, pass information through the cookie of a user’s browser. S2S is the more precise and reliable method of tracking conversions, however, there is not always an opportunity to use it. For other cases, the pixels will work.
Can I add conversions that are missing in statistics?
Yes. You can do that in the “Upload conversions” section:
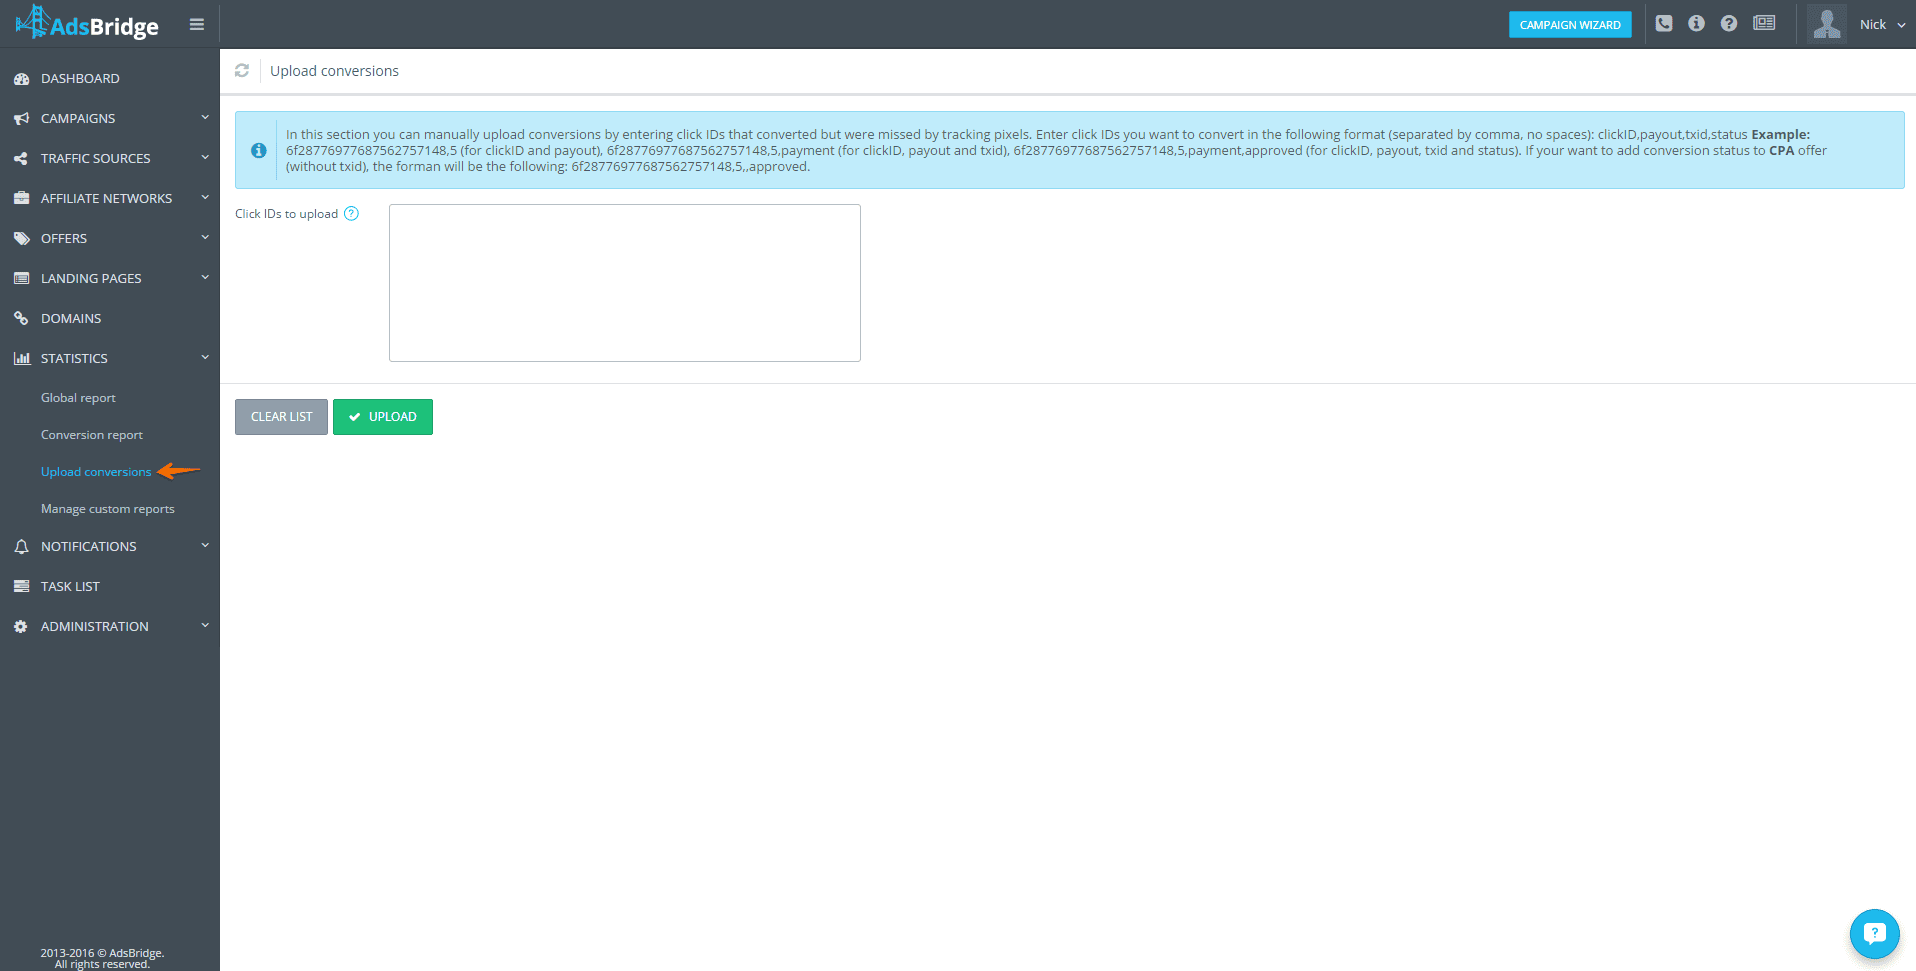
Simply follow the instructions. Please note that conversions will be recorded on the date of their adding, and not the date when they were made (e.g. the date of conversions on the affiliate network and AdsBridge will be different).
Can there be several conversions by one and the same tid?
Yes. For this, you need to set an offer as CPS and add the set txid parameter to the postback on the affiliate network. The unique combination of tid+txid will bring you several conversions from one click ID. As for CPA offers, there can’t be several conversions by one and the same tid (it is possible only if you use conversion status, but in this case, only 1 of these conversions will be approved and recorded in your income).
How does tracker work by means of pixels?
When a user lands on the offer URL, the tracker places a cookie file in the user’s browser with a unique click ID of a tracker in it. By making a conversion, a user must get on the “Thank you” page on which it is necessary to place a pixel. After landing on this page, the pixel pulls up a unique click ID from the user’s cookie and brings it back to the tracker. For an accurate tracking, the domain of a URL in the pixel should match the domain of a campaign URL, because the cookie is placed exactly on a domain.
What is anti-fraud in AdsBridge?
Anti-fraud in AdsBridge protects your campaigns from bots and low-quality traffic by using click filtering, geo-targeting, and in-depth traffic analysis.
How does it work?
The system automatically filters suspicious clicks using algorithms to analyze traffic sources and user behavior.
Why is it important?
Anti-fraud helps reduce losses from fake traffic, improving conversions and boosting the efficiency of your campaigns.
You can read more here: https://www.adsbridge.com/anti-fraud-detection-traffic-quality-control/
How to track Impressions?
You can track impressions only for banner ads and if your traffic source can place an impression pixel on their side (check with your traffic source manager).
If you fit these two conditions, follow these steps to track impressions:
1. When you create a traffic source you need to activate the “Track Impressions” checkbox.
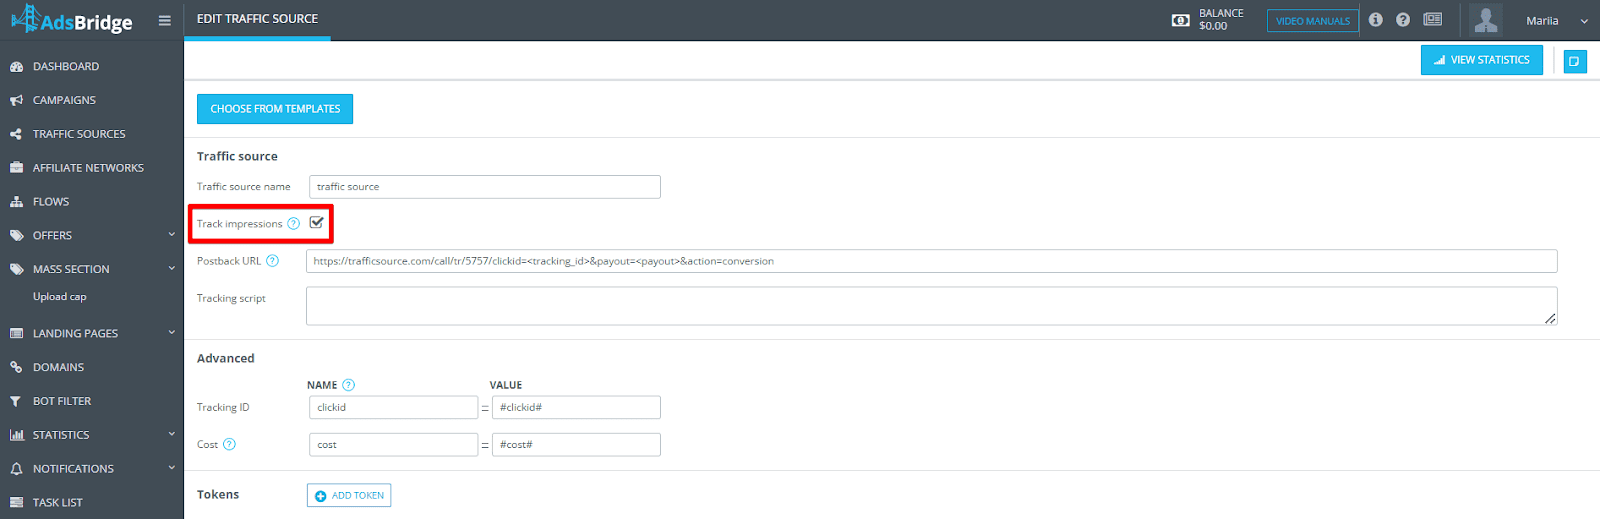
2. Then, when setting up a campaign, choose the CPM model — this will display the impression pixel URL.
3. Place the impression pixel on the traffic source’s side.
If placing an impression tracking pixel is not possible, you can only track visits, clicks, and conversions (without impressions).
Tracking conversions without postback – using tracking pixel
If you have your site, but there is no possibility to work with postback – to the rescue comes tracking pixel, with which you can track conversions!
1. Add your site’s link in the Offers section – Create an offer. In this case, you do not need to create an affiliate network.
2. Add the traffic source or select it from the templates.
3. Create a campaign and add your offer with the link of your site to it
More details about creating a campaign https://www.adsbridge.com/guide/create-campaign/.
The result of the campaign creation will be a tracking link, which should be placed on the traffic source.
4. For conversion tracking in this case, you will need to use AdsBridge pixel.
This pixel should be placed on the Thank You page of your website or any other page that comes after a conversion is made
You can find the pixel in the top right menu under Tracking Pixels.
AdsBridge offers 3 different pixels – Image, Iframe and Tracking script. In most cases you can use any of these (When working with Facebook and passing information using the pixel, use the Iframe type).
! Note that the pixel domain and your campaign domain must match. !
So, if you have added your domain to the campaign, replace the system domain in the pixel with your custom domain.
For example, replace <img style=“display: none;” src=“http://eenyl.adsb4trk.com/trackpixel/track.jpg?”> on <img style=“display: none;” src=“http://my.domain.com/trackpixel/track.jpg?”>.
In the case of working with the pixel, information about the click id (tid) is taken from cookies, so unused parameterstid=YOUR_NETWORK_TOKEN&amt=REPLACE&txid=REPLACE&status=REPLACE in the pixel should be removed.
Filtering vs. Tracking in AdsBridge – Bot Filter
AdsBridge bot filter has two key modes of operation: filtering and tracking. Both approaches help to detect low-quality traffic but work in different ways.
1. Bot filtering.
- It is used to filter out low-quality traffic before it gets to the offer or landing page.
- Bots are filtered out according to specified parameters (suspicious IPs, user agents, proxy servers, etc.).
- Unwanted traffic can be redirected to another page or simply blocked.
✅ Pros:
– Budget protection – no costs for irrelevant traffic.
– More accurate statistics – only real users remain in the reports.
2. Tracking bots.
- Bots are not blocked but are marked as suspicious in analytics.
- All transitions and actions of bots are recorded in reports, which allows you to analyze the sources of problematic traffic.
- Useful for optimizing campaigns without losing potential customers.
✅ Pros:
– Complete traffic picture – you can understand where bots are coming from.
– Flexibility – you can change the settings at any time without losing traffic.
Which mode to choose?
– If you need to immediately filter out low-quality traffic and not waste your budget on it, choose filtering.
– If it is important to analyze bots to make more accurate decisions, it is better to use tracking.
💡 Recommendation: you can first enable tracking to analyze traffic and then switch to filtering for more efficient work.
Statistics
Why can’t I see my conversions in the tracker?
This situation may be affected by several reasons:
- First and the main one, you set up the postback with the affiliate network incorrectly. Double check all the parameters and macros in the postback with your AdsBridge account manager and affiliate network manager.
- If you use a landing page in your campaign, but haven’t placed a click URL on the CTA button of your landing page.
- You might be using an incorrect URL at your traffic source. This is a rare case but sometimes it happens.
- You set up an approved status of postback.
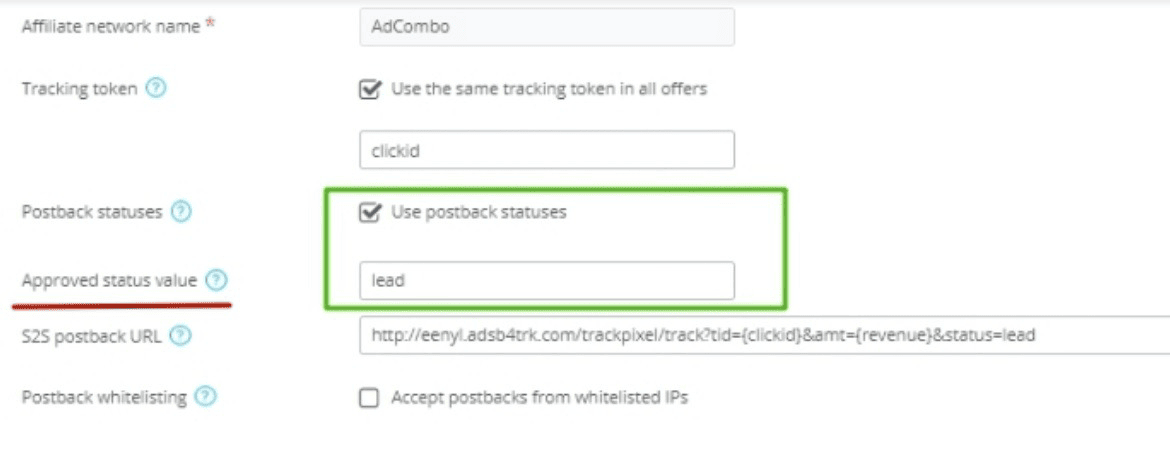
If you made such settings, in the General report you will see conversions only with the approved status. Conversions with all statuses will be displayed in the Conversion report.
Therefore, if your conversions have status different from the approved one, e.g. trash or new, check them in the Conversion report.
For instance, if you set up an approved status value for an affiliate network as lead, then in the General report you will see conversions only with this status, all other conversions, including approved ones, will be displayed in the Conversion report.
In order to get conversions with all statuses in the General report, use the parameter “txid” instead of “status” in the postback to get statuses.
This parameter passes the type of transaction. So put txid={status}, i.e. indicate the macro of an affiliate network, used to pass postback statuses. Also don’t forget to uncheck the box “Use postback statuses”.
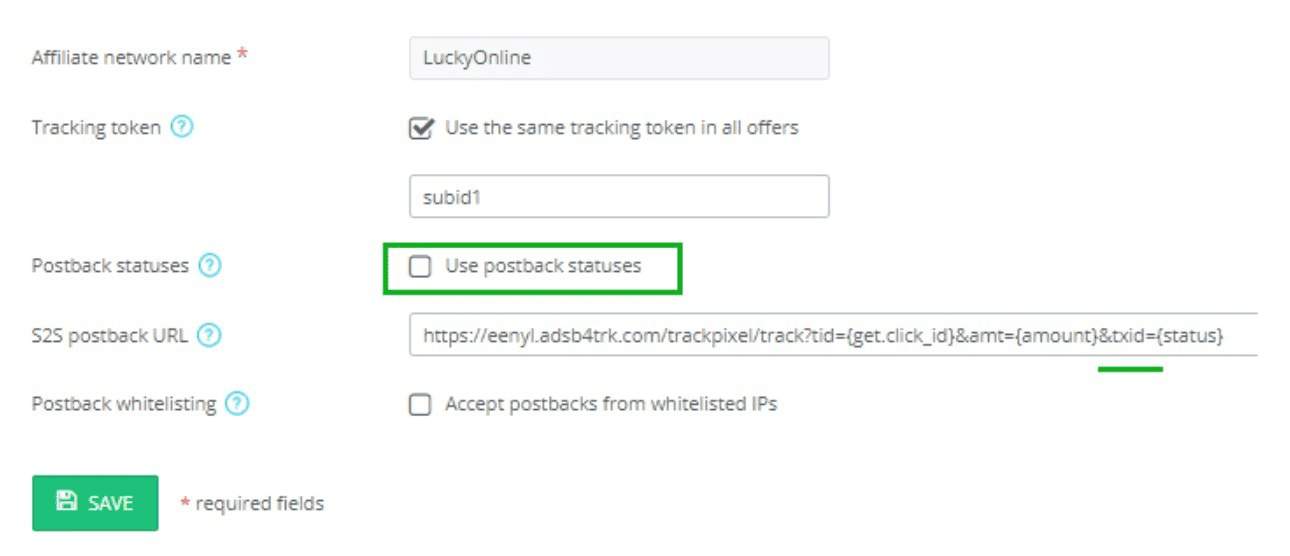
At the same time, set the type of offer as CPS on AdsBridge. This is a mandatory requirement in this case.
If you have questions about postback, you can check out the full article here.
How do you check traffic for fraud?
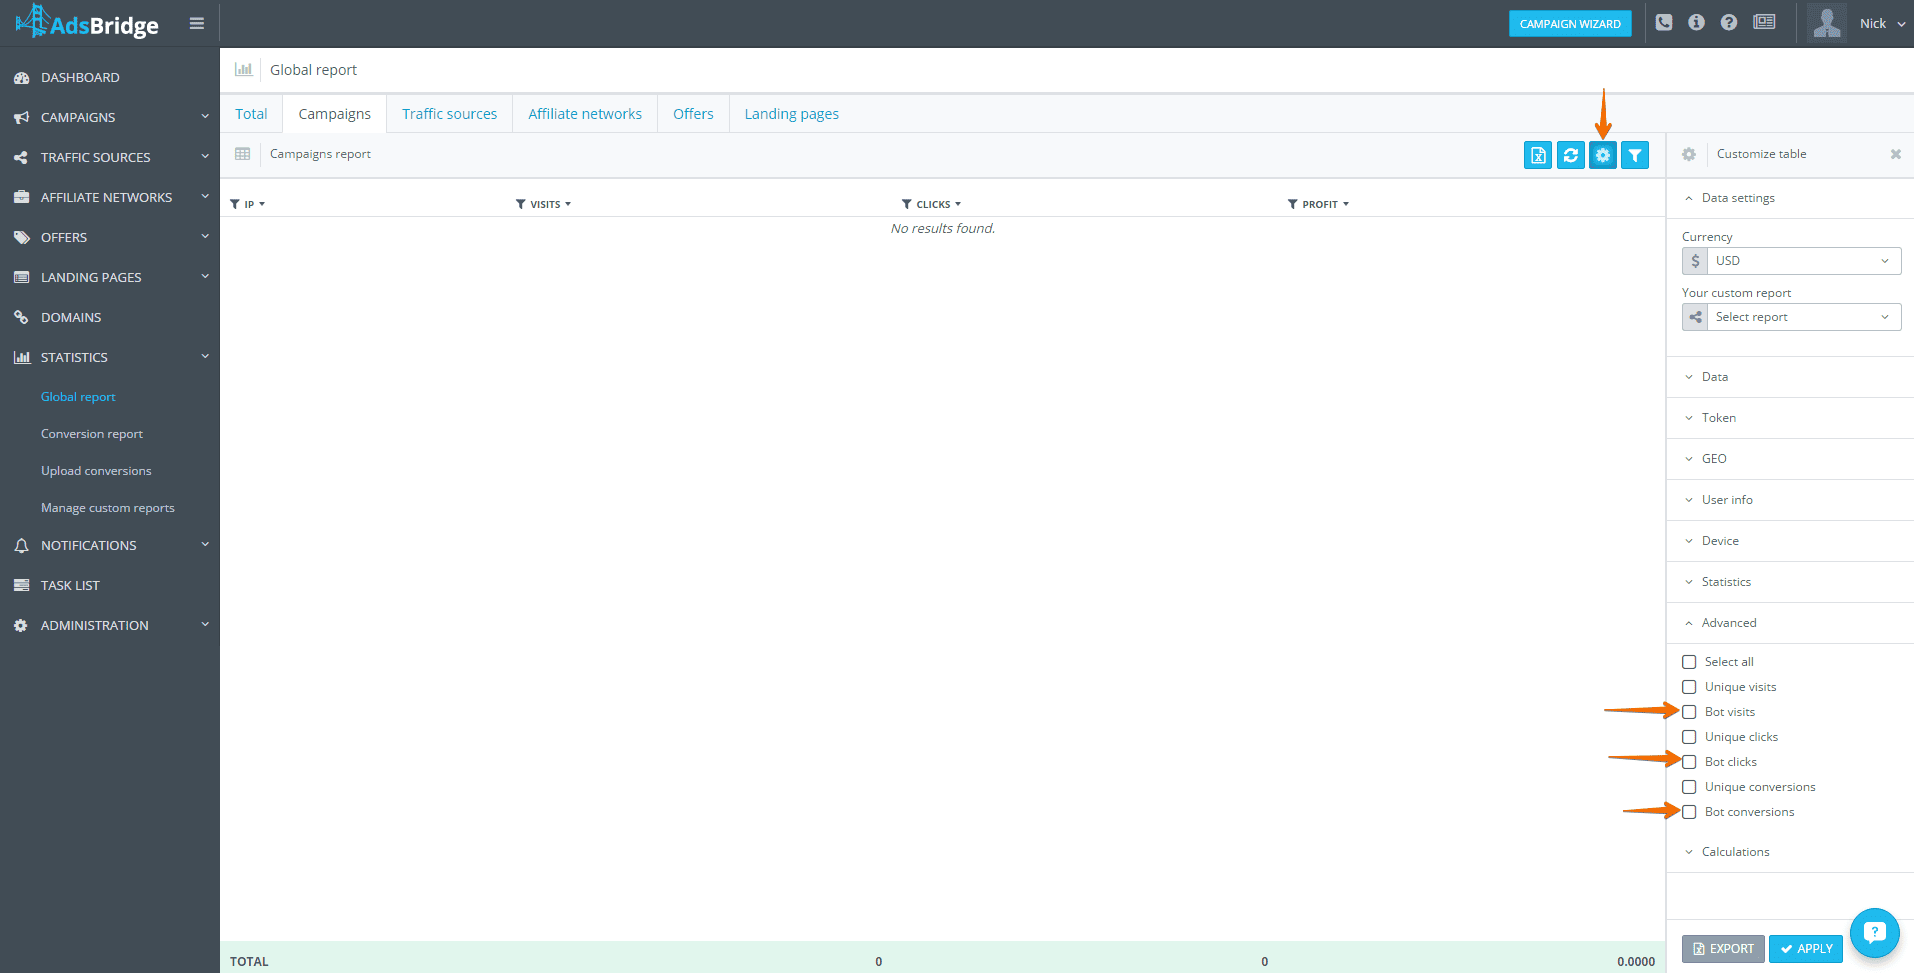
AdsBridge has its own anti-fraud guard which automatically checks all incoming traffic for fraud by 10 metrics. You can also check your traffic quality by ticking the checkboxes Suspicious visits, clicks and conversions in the General report of Statistics.
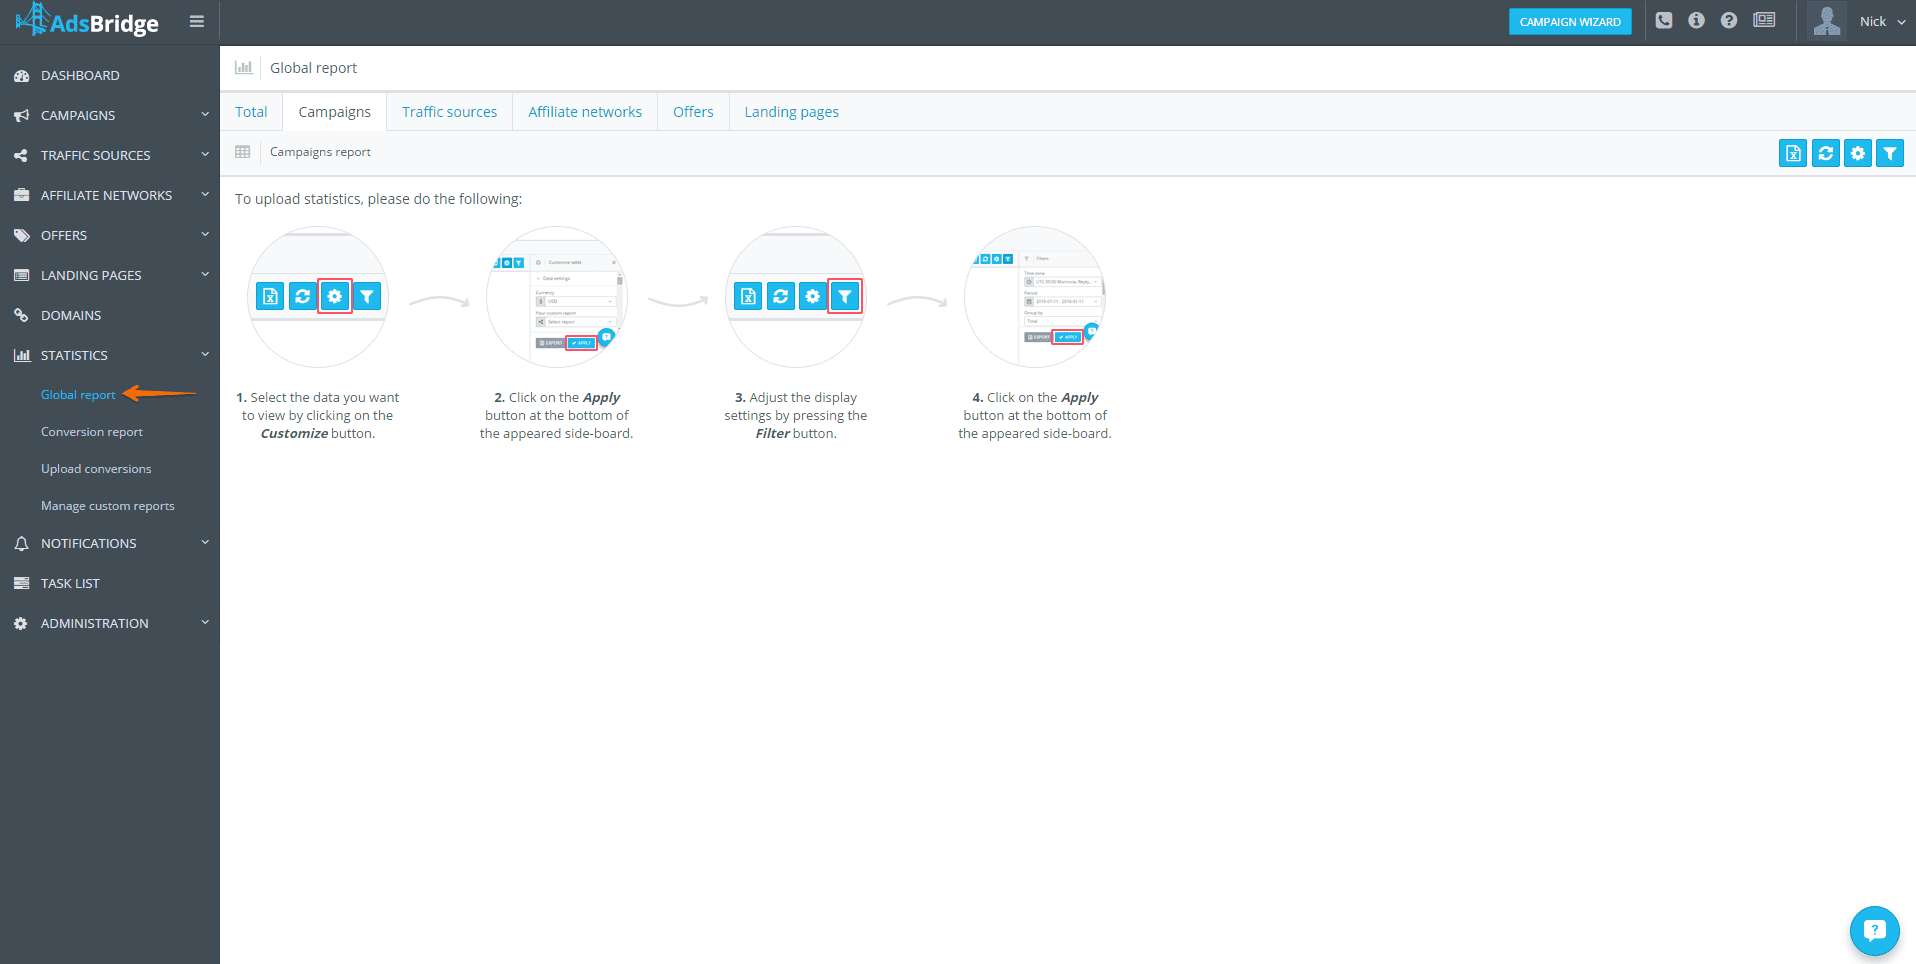
Can I view the general statistics in my account?
Yes. You can view this statistics in the “Total” section of the global report. Here, you will see the statistics by all campaigns (“Total” tab), as well as by specific campaigns, traffic sources, affiliate networks, offers and landing pages.
Do you have a Drill-down report option?
It is in process of development.
How can I group data by time periods?
There is a “Group by” drop-down list in the “Filters” subsection where you can choose how to group statistics: total, year, month, week, day, hour.
Where can I find the time of events?
Currently, you can view the exact time only for conversions in the “Conversion report” section.
Where can I view the detailed statistics of conversions? Where can I view the statistics of conversions with different transaction IDs?
In the “Conversion report” section.
How often do you update statistics?
Our statistics is updated in real time. The maximum time of statistics delay can be up to 2 minutes.
Where can I view all click ID that was passed to the affiliate network?
Currently, you can view only the converted click ID in the “Conversion report” section.
Can I reset the statistics for the campaign?
No, all statistics is permanently stored in your account and you can’t reset or delete it. However, if you don’t want to spoil the statistics of your campaigns with test clicks, you can use the functionality of a test campaign link. Using the filter in the statistics, you can choose to show or hide the bot events.
Can I download statistics for specific hours?
You can create a report with a breakdown by hours using the “Group by” drop-down list in filters of a table. Also, you can set a particular time period for the downloaded statistics.
Is it possible to remove bot traffic from the statistics?
Many traffic sources are concerned as to whether their traffic has reached the specified destination. Therefore, your campaigns must go through the process of moderation by bots before the real traffic goes on them. In order to send these bots somewhere else or determine the number of bot clicks, you can set up our bot filter. You will find it in the “Campaigns” section. There two stages of setting: general and rules. On the “General” tab you can:
- Enable or disable the filter
- Select the filter type– The filter lets you send the bot traffic elsewhere. – Tracking only determines bots and distributes them by the targeting rules of your campaign.
- Select the site for sending the bot traffic in case of the “Filtering” type. On the “Rules” tab you can set the rules for filtering. The setting is the same as for the distribution rules in a campaign. Traffic that corresponds to the set rules here will be determined as bot, and will be either filtered or simply counted in the statistics as a bot traffic according to your settings. After setting the bot filter, you enable it in the campaign settings, on the second step. In order to view these bot events in the statistics, simply mark the corresponding boxes:
On the source traffic and on your platform the country/device/os/isp are determined differently. Why so?
It all depends on the databases that the platforms use to determine these parameters. We use quite popular and advanced Digital Element, which is updated regularly.
Are there any restrictions for token 1-6?
Yes. There is a limitation on a number of characters for all six primary tokens:
I: 255
II: 255
III: 255
IV: 255
V: 255
VI: 255
Can I view the full referrer?
No. In the statistics, we show only the domain of a referrer.
Can I filter the data in the table by some specific value?
In the table, you can change filters by columns. To do this, click on the filter icon or simply press filter in the column:
How to change the time zone for the downloaded statistics?
Simply select the time zone in filters to the table:

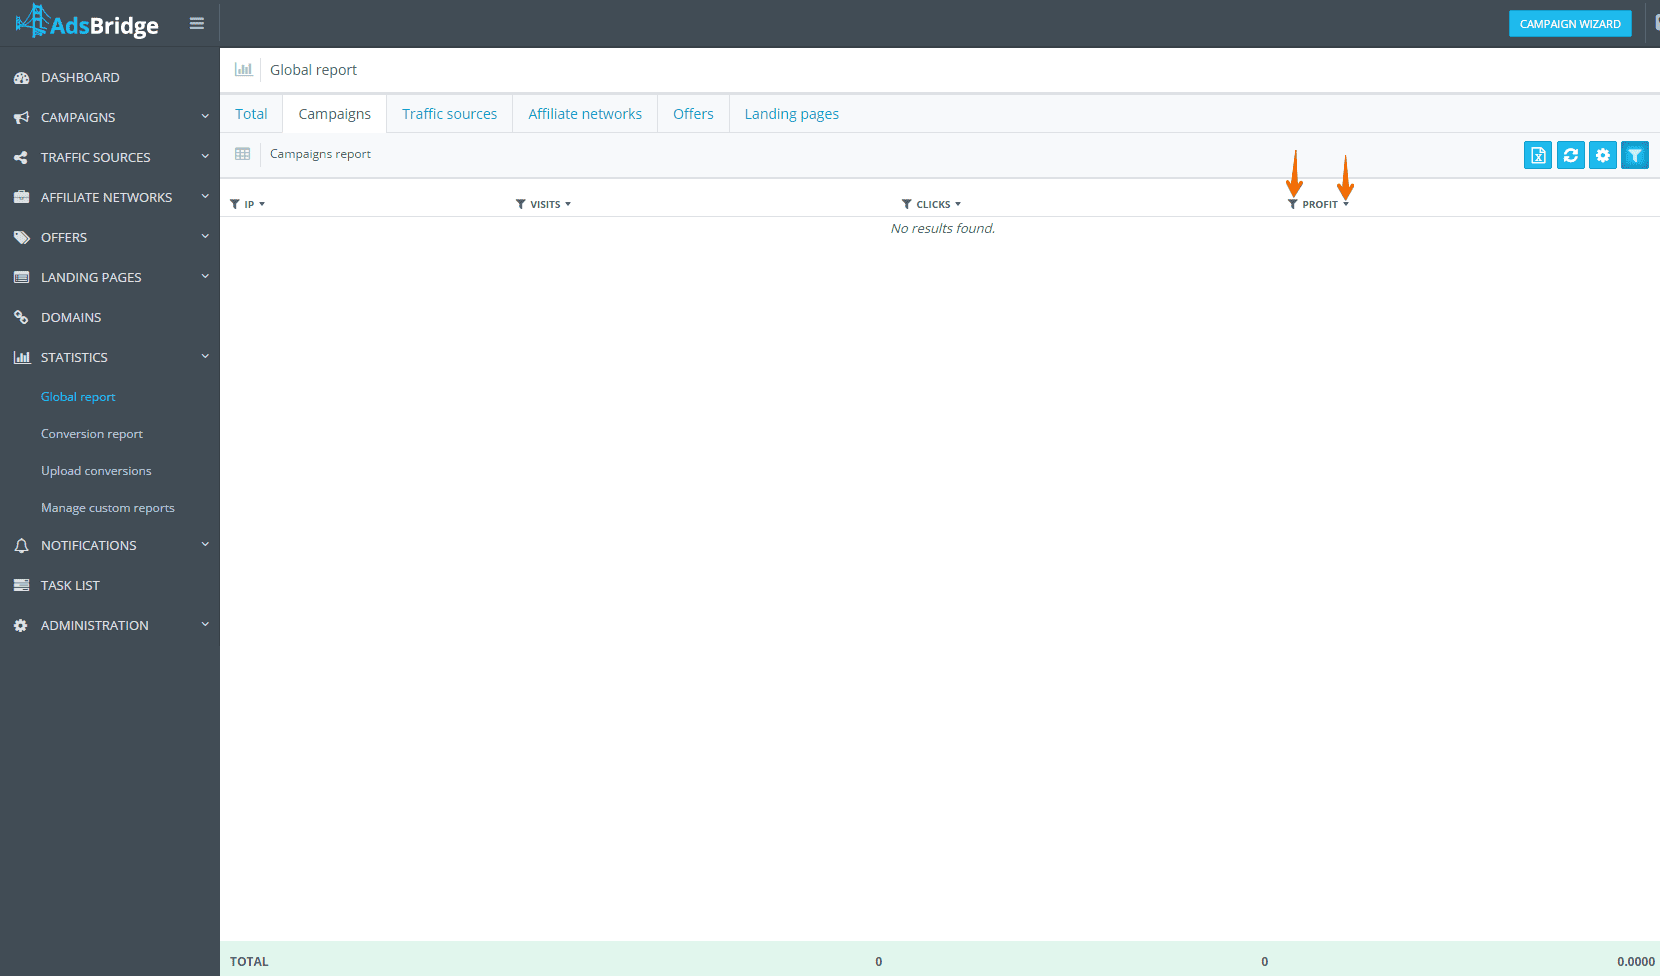
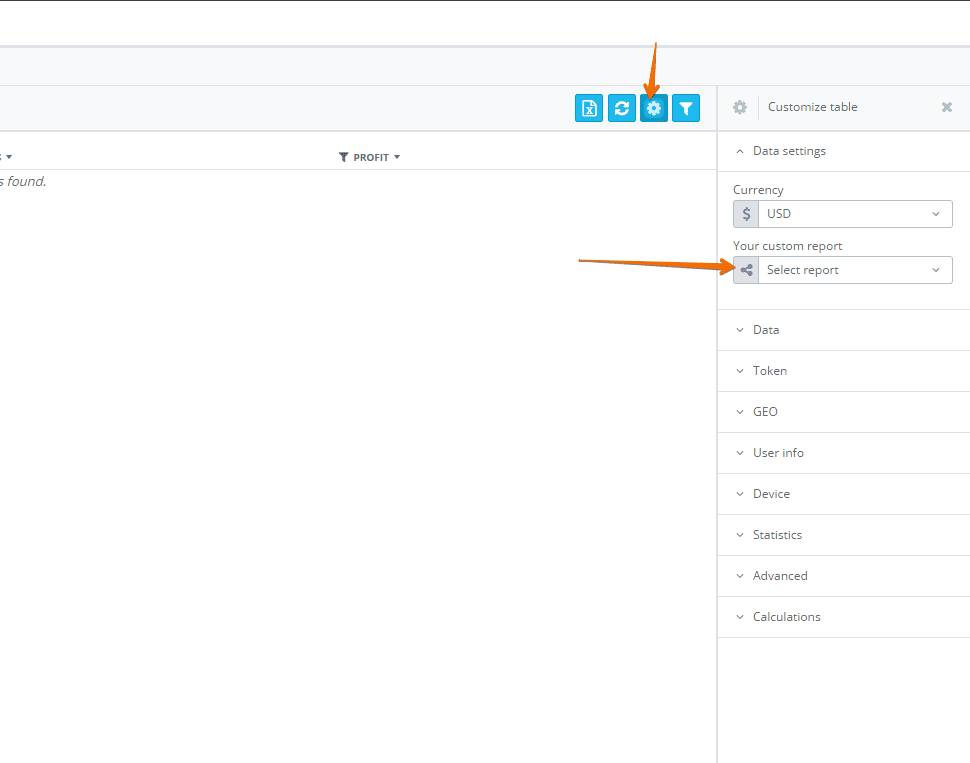
What is the “Custom report” option for? How to create my custom report?
This section significantly speeds up the process of receiving the needed reports in the statistics. Here you can create any number of pre-set reports for different occasions. In order to create a report, click on the button in the right upper corner, select the type of a report, columns from the drop-down lists, and press “Save”. To apply the report, choose it in the “Customize table”:
The pop-up saying “the data volume is too large” appeared. What does it mean and what to do in this case?
This pop-up means that the volume of a downloaded data is too large to be processed. Try to lessen the number of marked checkboxes or the period of the uploaded statistics.
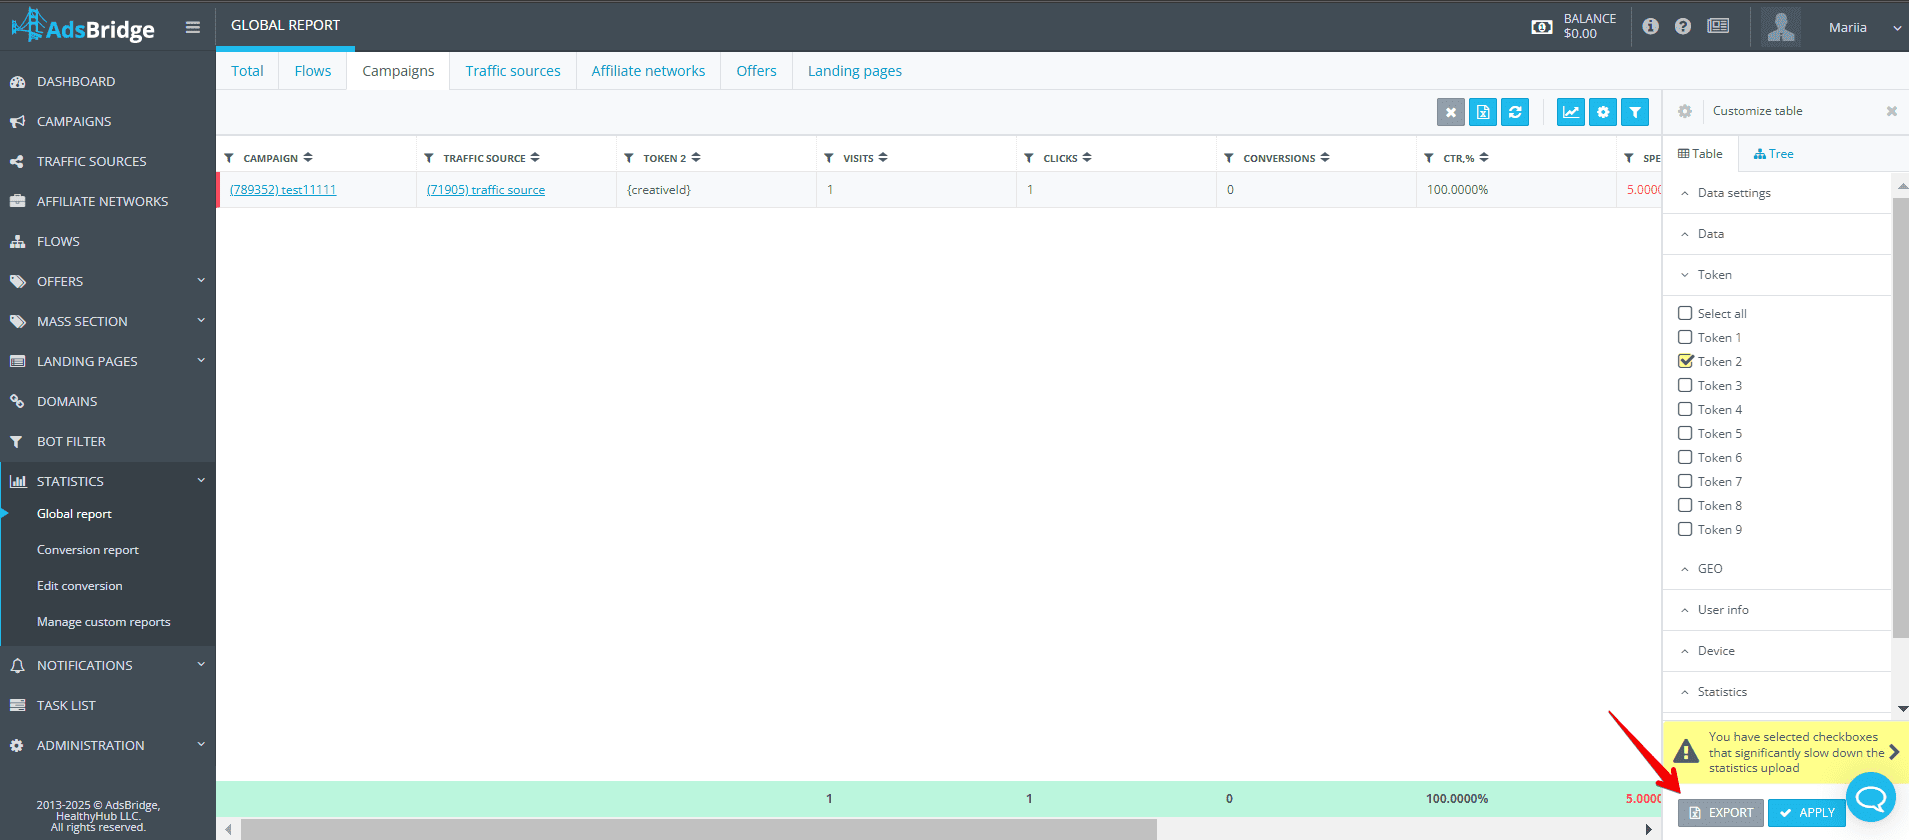
How to view the data transmitted by the traffic source via macros to the tracker?
To view the data transmitted by the traffic source via macros to the tracker, follow these steps:
1. Configuring the traffic source
Make sure that your traffic source is correctly set up in the AdsBridge tracker.
To do this, enter the necessary macros provided by your traffic source to the Token in the traffic source settings. This will allow the tracker to track data (e.g., banner, creativeId, etc.).
2. Exporting reports
To export statistics, open the “Statistics” section in the AdsBridge tracker. Here, you will find detailed traffic reports.
Use filters to sort and select the required data (e.g., by traffic source or a specific campaign).
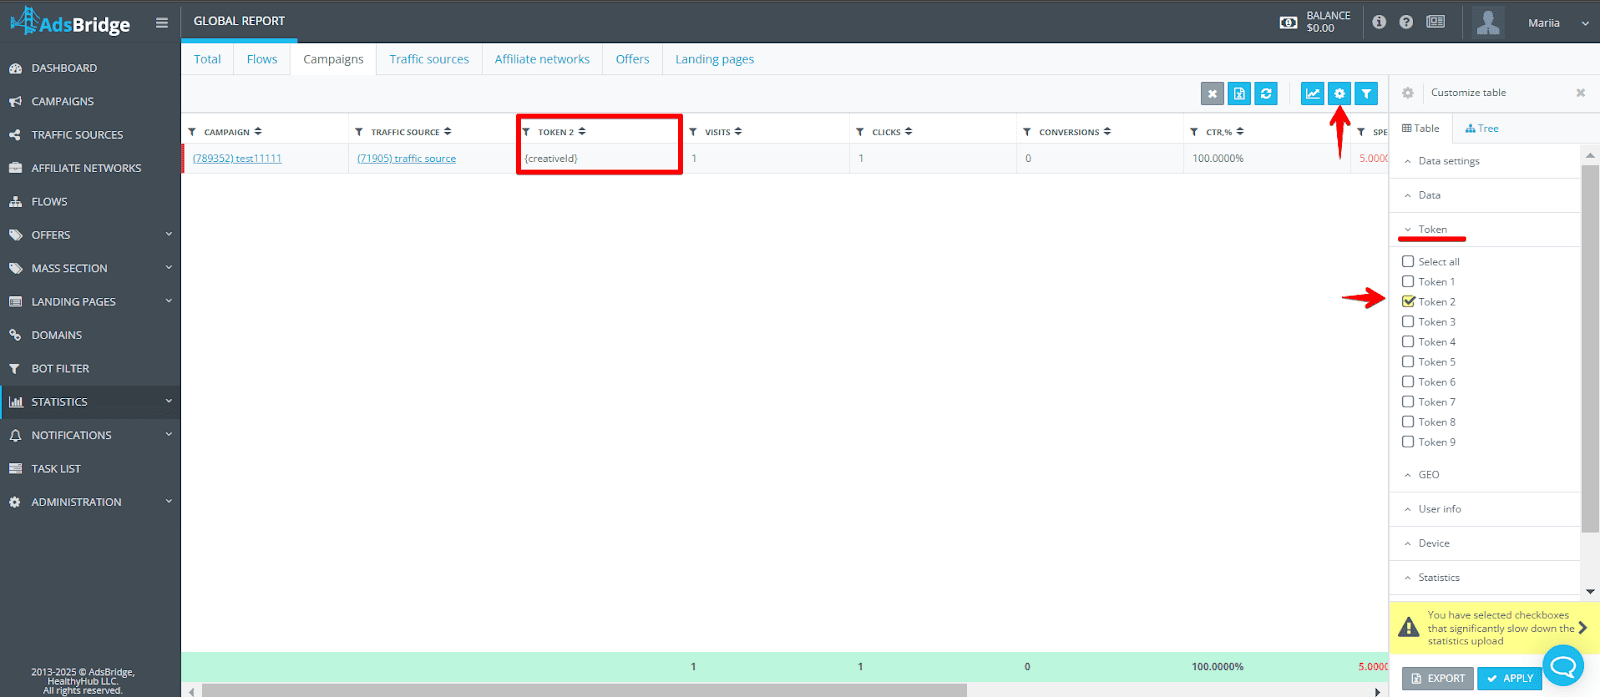
3. Adding transmitted parameters to the report
- In the “Statistics” section, click on ⚙️ “Customize table”.
- In the menu that appears, open the Token subsection and select the necessary Token values for export.
For example, if you specified {creativeId} in Token 2 in the traffic source settings, you should also select Token 2 here to display the corresponding data in the statistics.
3. Save the changes to ensure the data appears in the table.
*If necessary, you can export the data in CSV format by clicking the “Export” button.
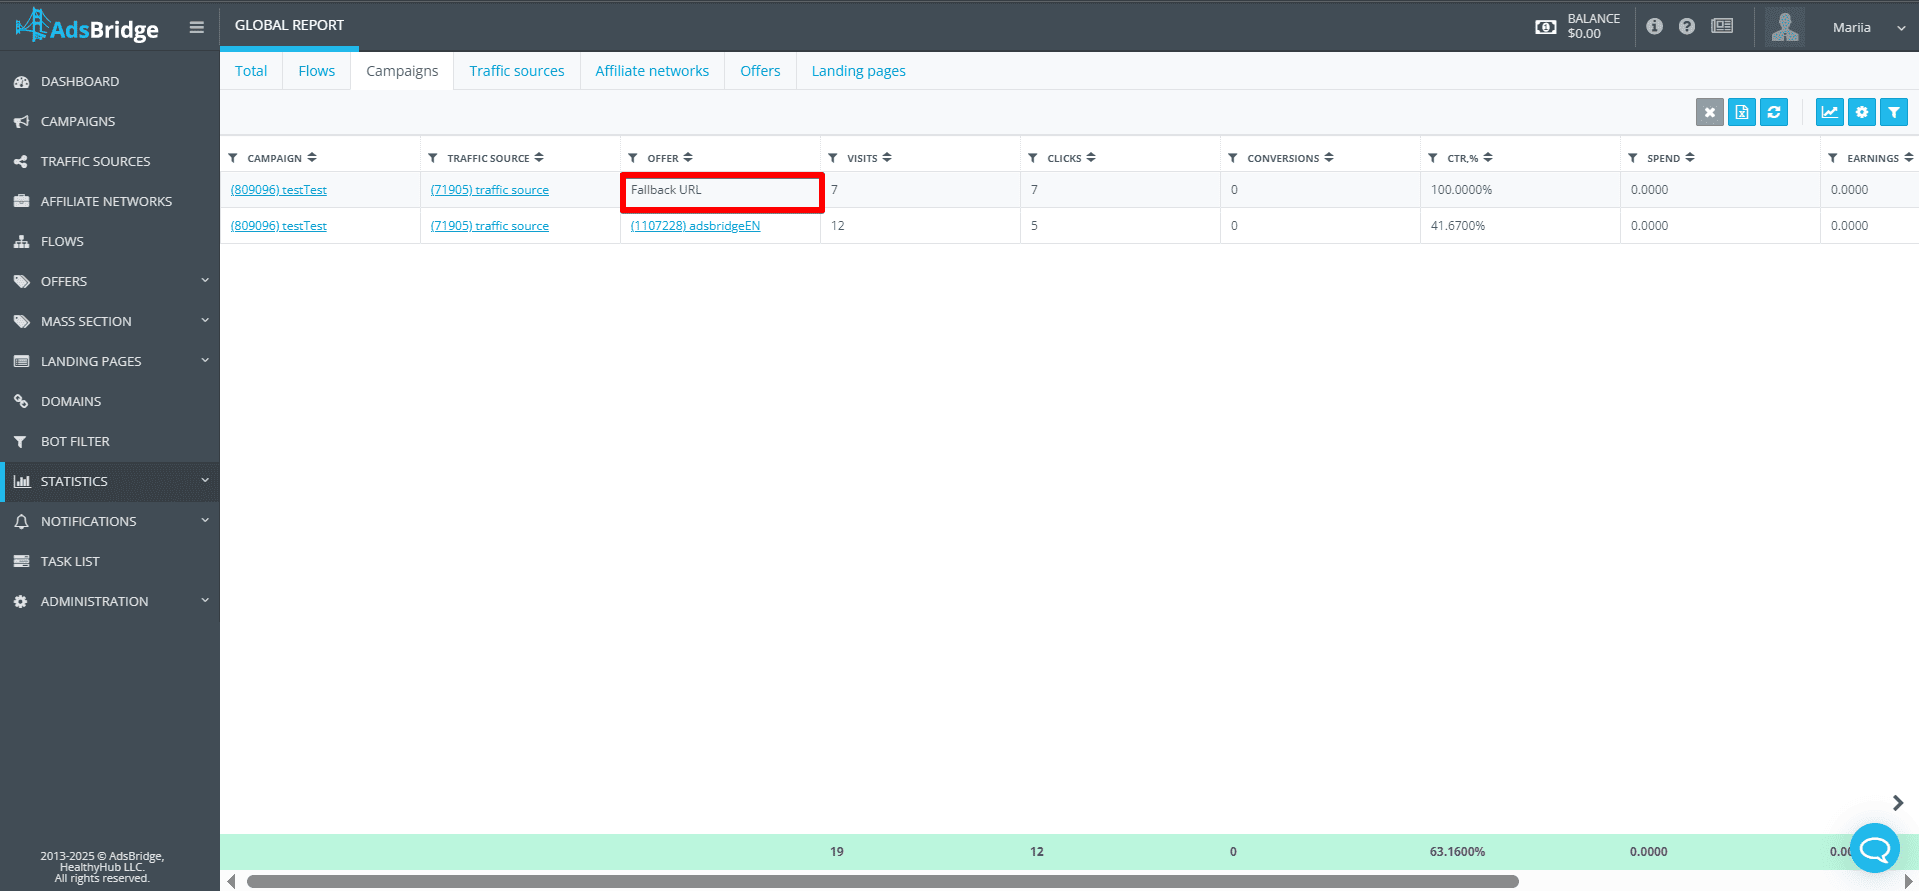
What does Fallback URL mean in the “Offer” column in the “Statistics” section?
Fallback URL in the “Offer” column means that the traffic was redirected to a fallback (reserve) link specified in the settings.
This happens when the user does not pass the set filters e.g., specified bot filter. In such cases, the system does not send the user to the main offer, but instead redirects them to the fallback URL.
As a result, all such visits (e.g., those that triggered the bot filter) will be displayed in the statistics as Fallback URL.
Financial questions
Where can I find pricing?
You may check our pricing plans here: https://www.adsbridge.com/pricing/
Do you have a referral program? What are the terms?
Use links for directing your referrals to any AdsBridge site page. All registrations by this links will be added to the list of your referrals.The sites visitors who passed through your referral link will receive a cookie that is recorded on their computer for a 30-day term. If during this period a user registers on the platform, they will automatically become your referral. You will get 10% commission on all basic payments from referrals, including payment for an overage. By taking part in the referral program, you agree to our terms of service.
Please note that a minimum sum available for a withdrawal is $100.
https://www.adsbridge.com/opportunities/to-be-a-referrer/
Can I stop/pause my subscription?
No, we do not provide such an option. However, you can contact our customer support at support@adsbridge.com and we will cancel the auto-renewal of your pricing plan.
Thus, you won’t pay for the periods when you are not using the tracker.
What if 14 days are not enough on a trial period?
Please contact our customer support at support@adsbridge.com.
We will try to assist you individually.
What will happen in case of an overage on a free trial plan?
There can’t be an overage on a free plan. Upon reaching 50,000 visits, the traffic is automatically blocked.
Can I put other information details in my invoice (i.e. of a company I work in)?
Please contact our customer support at support@adsbridge.com.
Specify the details you’d like to see in the invoice for the service received from our company. We will try to assist you individually.
I purchased an annual plan, I have 2 end dates: expiration date of my subscription and 30-day period. Why there are 2 dates?
The expiation date shows the end date of your annual plan (the end date of a 365-day period from the moment of purchasing the subscription).The expiration date of a 30-day period shows the date when you will receive an invoice for an overage (if there is an overage). In case you don’t have an overage, the next 30-day period will start.
Please note: the invoice for an overage must be paid within 10 days after its issuance or else your subscription will be blocked.
Do you make refunds?
According to our Terms and Conditions (https://www.adsbridge.com/terms-and-conditions/), we do not make refunds.
How can I downgrade?
At the end of a reporting period, you may contact us and we will cancel your current subscription by switching to Basic. After that, you can purchase any pricing plan you’re interested in.
How to unsubscribe?
Thank you fro choosing our tracker. We are sorry that you want to stop using our tracker. In order to unsubscribe, please contact our support in advance, and we will cancel your subscription.
How to use a promo code?
Step 1: Press “Use promo code” in the “Subscription” section
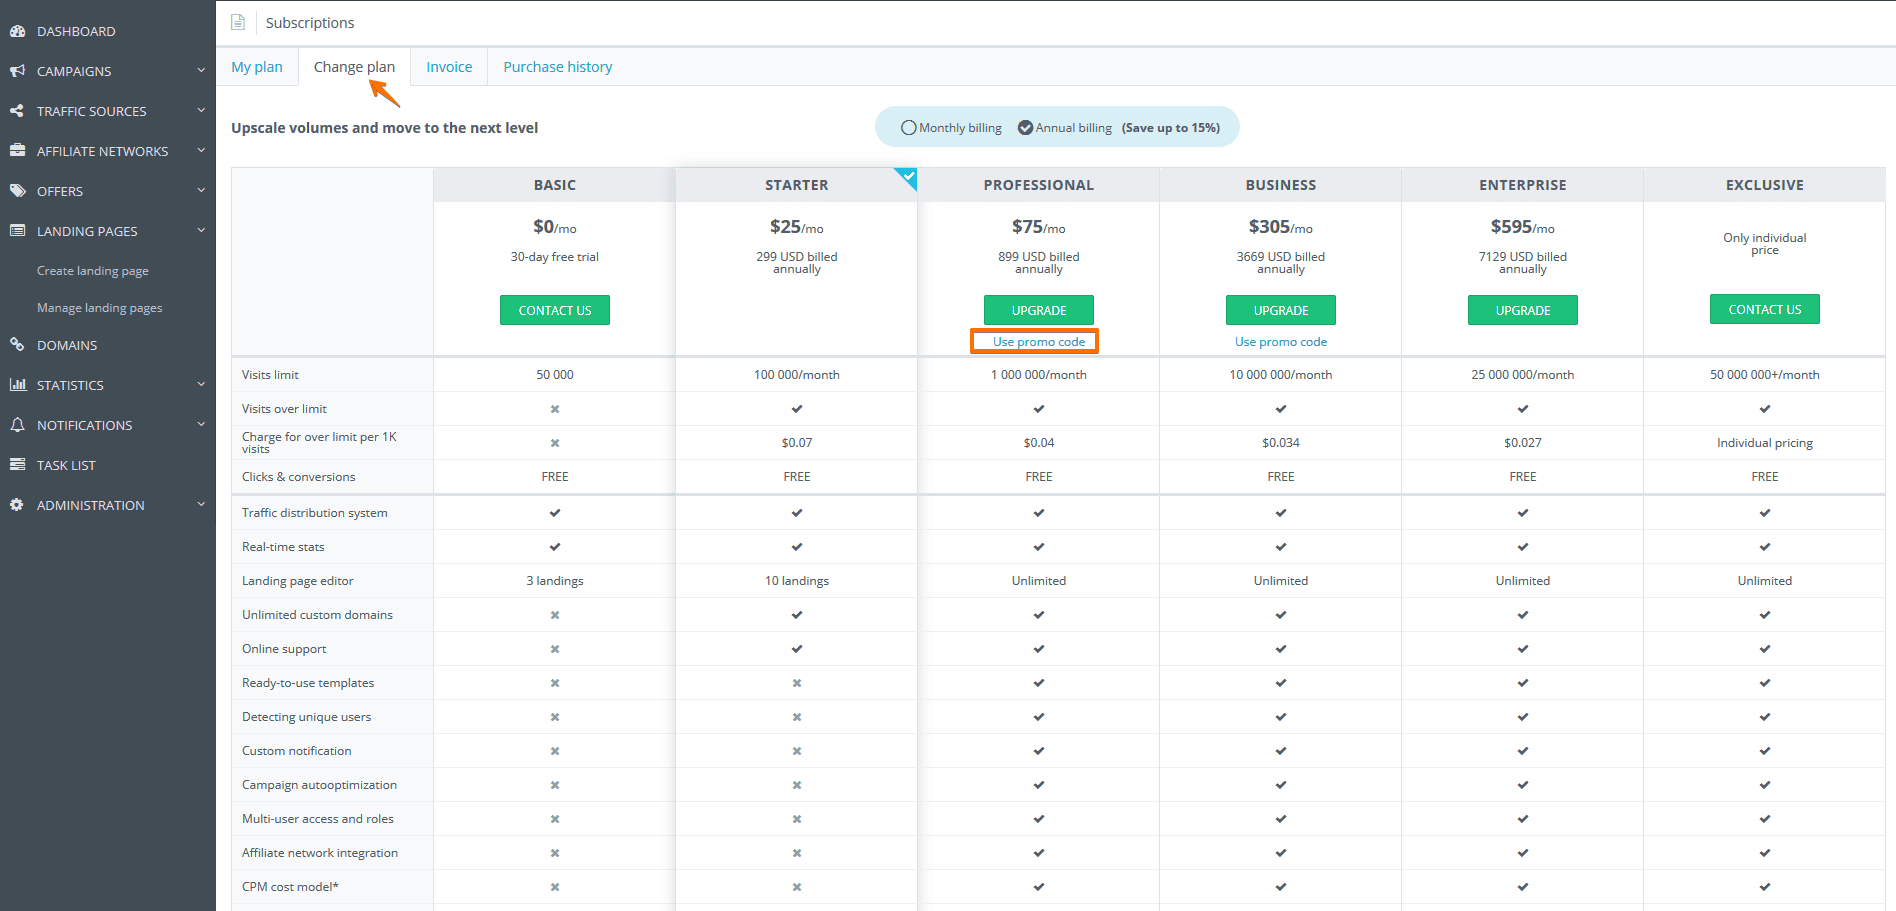
Step 2: Enter promo code
Step 3: Get a discount!
Do you have annual subscription plans?
On the Pricing page, you can use the following switch:
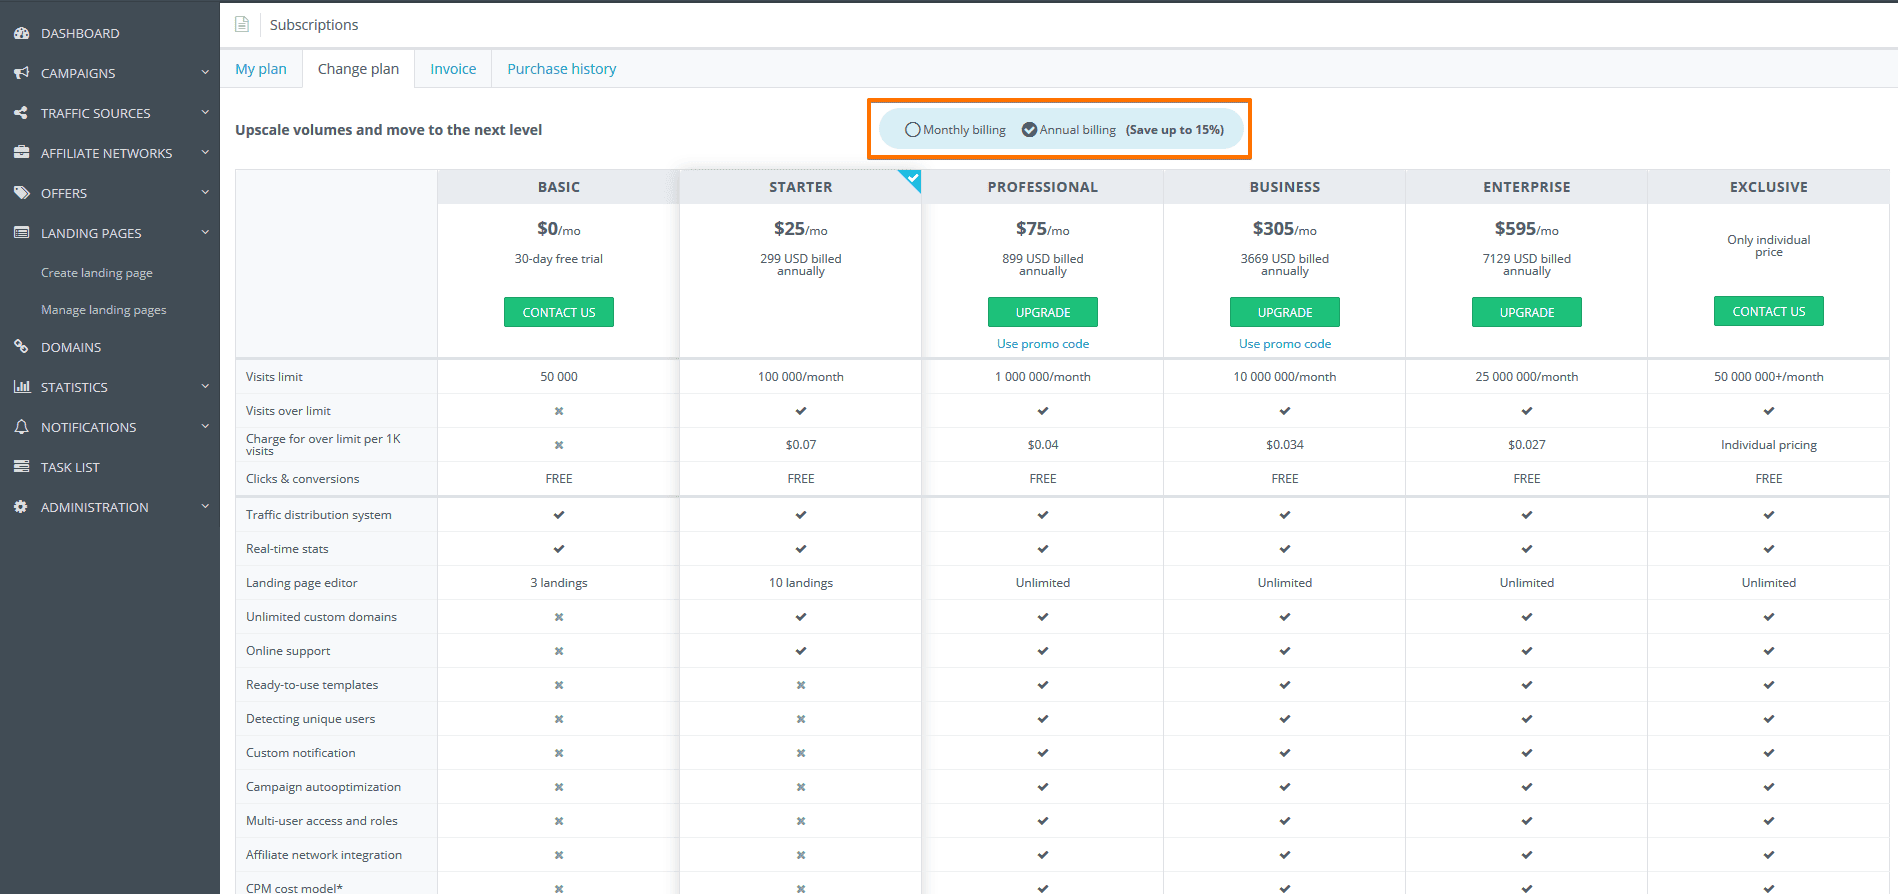
Annual plans are more beneficial if you plan to use a tracker for a long time.
I can not delete the invoice
All created invoices will be automatically removed within a month. However, the invoice for an overage which is created automatically will remain in your account until the actual payment.
Where can I find paid invoices?
In your Admin Panel – “Subscriptions” – “Purchase history”. In this tab, you can view all your purchases.
The system has shown that the payment was successful, but the subscription has not changed.
The payment process may take several hours (usually it is done faster). Please contact our support and we will check the status of payment.
Can I change the method of payment myself?
Unfortunately, no. Please contact our support at support@adsbridge.com and we will assist you.
After an unsuccessful attempt to pay the invoice, there is a timer on all buttons. What is it?
Please wait 15 minutes and try again. After 15 minutes, the button will be available again for payment.
What will happen if I don’t pay for an overage?
If you fail to pay an overage during 10 days, the traffic will be blocked. Please try to make payment on time.
What happens in case of overage on paid subscriptions?
In case there is a traffic overage on Starter and higher subscriptions, at the end of subscription period in the “Subscription” section you will receive an invoice that must be manually paid during 10 days. If you fail to do so, the traffic will be blocked.
What are the limitations of a trial period?
The trial plan is only given for 14 days with a limit of 50,000 visits and without renewal. A complete list of available features on it, you may see here: https://www.adsbridge.com/pricing/
What is considered a paid event?
Unlike our competitors, on our platform, a paid event is only a visit (the pass by campaign link). In the near future, a banner display will also be paid (when the display tracking function is used), in the ratio X displays = 1 visit.
What payment options can be used?
You can pay via PayPal, WebMoney or with your credit card. The purchase of pricing plans via WebMoney can be done only through our customer support.
What will happen when the 14-day free trial is over?
Your account will be blocked and traffic stopped. Next, you will need to choose one of our pricing plans.
Affiliate networks
How to set up Push House + CPA house campaigns?
To make a quick set-up for Push House-CPA House campaigns, you need to follow the next steps:
Settings at the side of AdsBridge:
1. Create a Traffic Source. Push House is available in our templates, so you just need to select Push House from the list and click apply. All necessary settings will filled in automatically.
2. Create an Affiliate Network. CPA House is also pre-configured and available in templates.
3. Place the postback at the side of CPA House. You need to insert the postback link from the tracker (pulled up after completing the previous ste) in your account at the side of CPA House.
4. Create an offer and a landing page (if necessary). In the field “URL”, insert the link of your offer, and in the Advanced settings section select the CPA House as an affiliate network.
5. Create a Campaign.
Step 1 – Filling in the basic settings. Since your traffic source has already been preconfigured, all the required fields will be filled in. We recommend to select CPV – the cost per visit, as a cost model.
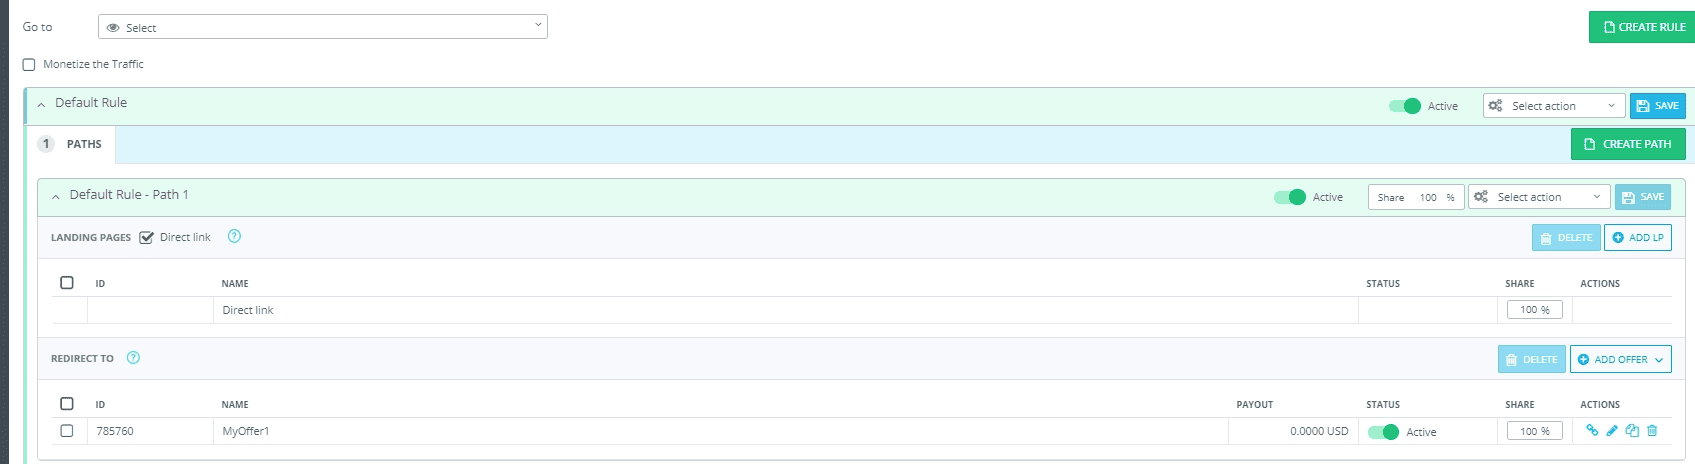
Step 2 – Filling in the default rule: if there is no Landing page, enable the Direct link checkbox, add an Offer. Also, if necessary, you can add additional rules.
The result of creating a campaign will be a tracking link which must be placed on the traffic source.
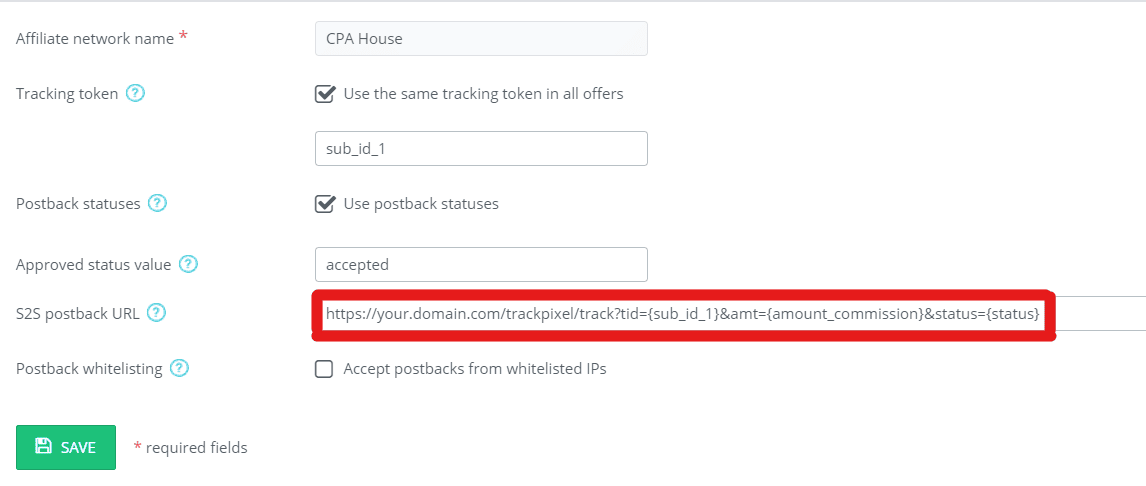
Settings at the side of CPA House
Place the postback link from the tracker in the Postback URL field and switch on all the checkboxes “Statuses”.
Where can you see campaign statistics?
Please note that only conversions with the approved status (in this case “accepted”) will be displayed in the General report. Conversions with the other statuses will be displayed in the Conversion Report.
If some of the checkboxes are not marked at the side of CPA House, then conversions with such statuses won’t be passed to the tracker.
How can I set up tracking for Imonetizeit offers?
If you work with such an affiliate network as Imonetizeit, you need to carry out the following settings:
1) Select an affiliate network Imonetizeit from the templates and save it.
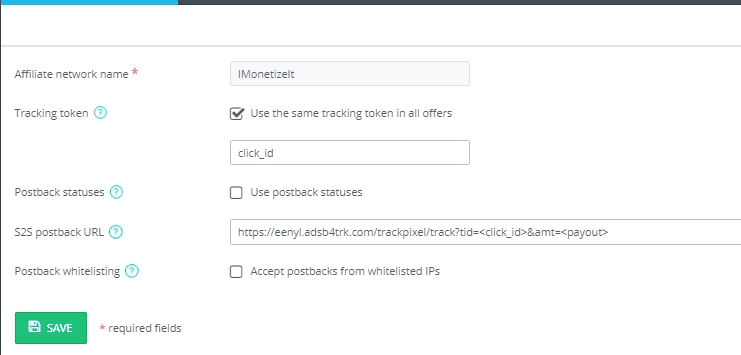
2) Place a pre-set postback at the side of Imonetizeit:https://eenyl.adsb4trk.com/trackpixel/track?tid=<click_id>&amt=<payout>
Important note: If you don’t place the postback at the side of Imonetizeit, conversions won’t be tracked.
3) Go to sections Offers -> Create new offer and input your offer URL. At the same time select the affiliate network for the offer accordingly.
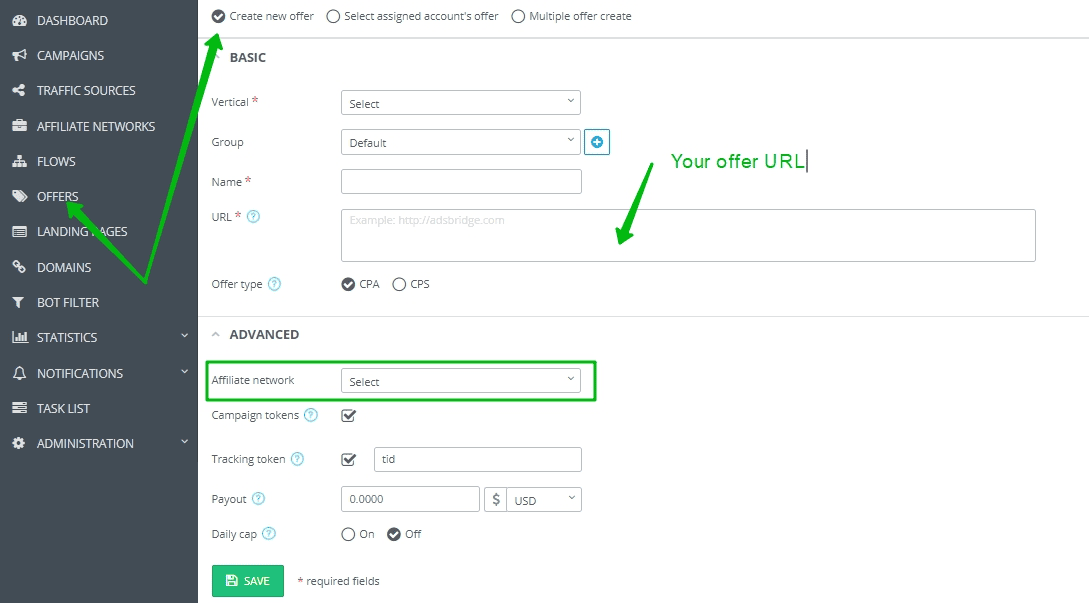
4) After create a campaign with your offer. Section Campaigns – Create a campaign and on Step 2 add earlier created offer.
6) After adding the offer, click Done.
As a result you will get a campaign URL which you need to place at your traffic source for tracking purposes.
Additional options:
- For better work with your campaign, we advise you to use your custom domain https://www.youtube.com/watch?v=E8ZwuER_iGQ&t=1s
- If you need to add a landing page, add it to the sections Landing pages – Use a self-hosted landing page. For correct work pay attention that the campaign domain and the click URL domain have to correspond. Therefore if you use a custom domain in the campaign, change the domain in click URL as well. After adding a landing page, add it to the campaign with your offer.
How can I set up S2S postback with an affiliate network?
To get conversions in the tracker, you need to set up and place AdsBridge postback at the side of an affiliate network.
You can find a template of postback in the Tracking pixel section in the top right menu.
This is an example of AdsBridge postback: http://xxxxx.ab4all.com/trackpixel/track?tid=YOUR_NETWORK_TOKEN&amt=REPLACE&txid=REPLACE&cdata=YOUR_CUSTOMDATA&status=REPLACE
(xxxxx – your unique subdomain in our system)
To set the postback correctly, you need to substitute the placeholders like YOUR_NETWORK_TOKEN, REPLACE with the relevant parameters of your affiliate network and delete the part of the postback that won’t transfer any information.
About the parameters:
The only obligatory parameter in the postback is tid. It is the only required parameter in the postback without which conversions won’t be passed. After the “=” sign in this parameter, you need to insert affiliate network macro instead of YOUR_NETWORK_TOKEN, which will be replaced by the value that came in a parameter entered in the Tracking token field when setting an offer.
amt – passes the dynamic value of a payout by conversion.
txid – is set only for CPS offers. It allows tracking of several conversions from one click ID.
cdata – passes any parameter straight to the source traffic without saving on our side.
status – passes the status of conversion, if your affiliate network provides such kind of option.
Important note: If your affiliate network is in our templates, then its postback is already set up. So all you have to do in this case is copy and paste it at the side of the affiliate network, usually in the field Global Postback.
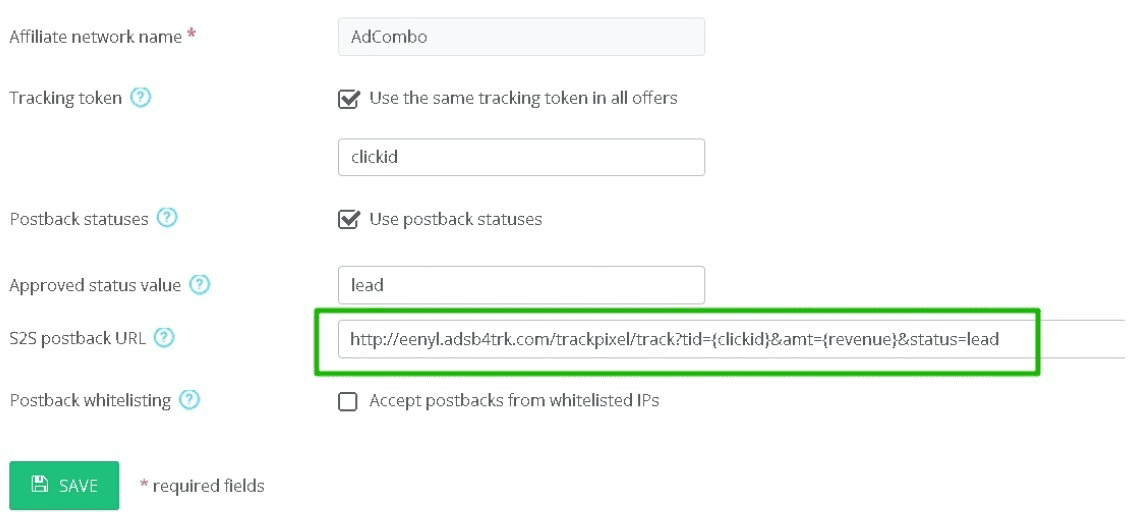
Copy and past the pixel at the side of an affiliate network.
Important note: If you work with your own offers (not with an affiliate network), then in order to track conversions, you need to use a pixel. AdsBridge pixels can be found in the Tracking pixel section in the top right menu.

AdsBridge offers 3 different pixels – Image, Iframe and Tracking script. In most cases you can use any of the listed ones (but when working with Facebook and sending back information back, use the Iframe type at the side of the offer)
For correct work, the pixel has to be placed on the Thank you page after your offer.
Pay attention that the pixel domain and the domain of your campaign have to correspond.
That’s why when you add your own domain to the campaign, change the system domain in the pixel to your custom domain. For example, <img style=”display: none;” src=”http://eenyl.adsb4trk.com/trackpixel/track.jpg?“> change to <img style=”display: none;” src=”http://my.domain.com/trackpixel/track.jpg?“>.
In case you use a pixel, information about click id (tid) is taken from cookies, therefore unused parameters can be removed from the pixel accordingly.

Place this pixel on the Thank you page of your offer.
Read more about postback settings in the article: https://www.adsbridge.com/postback-settings-why-you-don-t-get-conversions-in-the-tracker/
What does integration with affiliate networks consist of?
Integration with affiliate networks allows to connect your network account to your AdsBridge account through API. With help of this connection you can:
- connect your active offers from affiliate networks directly to the AdsBridge interface (name of offer, link, payment per conversion, and payment currency are all connected automatically).
- view the postback link that is set on the offer.
- send correctly set up postback to your offer directly from the AdsBridge interface with just one click.
Integration significantly speeds up the process and eliminates mere navvy’s work, which is time consuming, and at the same time, may be the cause of error in tracking.
What affiliate networks is AdsBridge integrated with?
You may view the list in the “Creating an Affiliate Network” section – “Affiliate Network templates”. Next to the integrated networks there will be a sign:

Where can I find out about the parameters which I can use in postback?
You can look at the meaning of each parameter in the “Tracking pixel” section (https://partner.adsbridge.com/tracking). Here is a list of available parameters:
- tid – serves for conversion tracking. It is used for passing the AdsBridge click ID from affiliate network back to tracker. It is the only required parameter in the postback without which conversions won’t be passed. After the “=” sign in this parameter, you need to insert affiliate network macro instead of YOUR_NETWORK_TOKEN, which will be replaced by the value that came in a parameter entered in the Tracking Sub ID field when setting an offer.
- amt – passes the dynamic value of a payout for conversion.
- txid – is set only for CPS offers. It allows tracking of several conversions from one click ID.
- cdata – passes any parameter straight to the source traffic without saving on our side.
- status – parameter for transmission of conversion statuses. You can read more on the tracking conversion statuses here: https://www.adsbridge.com/s2s-postback/.
To set the postback correctly, you need to substitute placeholders like YOUR_NETWORK_TOKEN, REPLACE with the relevant parameters of your affiliate network and delete the part of the postback, that won’t transfer any information.
If my network is not included in the “trusted affiliate networks” list does that mean that I cannot track conversions from it?
We can set tracking with any affiliate network, if your network is not pre-set, then you’ll have to set it up manually.
What does the “use the same tracking token” mean? What is this setting for and how does it work?
It enables the use of one parameter for passing the unique click ID for all offers of this affiliate network.
Tracking token is a parameter used by our tracker for passing the value of a unique click ID. In this field, you should specify the name of this parameter provided by your affiliate network, in which it can receive the unique click ID of our tracker, and it is then be added to the offer link.
For example: if your affiliate network is created on the Cake platform, you may use s2, s3, s4, s5 for Tracking token. If it is created on the HasOffers platform, then you may use aff_sub2, aff_sub3, aff_sub4, aff_sub5.
Also, there are affiliate networks created on custom platforms. And it is necessary to check this value from affiliate manager for each one of them.
Please note: this field is useful only when the affiliate network has a standard format of an offer link, that is: http://offerurl.com?parameter1=value1¶meter2=value2...
If the format is different, then this field can’t be used.
How to pull up an offer from an integrated affiliate network?
On our tracker, you are able to pull up all data of your offers by API of our integrated affiliate network, for instance, ClickDealer. This option is available for users with Pro, Business, Enterprise and Exclusive pricing plans. In order to use this option, when creating ClickDealer (or any other integrated) affiliate network in our interface, you need to enter your login data of a ClickDealer account in the pop-up that you’ll see after clicking this button:
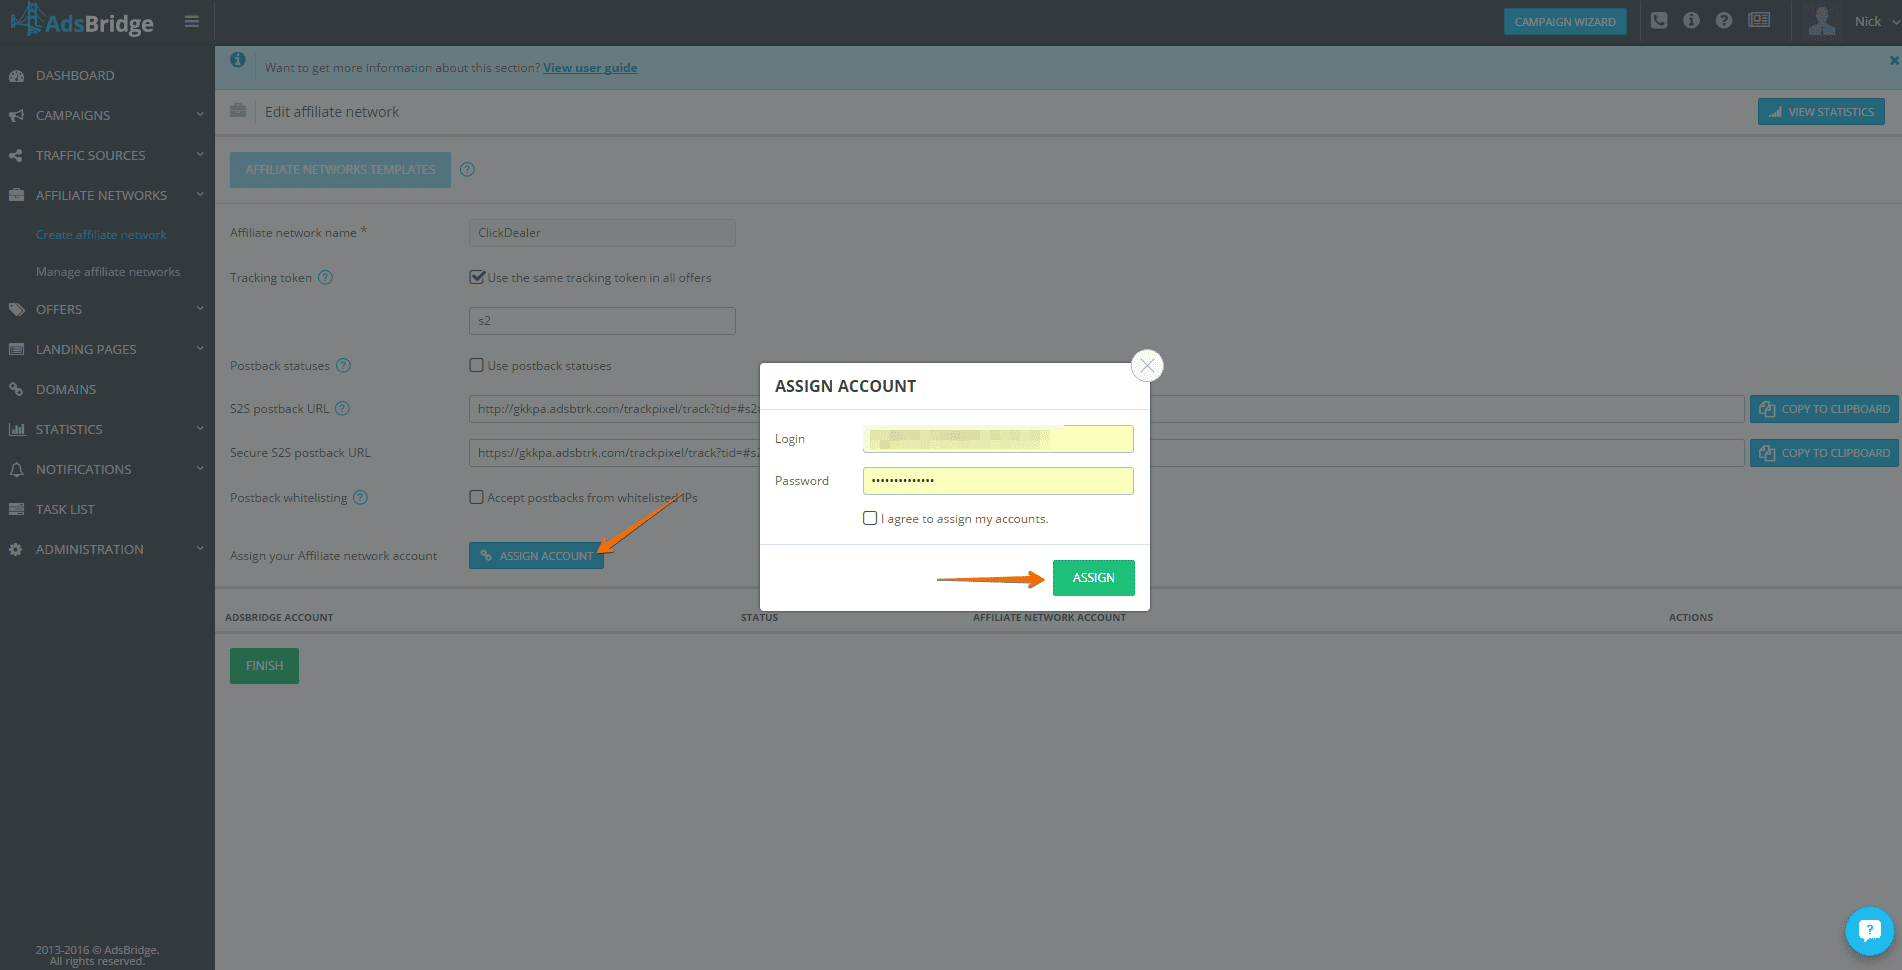
The number of clicks and conversions on AdsBridge and on the affiliate network do not match. What to do?
The number of clicks may differ, it is a normal situation. The difference of 10% is normal. If it is more than that, the reason may be:
- a different mechanism of tracking clicks (e.g. the affiliate network counts only unique clicks);
- a different time zone of viewing statistics on the affiliate network and on AdsBridge.
The number of conversions should match by 98-100% (at S2S tracking). If it doesn’t match, there may be various reasons. The most common one is an incorrect setup of tracking. Therefore, you should first send us the latest screenshot of your offer setting, the current postback that is set on affiliate network and a list of parameters used by your affiliate network. We will help you to resolve this issue.
Whitelist IP feature
If you want to receive postbacks of affiliate network from specific IP addresses and get rid of fraudulent conversions, you can list these IP addresses when setting up an affiliate network:
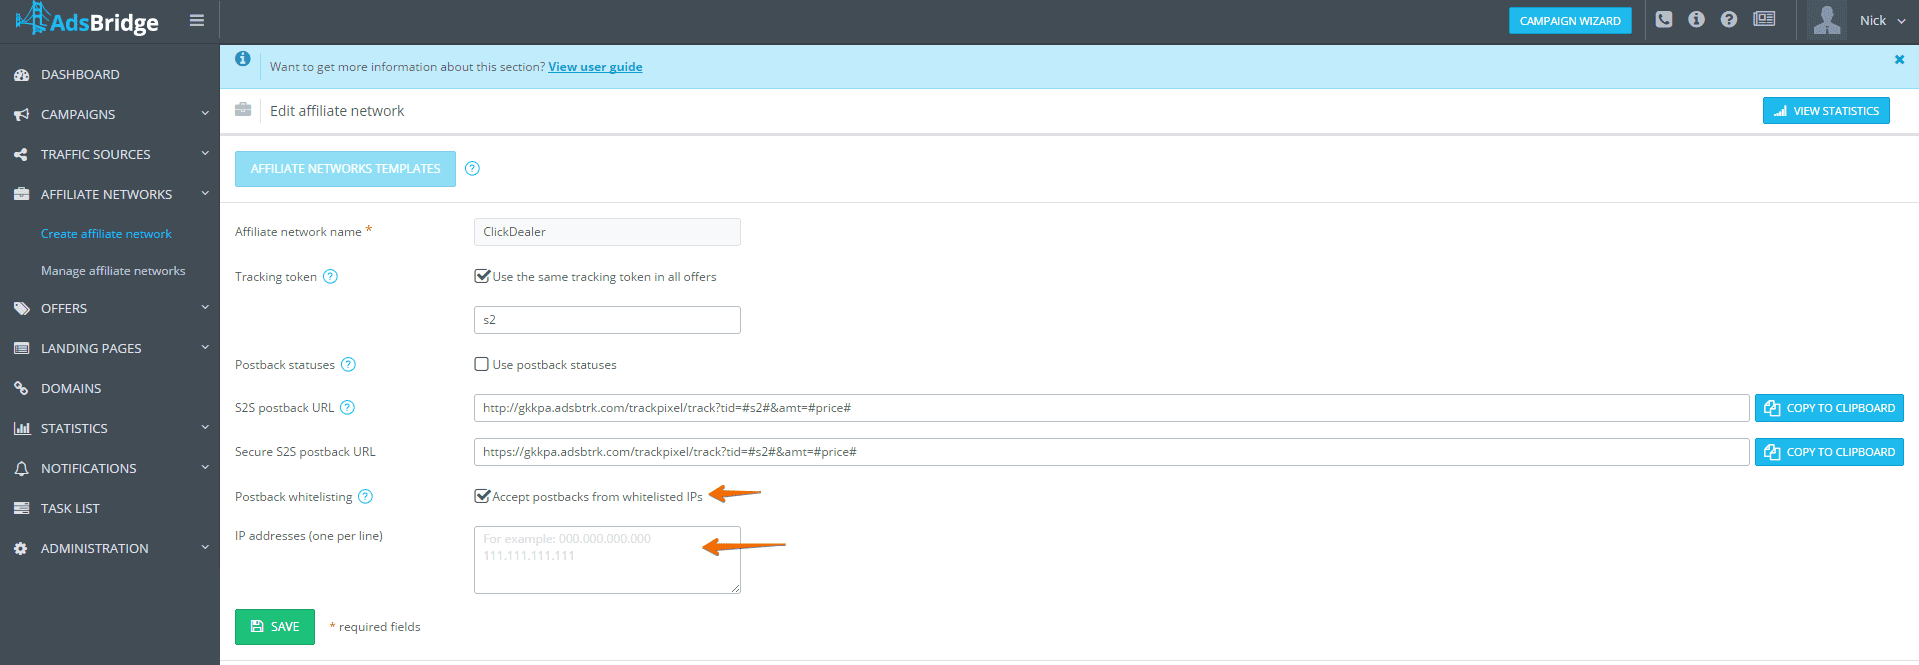
To get the whitelist of the IP addresses, please contact the manager of your affiliate network.
SSL certificate
How can I get a free SSL certificate?
You can get a free SSL certificate if you buy a domain in AdsBridge. In this case use the following manual to switch it on.
Please note: You cannot get a free SSL certificate in AdsBridge for your custom domain. If you would like to use your own domain, you need to upload your own certificate seperately.
How can I add my SSL certificate to AdsBridge?
You can add certificates bought on specialized websites (for example, comodo, gogetssl, etc.) and they will be automatically bound to your domain.
First, write to your AdsBridge manager and make sure that this option is switched on. Then follow the guide.
Secret features
12.1 Filter stat by Token
After activating the Filter stat by Token feature you do not need to unload all statistics and among the general list of tokens to search for the necessary value (sites, zones, creatives, etc.) and then to filter with the filtering column. The main convenience and advantage of Filter stat by Token is the speed of unloading statistics by the necessary value, you no need to wait for loading a large amount of data!
The Filter stat by Token function allows you to get information about traffic by a particular token in the general report as well as in the conversions report (the following steps are the same in the conversions report and the general report):
The following steps are required to upload statistics:
- Ask your manager for access to this function
- In the Statistics section, upload the statistics in your usual way
- To upload data by Filter stat by Token, click on the “Filters” button, then scroll down to the Filter by tokens field.
- Select the token you are interested in (in the settings of the traffic source you can see what information your traffic source transmits by what token), as well as the token values for which you would like to see advanced information (for example, the id of a particular creative, zone, site, etc.).
- Click on the “Apply” button at the bottom of the panel that appears.
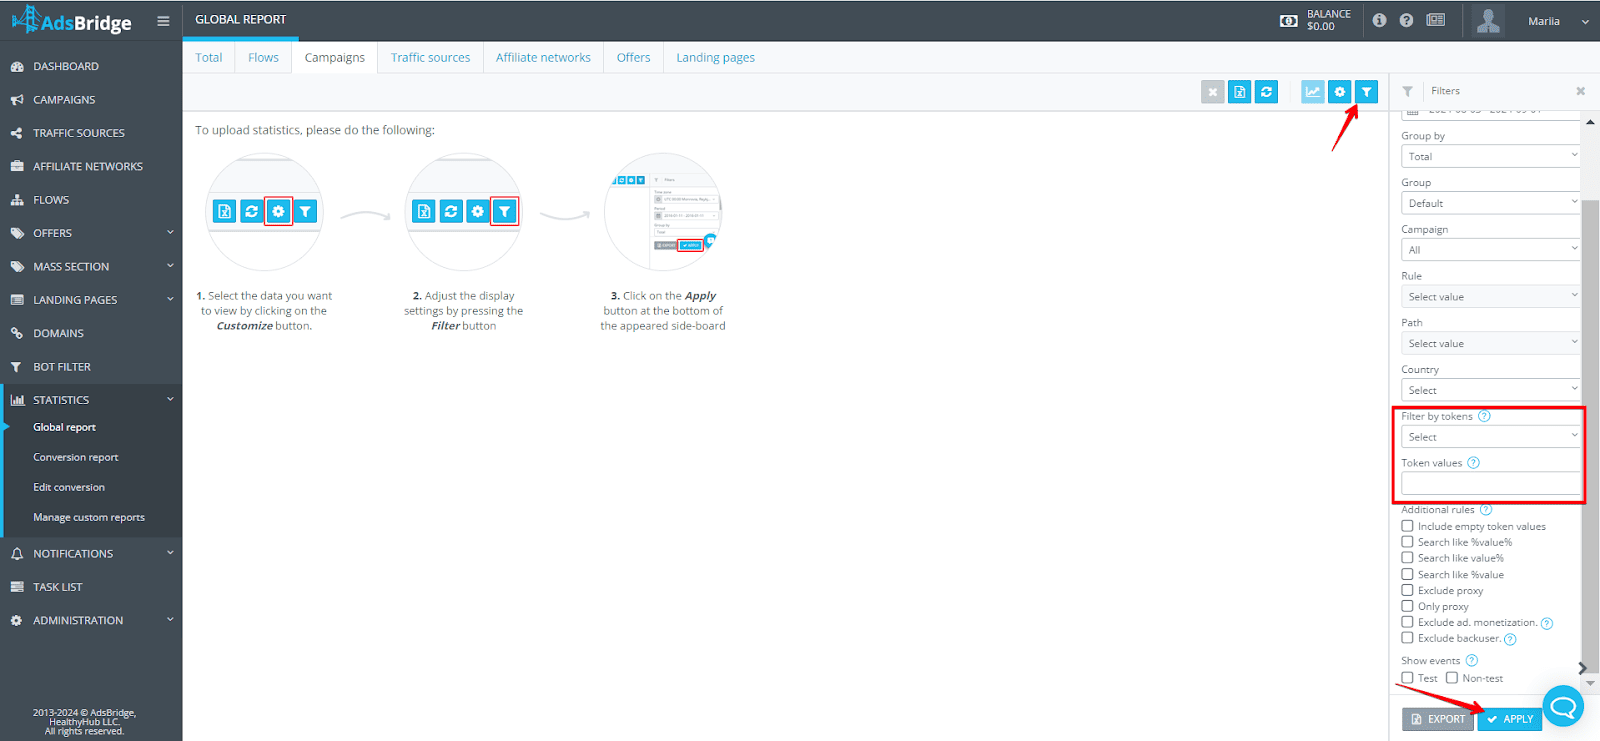
Additional options are also available to you, you only need to check the checkboxes to add or exclude the information you need.
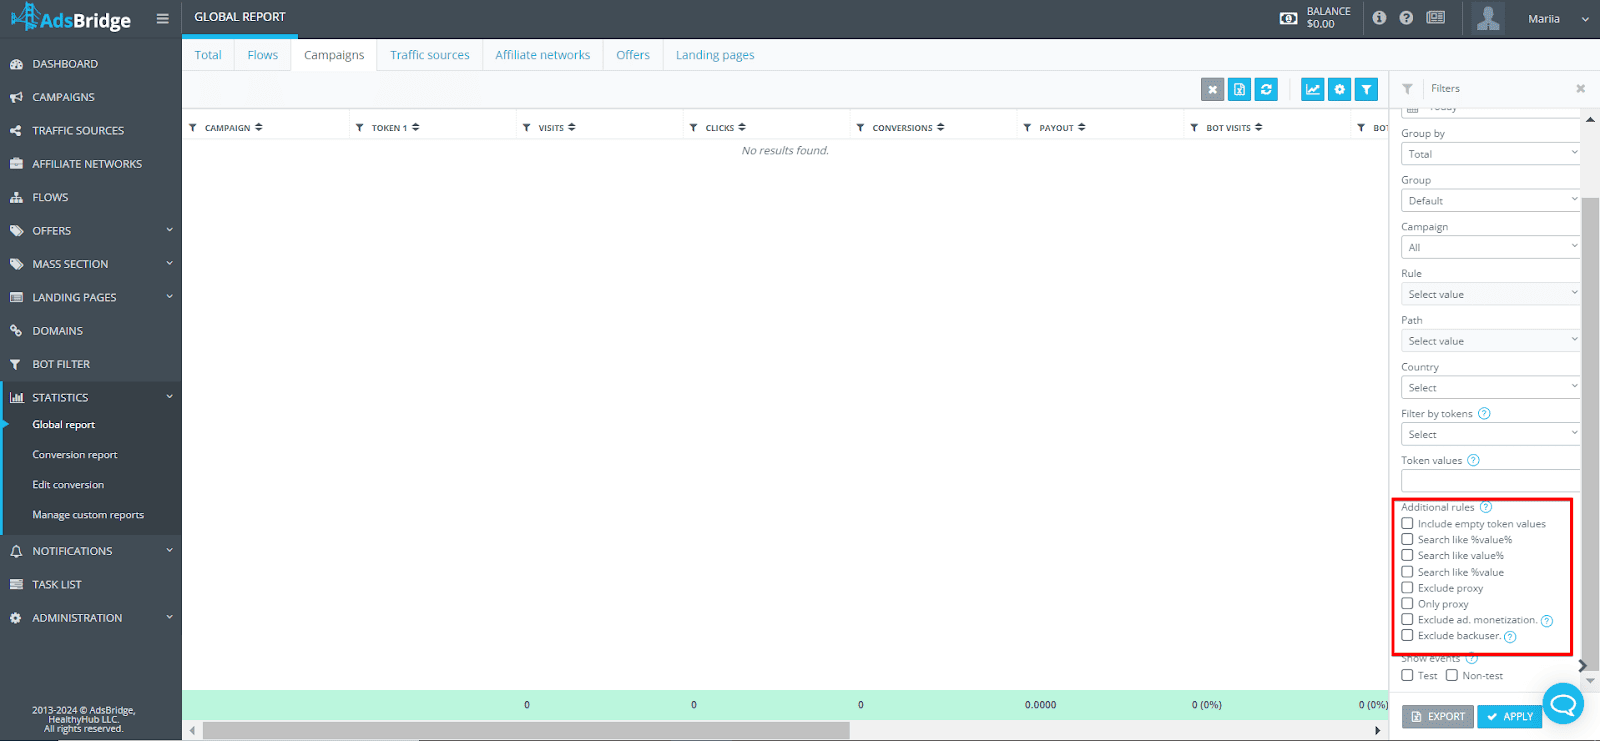
Let’s see an example:
Let’s take Token 1, which transmits information about the creative from the traffic source to the tracker. We need to see how a creative with id 1234 converts.
- Open the “Statistics” tab the way you are used to it.
- Click on the change table icon in the upper right corner and select the Token 1 checkbox on the right side of the column.
- Then click on the filters icon in the upper right corner and in the Filter by tokens field select the Token 1 checkbox as well.
- Below in the Token values field you specify the id of your creative 1234.
- Click on the “Apply” button
With this feature, you can make a better split to analyze your traffic.
12.2 Daily cap token
The Daily Cap Token feature provides the ability to set limits not only at the offerer level, but also for individual tokens (sub IDs), allowing you to more precisely control the number of clicks or conversions for individual sub IDs
How to set up Daily Cap Token:
- Request access to this feature from your support manager.
- Go to the “Offers” section and in “Advanced Settings” select in the “Conversion Limit” field the desired limit – by clicks or conversions.
- Select the type of limit: Daily or Monthly.
Please note: The monthly limit is valid within a calendar month. For example, if you set the limit on the 10th of the month, the limit will be updated automatically on the 1st of the next month. - In the “Go to” field, be sure to select the offerer to which traffic will be redirected after reaching the conversion limit on the original offer.
- “Time zone”: select the time zone by which the monthly conversion limit will be tracked and calculated for the selected offerer.
- “Conversion limit”: specify the desired number of conversions.
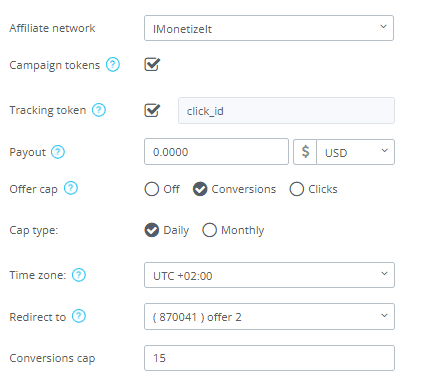
Benefits and examples of use:
This feature allows you to distribute the total conversion limit among all tokens, or limit specific tokens to N number of conversions. For example, if you set an overall limit of 15 conversions, and set limits for Token 1, which transfers Zone:
- Zone 1234 will get 5 conversions
- Zone 5678 – 6 conversions
- Zone 7890 – 4 conversions
When zone 1234 reaches a limit of 5 conversions on this offer, traffic will automatically switch to the “Go To” offer, and so it will be with each subsequent zone once the specified number of conversions is reached
Limit of unique conversions:
The feature also allows you to evenly distribute the number of conversions among all tokens in a campaign. For example, if you set the limit to 10, no more than 10 conversions will be allocated to each token, which promotes a more balanced distribution of traffic and better control over results.
12.3 Txid in Global Report
Txid in Global Report feature opens up new possibilities for working with reports, allowing you to see more detailed data in the Statistics section.
Now in the Global Report, you will be able to track not only the total number of conversions, but also an additional parameter txid, which is a unique transaction identifier associated with each Click ID.
The txid parameter helps recognize between multiple transactions that occurred on the same Click ID, which is especially useful when working with multiple action types.
By default, when Txid in Global Report is disabled, the unique txid parameter is only displayed in the Conversions Report. However, once activated, you’ll be able to see the txid directly in the Global Report, as well as pass this data to the traffic source via postback, making it easier to track and analyze ad campaigns.
How to enable and use the Txid in Global Report feature:
1. Check your postback settings: Make sure your affiliate network’s postback link includes the txid parameter, and add a macro that is responsible for passing the transaction ID (e.g. [transaction_identifier]).
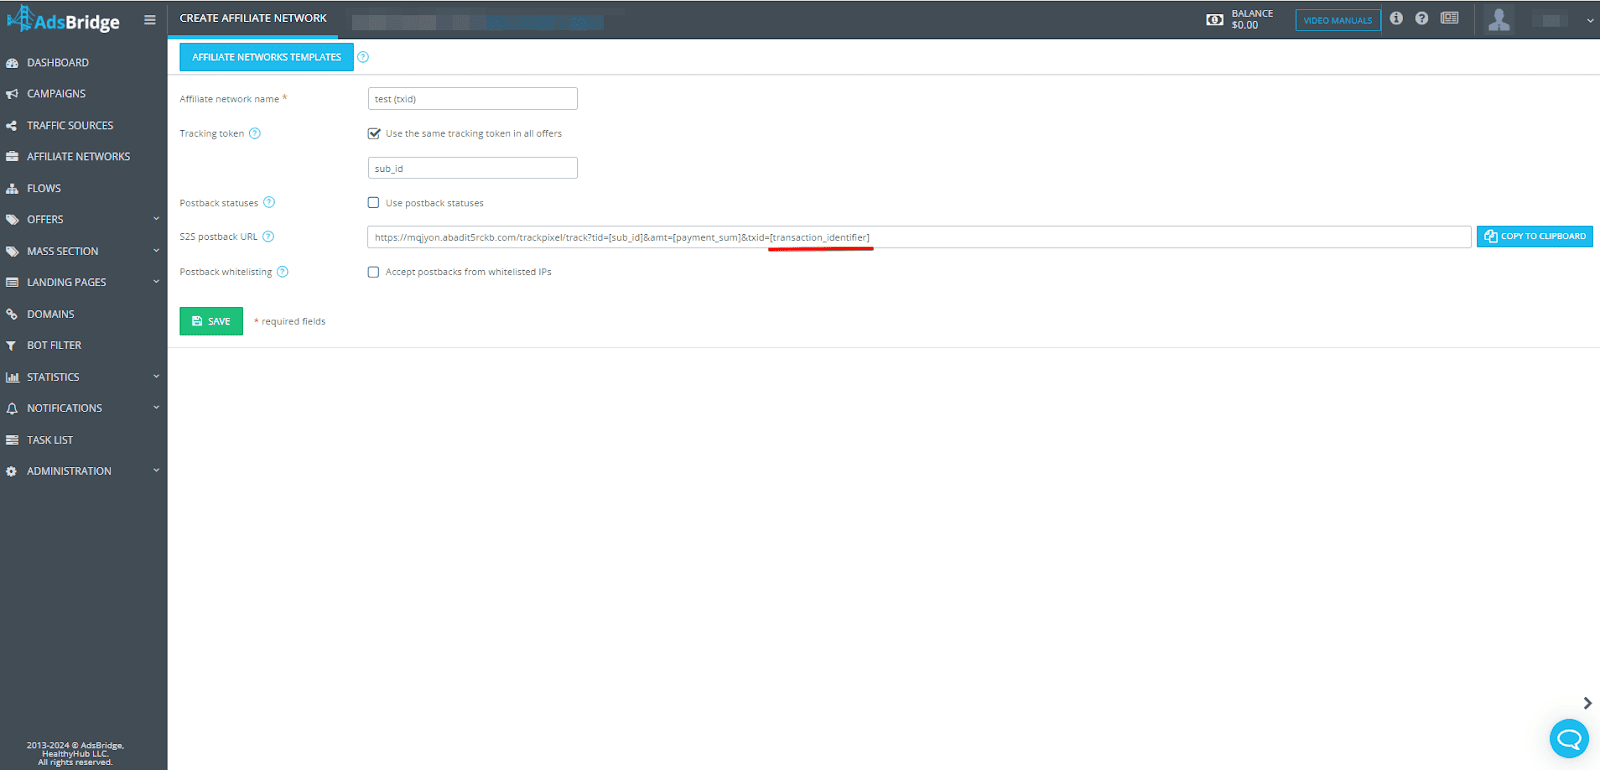
2. Contact your AdsBridge manager: Contact your manager to request access to this feature and activate it in your account.
3. Customize Filters: In the General Report section, go to Filters and check the Transaction ID checkbox to start displaying additional transaction data.
After following these steps, you will see the total number of conversions and the txid, right in the “Statistics” section of the General Report. This information will allow you to manage your campaigns more effectively and optimize traffic.
12.4 Affiliate lead postback
The affiliate lead postback feature allows you to setup additional fields for postbacks with your traffic source.
If you need to send conversions with different statuses to your traffic source, the affiliate lead postback feature will help you with this task.
How to enable and use the affiliate lead postback feature:
1. Contact your AdsBridge manager: Contact your manager to request access to this feature and activate it in your account.
2. Create an affiliate network in the Affiliate Networks section:
If your affiliate network is in the list of templates, select it and save. If your affiliate network is not in the list of templates, you need to set it up manually or contact your support manager.
As opposed to the standard affiliate network setup, you will also have additional fields for transmitting conversion statuses from the affiliate network to the tracker side for further transmitting to the source.
All conversions will be displayed in the conversion report, but conversions with values that you specify in the Approved status value and Deposit status value fields will be displayed in the general report.
For example, if you need to receive not only conversions with approved status, but also deposits in the tracker in the general report, then you specify the value in the relevant fields.
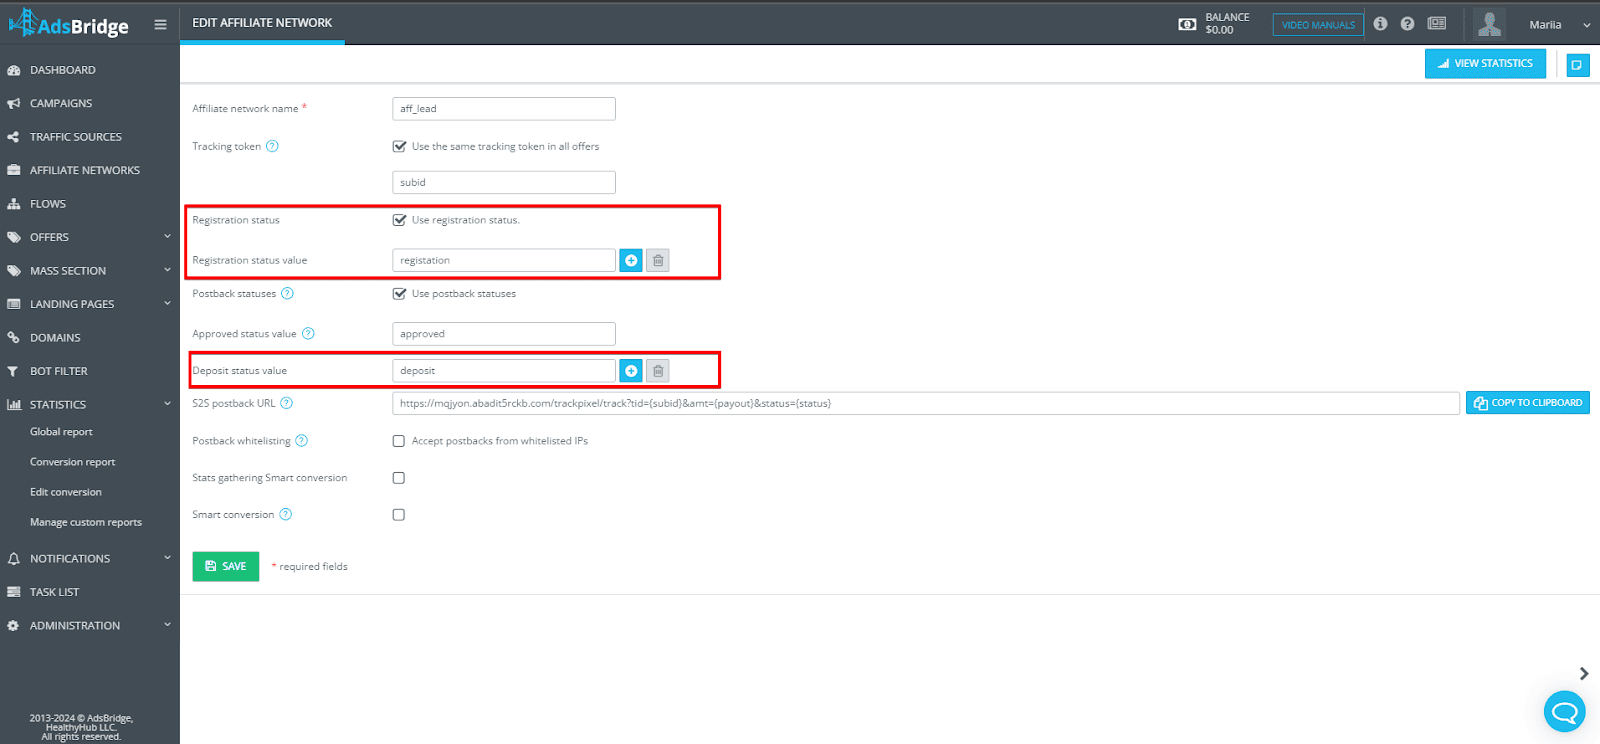
This way, instead of the standard setting, in addition to the approved status, you will also receive conversions with the deposit status to the general report.
A filled Registration status value field will not transmit the conversion to the tracker to the general report, but it will transmit it to the conversion report, as well as to your source side via postback.
3. Campaign creation:
Once we have saved the affiliate network setup next with additional postback fields we can pass these statuses to the traffic source.
When the function is activated, you have an opportunity to open additional fields to set up postback with source, where you can specify the statuses of conversions required to be transmitted to your traffic source.
In case of our setting, the statuses are registration and deposit.
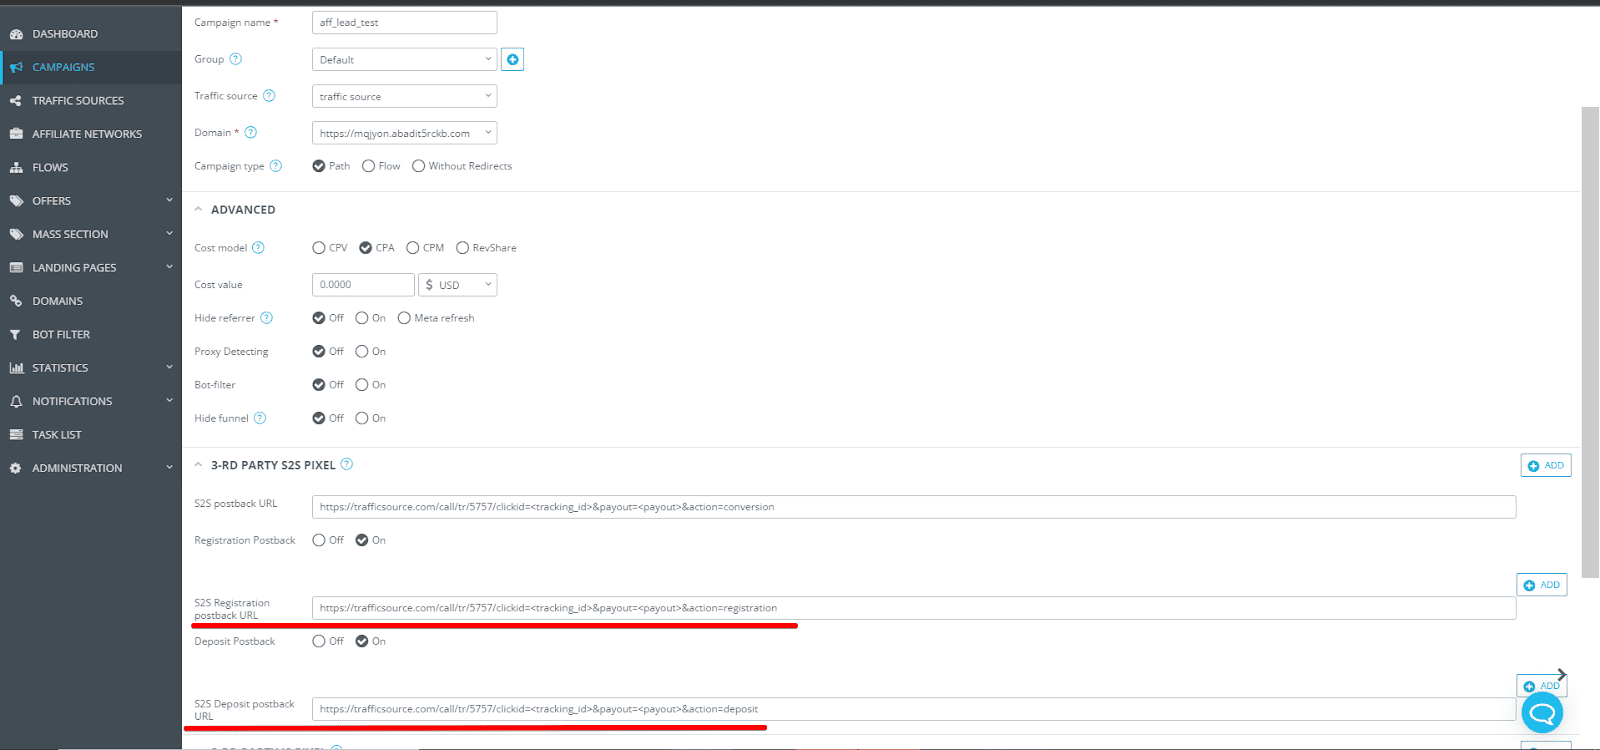
Let’s take a look at the second example, in case it is necessary to transmit conversions with the status, for example, registration and deposit to the general report and then to the source side, the configuration should be done as follows:
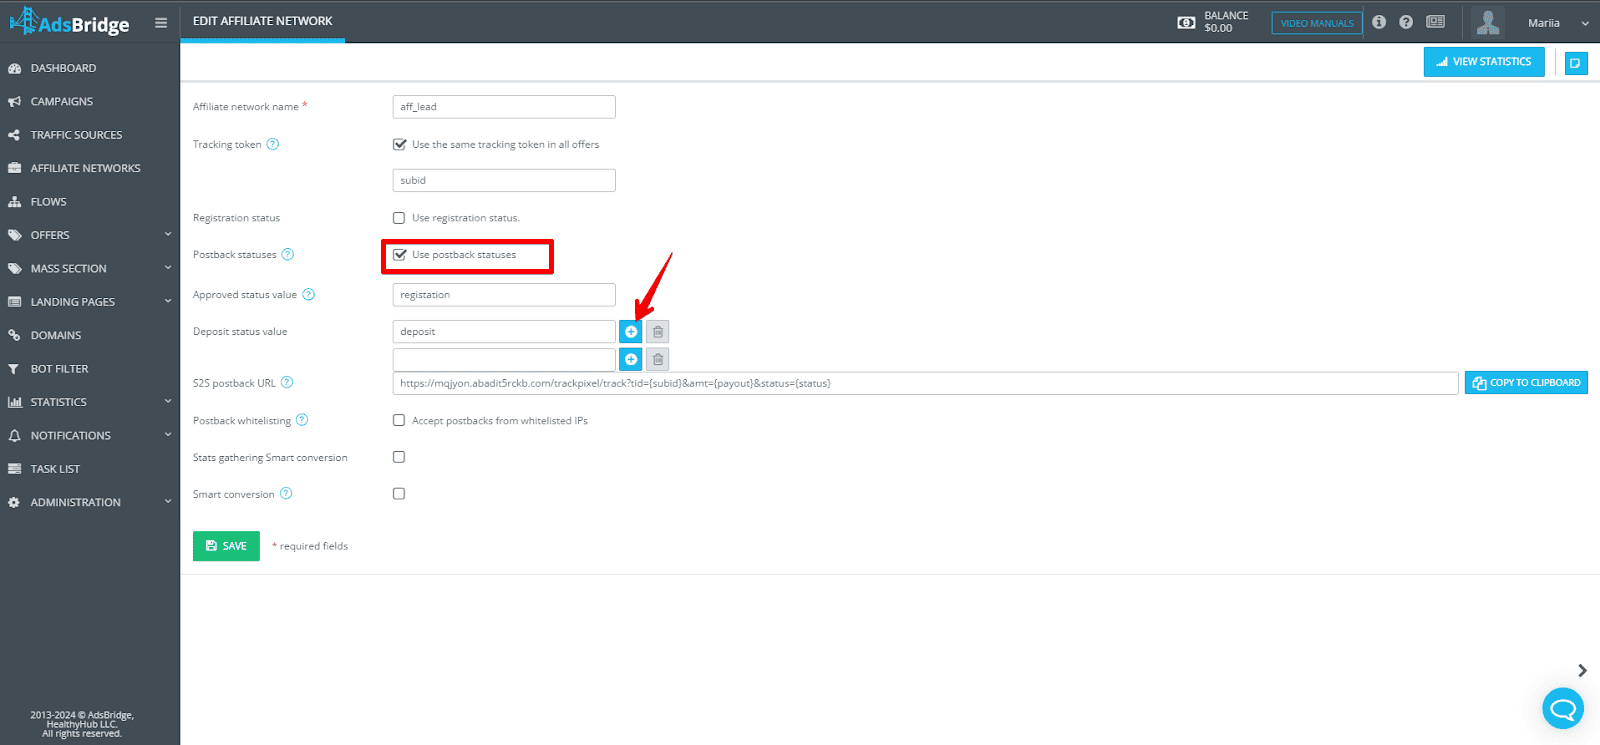
So by activating the postback statuses checkbox you can add the required number of fields for the value of your conversions, which should be received in the general report to the tracker and transmitted to your traffic source.
Since conversions with registration status are specified as Approved status value, and conversions with deposit status are specified in the Deposit status value field, postbacks should be placed in the same way in the relevant fields in the campaign settings.
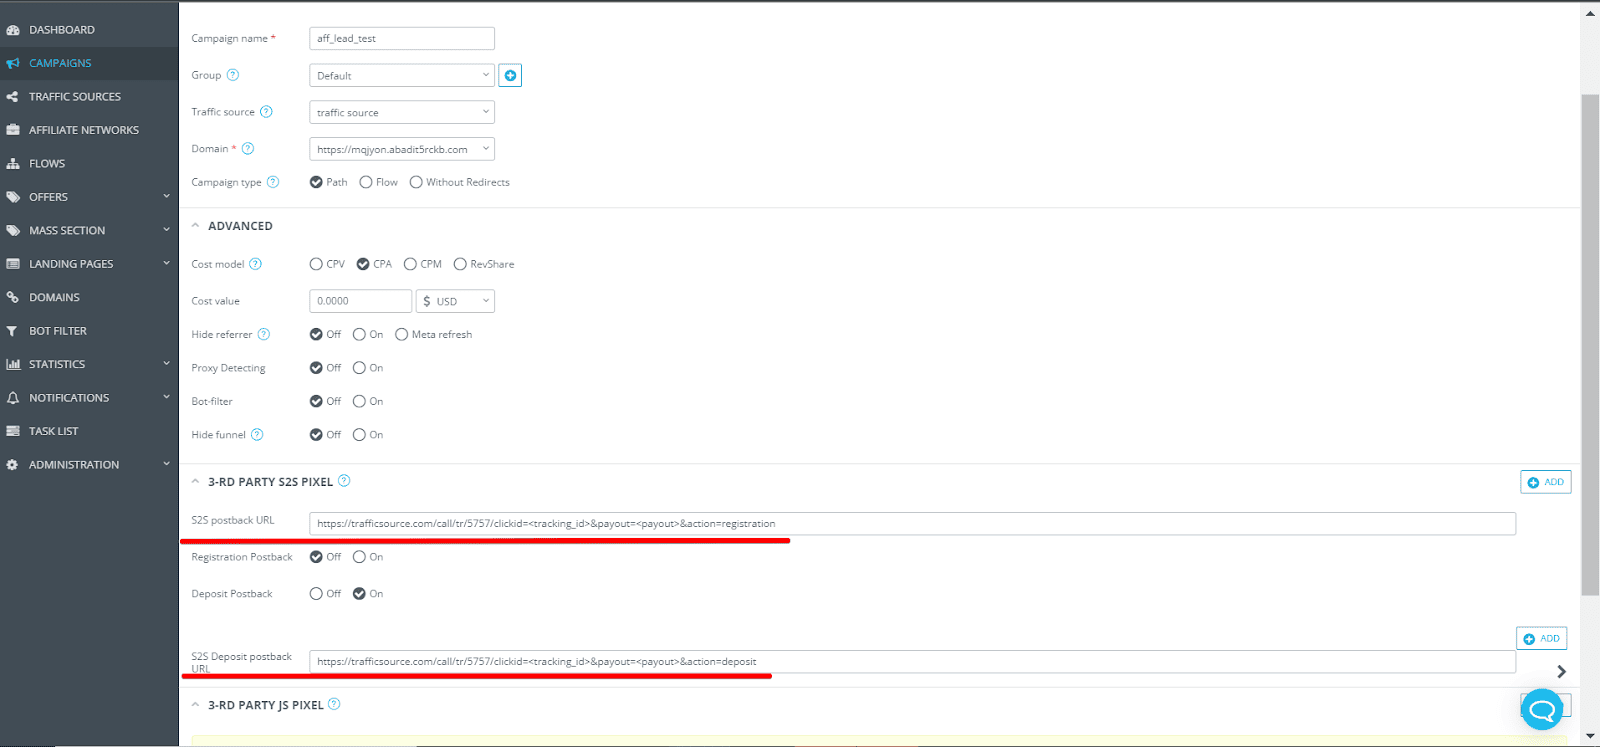
Here you can also add the necessary number of fields for postbacks with previously specified by you conversion status values in the Deposit status value field.
In this way, with the help of the affiliate lead postback feature, by transmitting conversions with different statuses from the tracker to the traffic source, the efficiency and manageability of advertising campaigns can be significantly improved. The traffic source can use this data to optimize impressions.
That is, the transmission of conversion statuses allows you to better analyze and monitor the effectiveness of advertising campaigns, which will improve performance and save money, resulting in a more effective campaign.
12.5 Unique Landing Page
We have great news! A new feature is now available on AdsBridge – LP rotation by repeated user visits.
Now the system will send users who repeatedly clicked on the campaign link to the subsequent landing pages in the rule so that the user won’t get to the same landing page again. If the user has clicked through all of the landing pages, the next time he clicks through, the circle starts over again.
Note. Cookies are stored for 30 days.
What’s the advantage?
When using landing pages without unique-rotating, users get to the same landing page multiple times when they click on the link again. The uniqueness rotator allows different content to be shown when a user revisits a landing page, thereby increasing the chance of a higher CTR.
How to activate the Landing Page Rotator?
- Create a Campaign.
- In Step 2 of the settings activate the check box Only unique LP (works with all the rules)
- Add the necessary number of landings.
- Save settings. Done!
Note. The function is only available upon request. To get access contact your support manager.
Have successful conversions!
12.6 Update payout for conversions
Imagine, you received conversions with wrong payouts that were recorded in statistics. According to that, statistics is already incorrect, BUT there is no reason to be upset because AdsBridge allows you.
To change the value of payout for conversions you need to:
- Open “Statistics – Edit conversion” section.
- Select “Update conversions” tab.
- Add a click_id and payout values to the field.
- Press “Update”.
- Done
New data will be automatically passed to “Task list” section.
Click_ID of conversions with wrong payouts should necessarily be inserted in the following format: click_ID, payout, txid, status (separated by commas and without spaces).
Example:
For click_ID, payout – ortln592fe4482318f538555813,5
For click_ID, payout, txid – ortln592fe4482318f538555813,5,payment
For click_ID, payout, txid, status – ortln592fe4482318f538555813,5,payment,approved
For conversions from CPA offer with status (without txid) – ortln592fe4482318f538555813,5,,approved
More information about updating conversions you can find in our user guide.
Wish you high conversions!
The AdsBridge Team.
12.7 Monthly cap function
Monthly conversions cap*. It is used on the same principle as the daily cap, if there are limits on the number of conversions per month (for example, 200) from the affiliate network, after which the quality of your traffic will be checked. In order not to check the number of remaining conversions every day, we suggest enabling this feature.
To activate this function, it is necessary to switch on the checkbox «Offer cap» and enter the necessary data in the fields «Time Zone», «Redirect to» and «Conversions cap».
- «Redirect to» you need to choose the offer to which traffic will be redirected in case of reaching the limit of conversions on the first offert.
- «Time Zone» – here you must select the time zone, which will be considered for the offer’s daily limit of conversions.
- «Conversions cap» – specify the desired limit
Note. The limit is valid for one calendar month (for example, if you set the limit on the 10th day, the limit will be updated again on the 1st day of the next month).
After filling all the required fields, click «Save».
*This option is optional. The function is only available upon request. To get access contact your support manager.
12.8 Smart conversion
The Smart conversion function allows you to optimize your traffic and give your users unique offers! Its main difference from the already known rule of uniqueness in the main traffic expansion is that the Smart conversion function analyzes the uniqueness of conversions, not visits, and is valid for 2 months from the moment of activation of the function in the campaign.
Please note! The Smart conversion function can be opened on request through the support manager.
Activation of the function is performed when setting up the affiliate network, you should activate the following checkboxes:
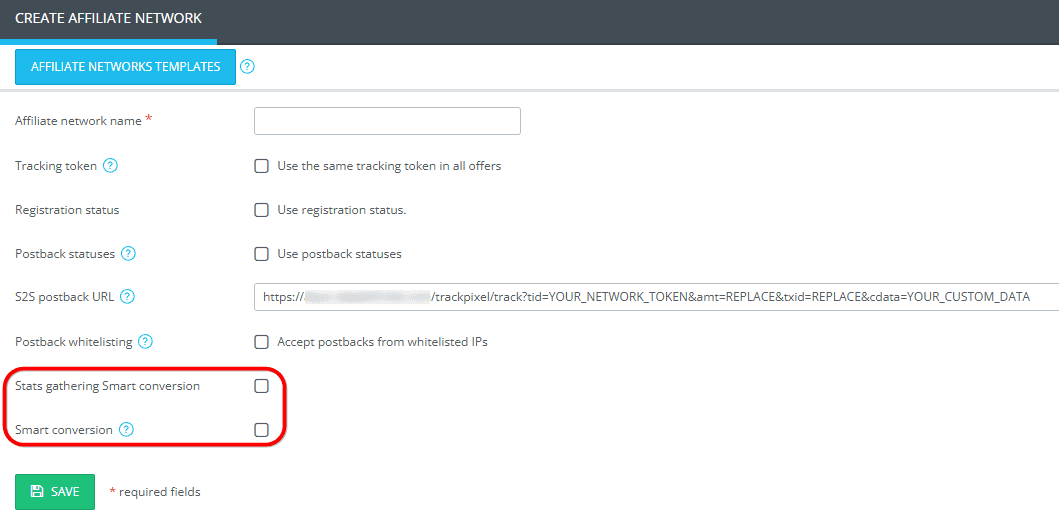
Stats gathering Smart conversion – collect statistics
Smart conversion – activation of the function itself
In the drop-down box, you will be able to choose the way of tracking Smart conversion: AffNetwork and Offers
AffNetwork will help you do smart conversion with several affiliate networks within one rule.
The scheme of work: for example, you have 3 affiliate networks and 2 offers from each.
1. After the basic setup of affiliate networks, activate Smart conversion, select the AffNetwork checkbox, and save.
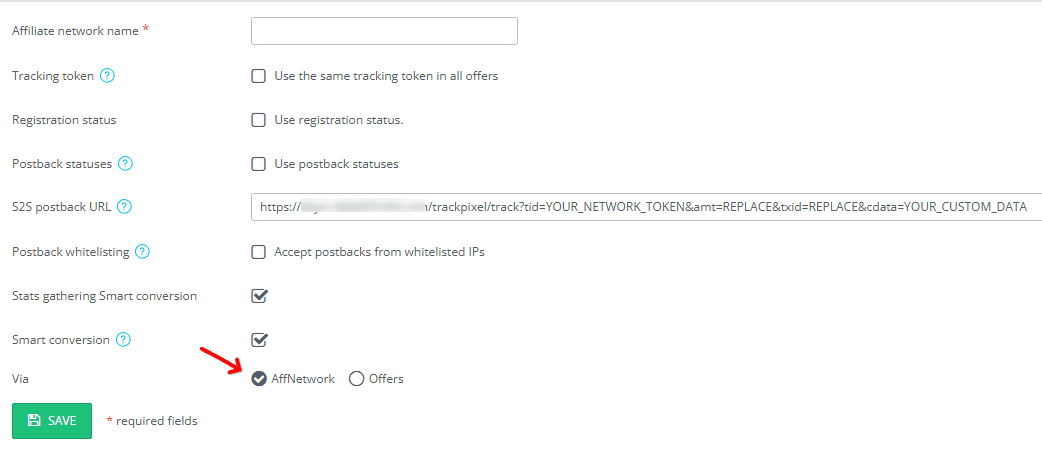
2. You create a campaign add all 6 affiliates into one rule and place the campaign link on the traffic source.
3. A user (traffic) follows the link of the campaign and makes a conversion on one of the offers (affiliate network 1), the next time this user does not go to the offers of affiliate network 1, the redirect will take place on the offers of other affiliate networks, so, after making a conversion, the user will go only to one of several offers of one affiliate network.
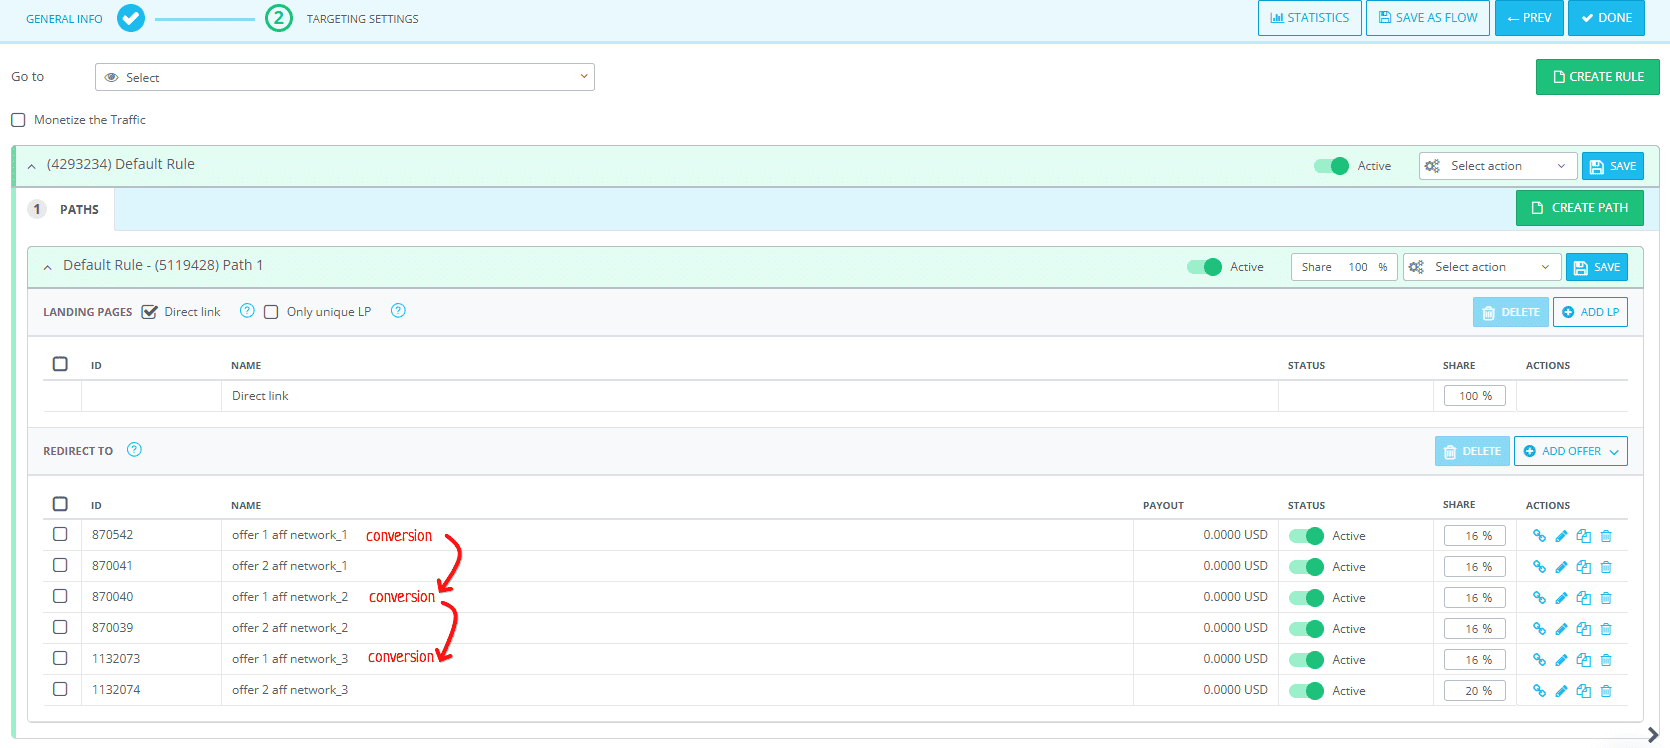
Offers – allows you to prevent the user from going to an offer where he has already made a conversion within one affiliate network.
The scheme of work: for example, you have 4 offers from the IMonetizeIt affiliate network.
1. After the basic setup of the IMonetizeIt affiliate network, activate the Smart conversion function, select the Offers checkbox, and save.
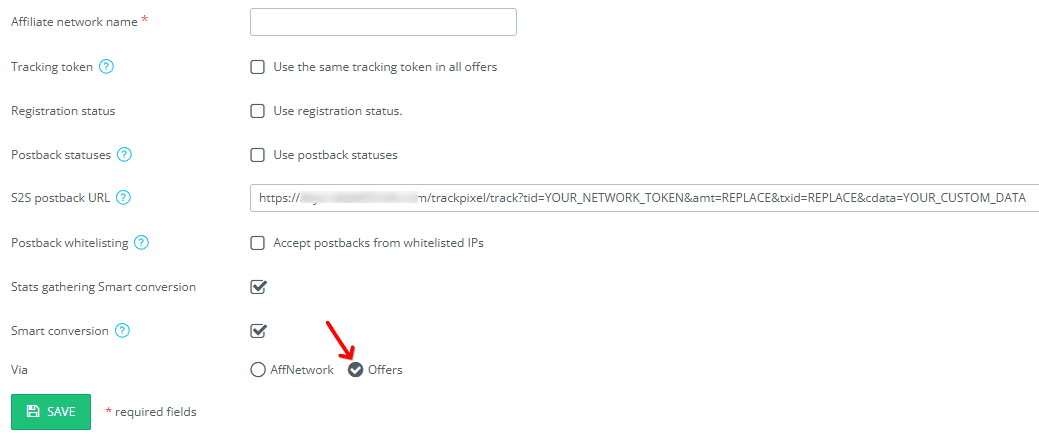
2. Create a campaign add all 4 offers into one rule and place the campaign link on the traffic source.
3. The user (traffic) goes to the campaign link and makes a conversion on the first offer, the next time he will go to the second offer and again make a conversion, each transition after the conversion will be redirected to the new offer.
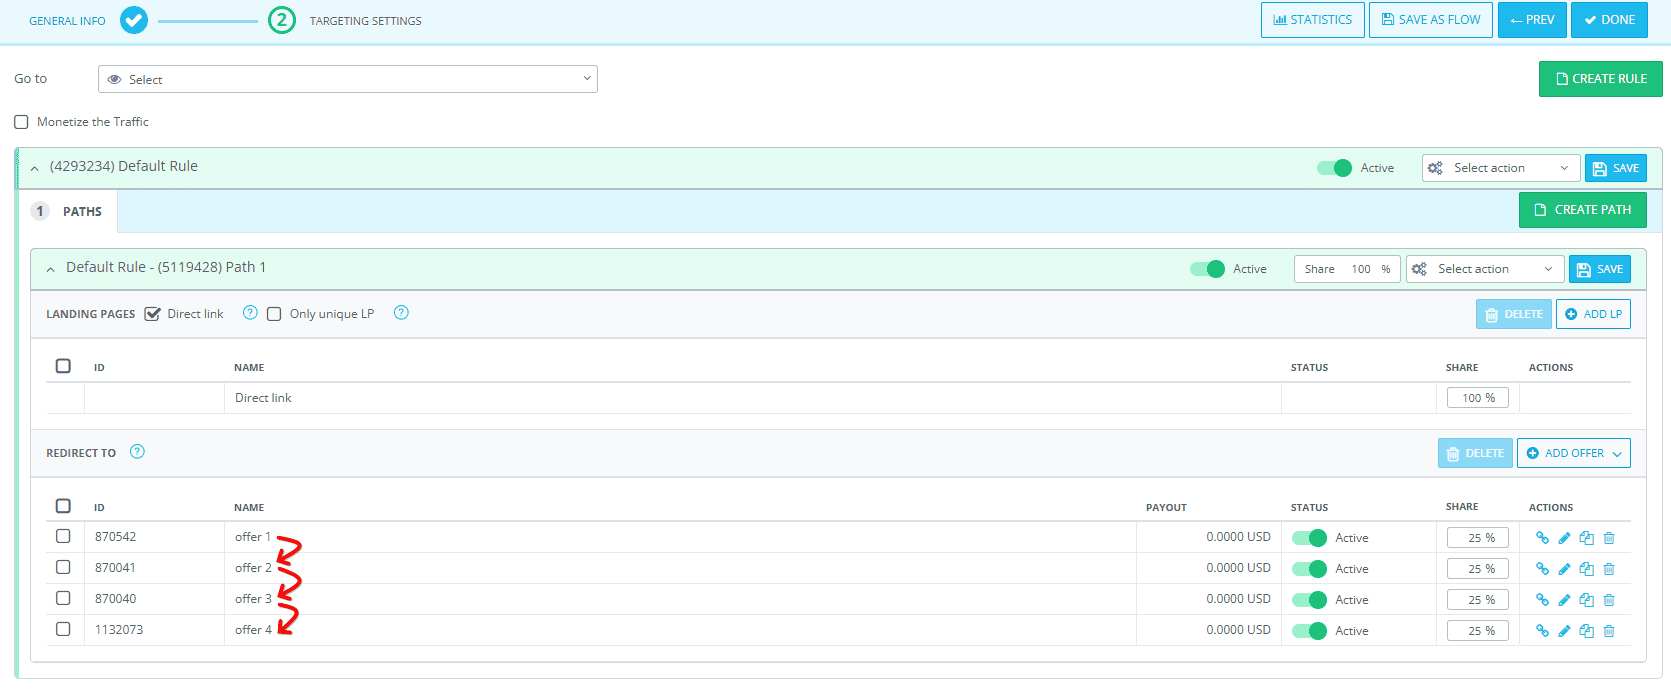
Thus, the traffic will make unique conversions and increase the profitability of each offer! Ideal when working with DOI and SOI
Please note! In case the user has made conversions on all offers in the rule, then further he gets to the offers according to the standard expansion in the rule.
12.9 Cost update
The Cost update feature provides the ability to manually change the cost values.
In the process of working with the tracker, there may be situations when costs are displayed incorrectly. This can happen due to incorrect data entry or incorrect transmission from the traffic source. To avoid distortions in the report, AdsBridge provides the ability to manually change costs using the Cost update feature.
These instructions will help you make adjustments quickly and correctly while maintaining data transparency and accuracy:
1. Request access to the feature from your AdsBridge manager.
2. In the CAMPAIGNS section, click on the campaign where you want to change the cost value.
In the top right corner where the line of icons are placed you will see the icon Update total costs.
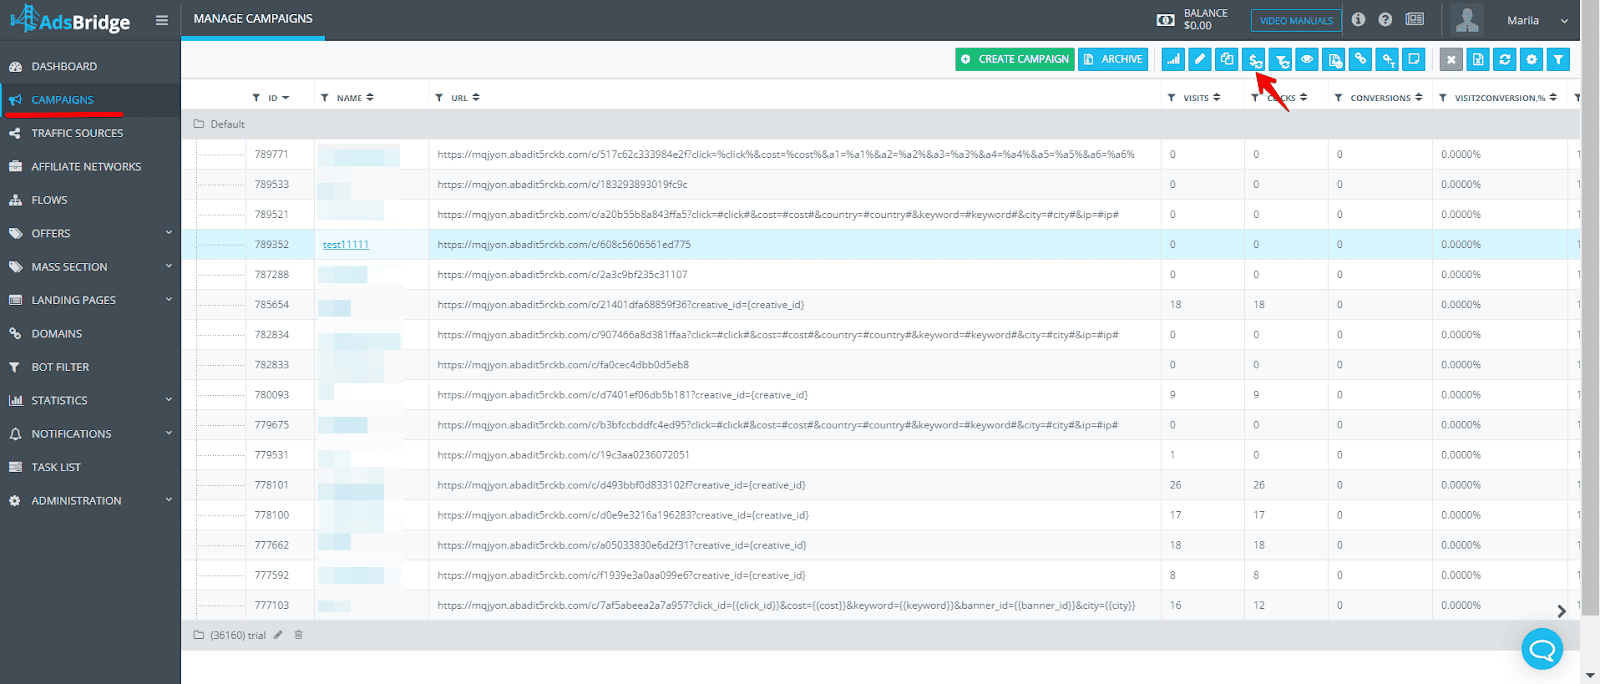
3. Next, you will see a pop-up with the necessary fields to fill out.
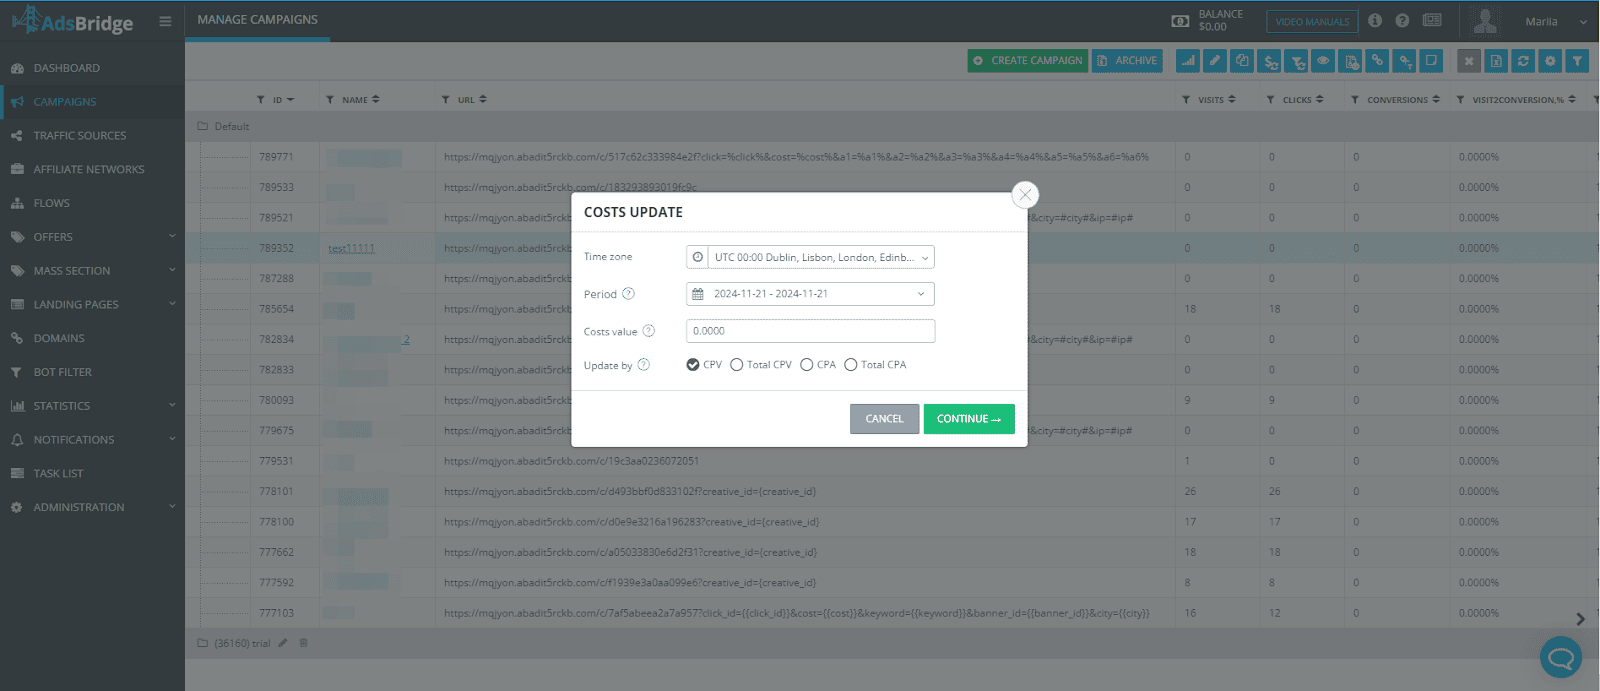
In the period field you can select the period for which you want to change your cost data.
Please note! The maximum cost update period is 31 days!
You also cannot update costs for today, as the data is still being aggregated.
In the cost value field you need to specify the cost value.
The cost currency will be the same as the currency selected in the first step of creating this campaign.
You also need to choose a cost update by:
CPV, total CPV, CPA, total CPA.
Total CPV takes the entered value and divides it by the total number of visits for the selected campaign for the selected period.
Total CPA works the same way, except it divides the value by the total number of conversions.
So if in the first step of creating a campaign you have a cost of, for example, 10.

But you need to edit the cost value for a specific period, for example, value by 5, then you can do it with this function.
And in the statistics you will be able to see already changed amount of your costs.
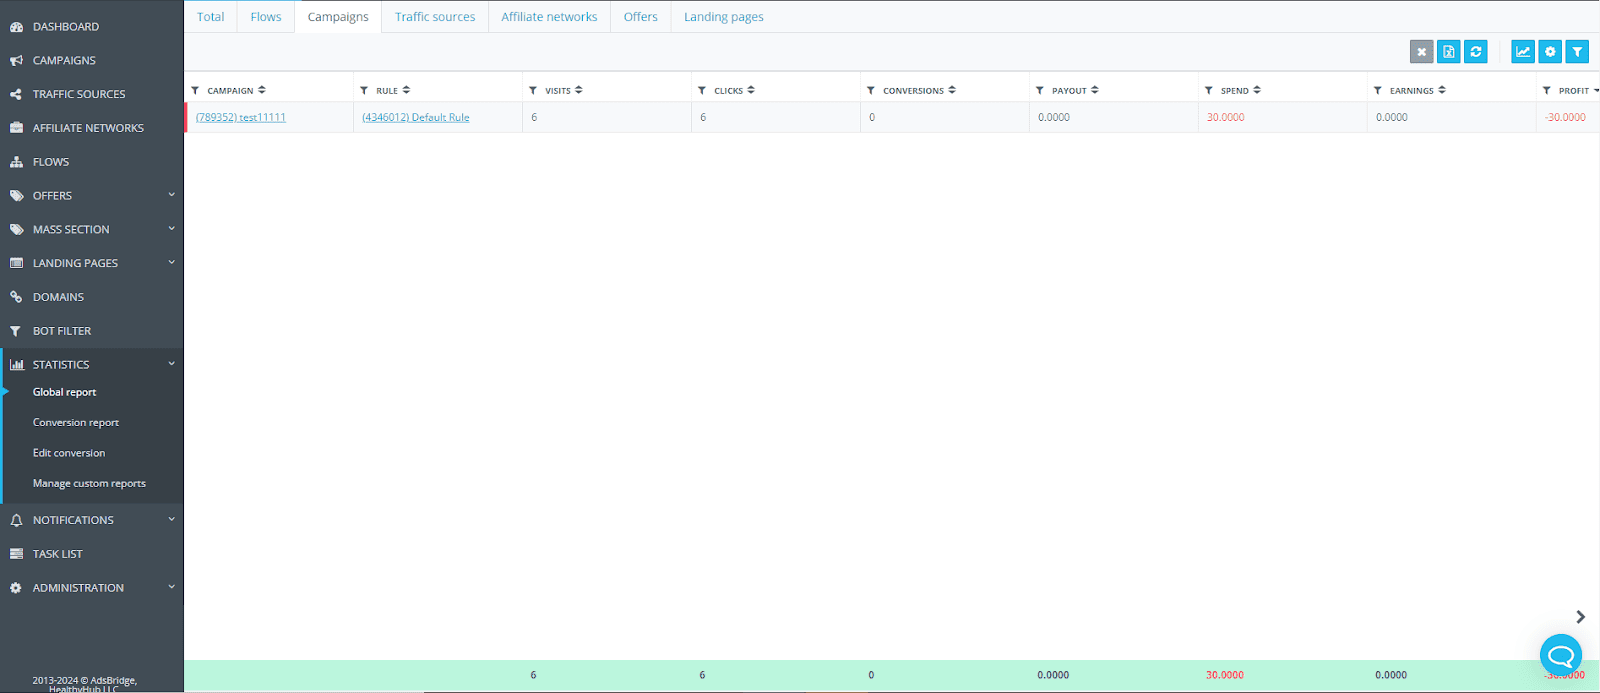
Also in case if you need to update costs by token you can also do it by using this function.
In the CAMPAIGNS section, click on the campaign.
In the upper right corner, there are a line of icons, you will see update costs by token icon.
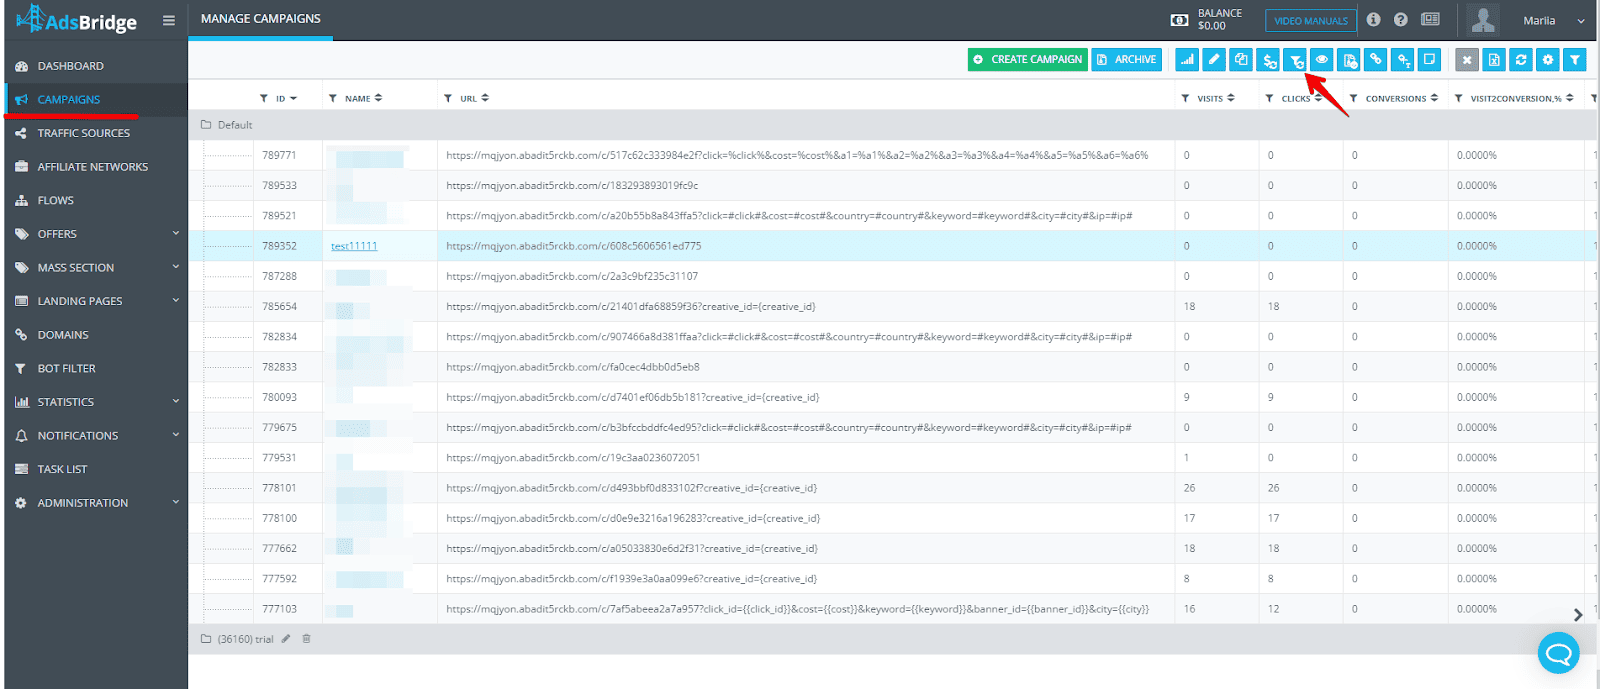
Next, a pop-up will appear in front of you, with the necessary fields to fill out.
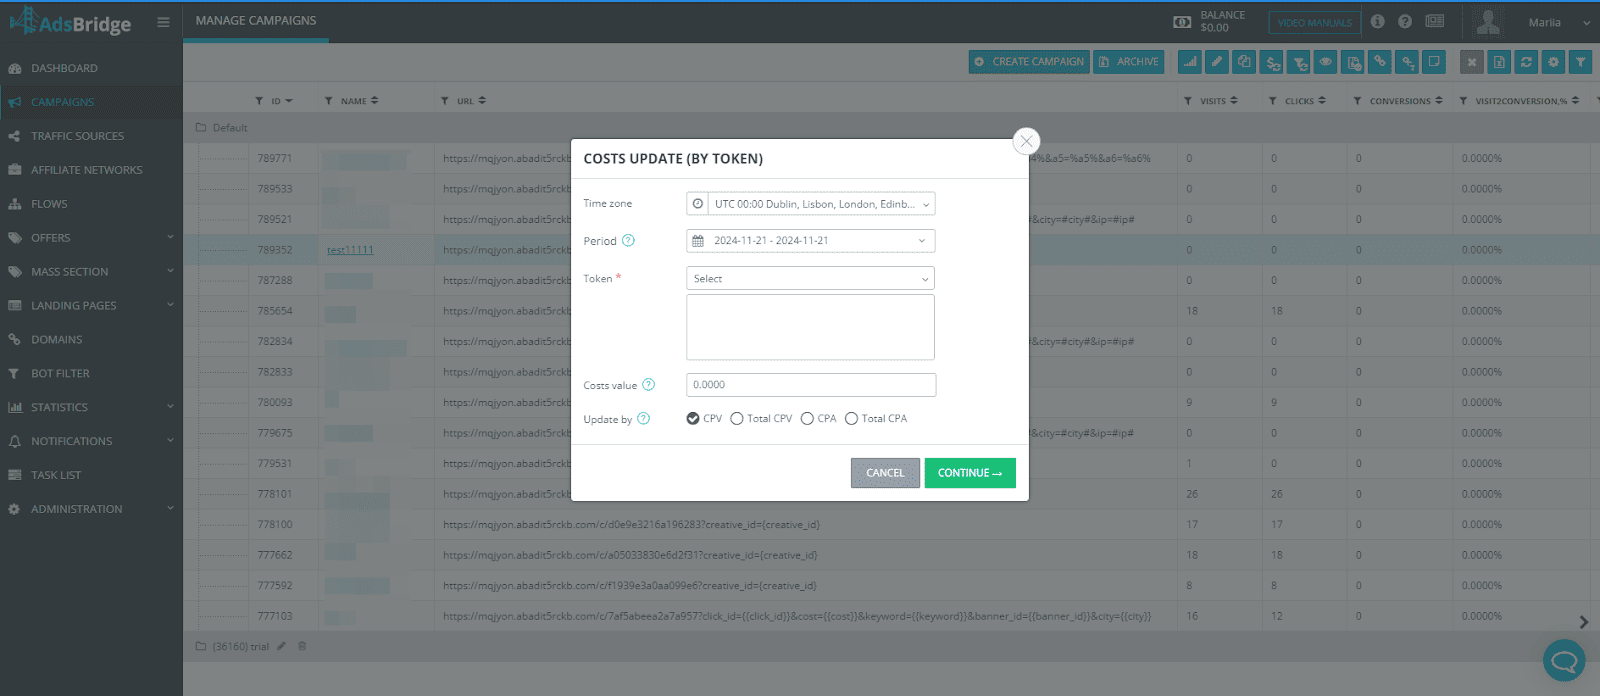
The fields are identical except the Token field.
There’s you need to select which specific Token you need to make a change to the cost value.
For example, your Token 1 is {zone_id}.
If you want to change the data for zone 12345678, just specify this zone in the relevant field – only this zone will be affected by the cost changes.
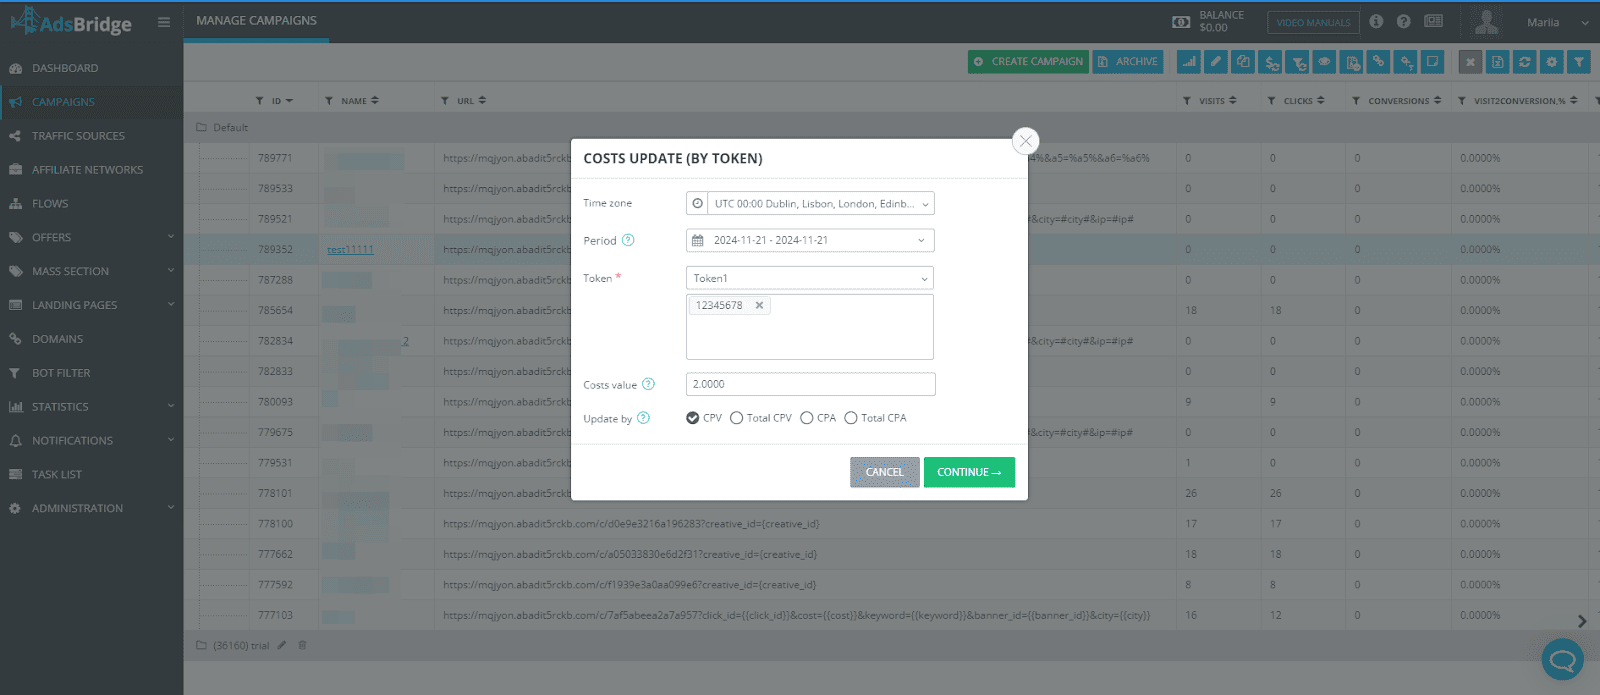
Manually updating cost values is a convenient tool for correcting data in the tracker, which helps to maintain accurate accounting and avoid reporting errors. By following these instructions, you will be able to correct data quickly and efficiently, ensuring that the information in your report is up to date.
12.10 Meta-tag verification
We would like to talk about a relevant problem in today’s realia – Facebook domain verification.
These changes were caused by new rules in security policies of iOS14 that led to new Facebook rules aimed at promotion of security measures.
AdsBridge team also took care of this change and provided a possibility to pass verification of the domain, purchased through the platform.
So, what is domain verification and what it means for affiliates?
Domain verification is aimed at confirmation of security rules of a certain brand. This change doesn’t concern publishers that much as it does affiliates and their partners on the market.
There are 3 main ways how you can verify your domain:
- Adding meta-tag to the index of the site (meta-tag verification);
- Uploading of html-file;
- DNS-confirmation
AdsBridge offers a possibility to pass domain verification with meta-tag verification. In order to do it, you need:
1. Purchase a domain through our platform. You can do it in the section Domain – Buy domains.
You also get a free SSL certificate for this domain.
2. Enter your Facebook business account and go to “Brand security → domains”
3. Click “Add” and indicate the name of the domain bought in AdsBridge.
4. After that, the domain will appear in the Domains section waiting for confirmation.
5. Select the domain and confirmation method as meta-tag verification.
6. Copy the meta-tag from Step 1

7. Return to AdsBridge. In the landing page editor create a new landing page. It can be a clear landing page or a landing page with necessary content.
On the right-side panel in the Meta tags add the previously copied meta-tag from Facebook.
8. Create a campaign in the tracker with this landing page and the domain. Save it.
9. Go to the Domains section in the tracker. Select the domain, click Edit button and assign the campaign for the Index page.

After that go back to Facebook and click the confirmation button. The domain indicator will change from red to green.
It means that you can start your work and launch your ad campaign?
We hope that this guide was useful and helped you pass domain verification. If you have any questions, contact support@adsbridge.com. We are always ready to help you!?