
Postback settings are one of the most commonly asked questions from newbies and even more experienced affiliates. Indeed, one incorrect symbol and information about your conversions just won’t be passed back to the tracker and/or to your traffic source.
The most effective way to make settings correctly is to understand the idea of postback and its types.
After it, regardless of an affiliate network or a traffic source, you can handle and set up any postback from scratch.
So, which types of postbacks are there and how can you make settings in each case?
Imagine the following funnel which is the most commonly set up in a tracker:
Traffic source – Tracker – Affiliate Network (or your own offer)
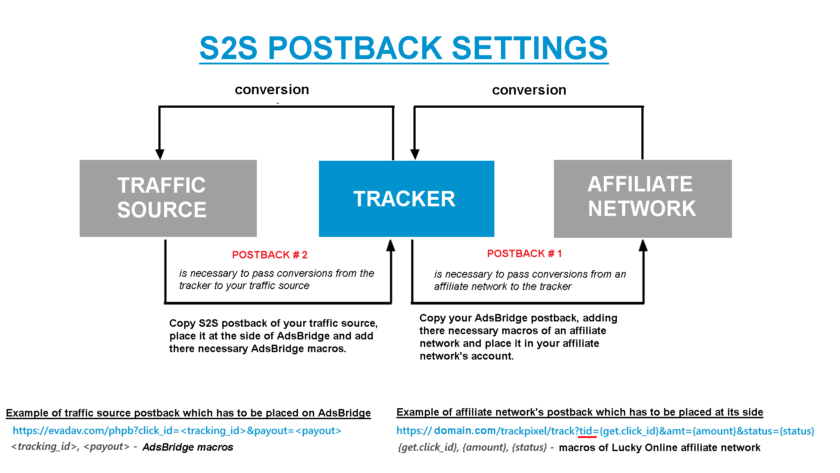
AdsBridge really plays a part of “a bridge” in this funnel, by getting information about conversions from an affiliate network, saving it and sending it to a traffic source.
In this case, in order to display information about conversions in the tracker, a postback (#1) is set up at the side of an affiliate network. At the same time, to pass this information to a traffic source, a postback (#2) is set up in AdsBridge (Numbers 1 and 2 were taken figuratively for explaining the scheme)
In order not to mix up where you need to place each of postbacks, think where information is passed in each case.
When a conversion happens at the side of the offer, an affiliate network has to pass to AdsBridge, right?
In this case we place an AdsBridge postback at the side of an affiliate network in order to get this information.
Please note the postback template in this case you take in AdsBridge, adding the macros of your affiliate network there and removing the part of postback which doesn’t pass any information.
So, postback (#1) is the AdsBridge postback which is placed at the side of an affiliate network.
You can find the postback template in the Tracking pixel section in the top right menu.
This is an example of AdsBridge postback:
http://xxxxx.ab4all.com/trackpixel/track?tid=YOUR_NETWORK_TOKEN&amt=REPLACE&txid=REPLACE&cdata=YOUR_CUSTOMDATA&status=REPLACE
xxxxx – your unique subdomain in our system
The only obligatory parameter in the postback is tid.
It is the only required parameter in the postback without which conversions won’t be passed. After the “=” sign in this parameter, you need to insert affiliate network macro instead of YOUR_NETWORK_TOKEN, which will be replaced by the value that came in a parameter entered in the Tracking token field when setting an offer.
amt – passes the dynamic value of a payout by conversion.
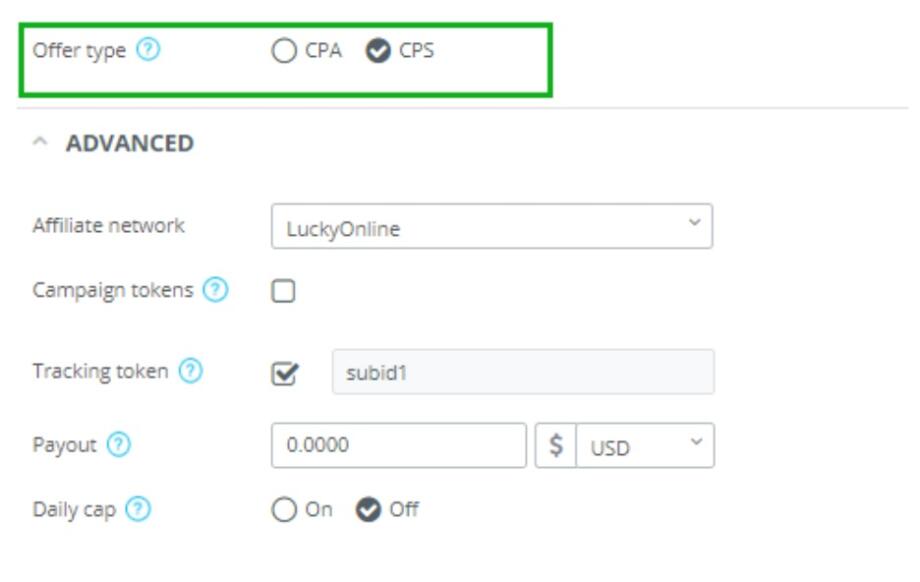
txid – is set only for CPS offers. It allows tracking of several conversions from one click ID.
cdata – passes any parameter straight to the source traffic without saving on our side.
status – passes the status of conversion, if your affiliate network provides such kind of option.
To set the postback correctly, you need to substitute the placeholders like YOUR_NETWORK_TOKEN, REPLACE with the relevant parameters of your affiliate network and delete the part of the postback that won’t transfer any information.
Important note: If your affiliate network is in our templates, then its postback is already set up.
So all you have to do in this case is copy and paste it at the side of the affiliate network, usually in the field Global Postback.
If you work with your own offers (not with an affiliate network), then in order to track conversions, you need to use a pixel.
AdsBridge pixels can be found in the Tracking pixel section in the top right menu.

AdsBridge offers 3 different pixels – Image, Iframe and Tracking script.In most cases you can use any of the listed ones (but when working with Facebook and sending back information back, use the Iframe type at the side of the offer)

For correct work, the pixel has to be placed on the Thank you page after your offer.
Pay attention that the pixel domain and the domain of your campaign have to correspond. That’s why when you add your own domain to the campaign, change the system domain in the pixel to your custom domain. For example, <img style=”display: none;” src=”http://eenyl.adsb4trk.com/trackpixel/track.jpg?“> change to <img style=”display: none;” src=”http://my.domain.com/trackpixel/track.jpg?“>.
In case you use a pixel, information about click id (tid) is taken from cookies, therefore unused parameters can be removed from the pixel accordingly.
Writing information to its statistics, AdsBridge can pass it to the traffic source.
So, postback (#2) is the traffic source postback which you place at the side of AdsBridge to pass information about conversions back to the traffic source
(it’s not a mandatory option. If you don’t need to pass conversions to the traffic source, remove the postback or just skip this part)
If you set a postback with your traffic source, the click id parameter is a must in the postback and in the tracking ID field. Other parameters are up to you.
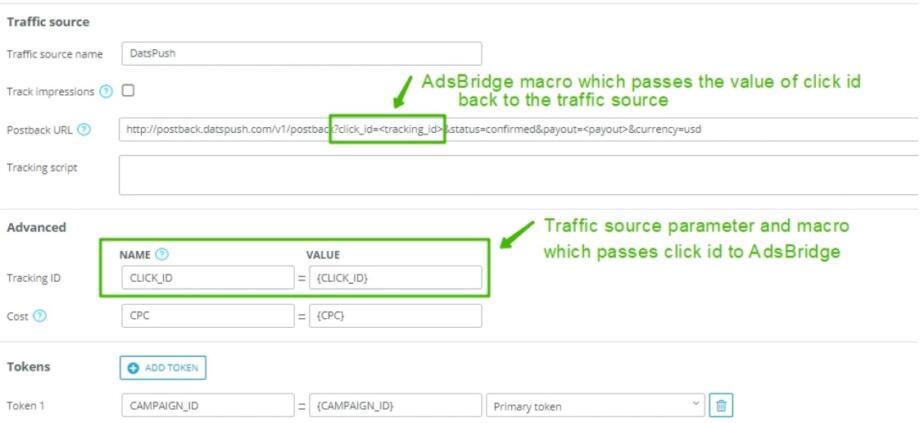
Pay attention that after “=” you have to use AdsBridge macros in <> brackets. For example, <tracking_id> or the name of parameter in <> (click id macro), <payout> etc.
Please note: not all traffic sources provide S2S postback to pass conversions (e.g. Facebook). In this case sometimes a traffic source pixel can be used.
In case you use a traffic source pixel, it has to be placed in the Tracking script field. At the same time you need to use AdsBridge IFrame pixel at the side of your offer.

If you still have some doubts about your postback settings, write to your account manager. He will check your settings and answer your questions.
No conversions in the tracker
This situation may be affected by several reasons:
- First and the main one, you set up the postback with the affiliate network incorrectly. Double check all the parameters and macros in the postback with your AdsBridge account manager and affiliate network manager.
- If you use a landing page in your campaign, but haven’t placed a click URL on the CTA button of your landing page.
- You might be using an incorrect URL at your traffic source. This is a rare case but sometimes it happens.
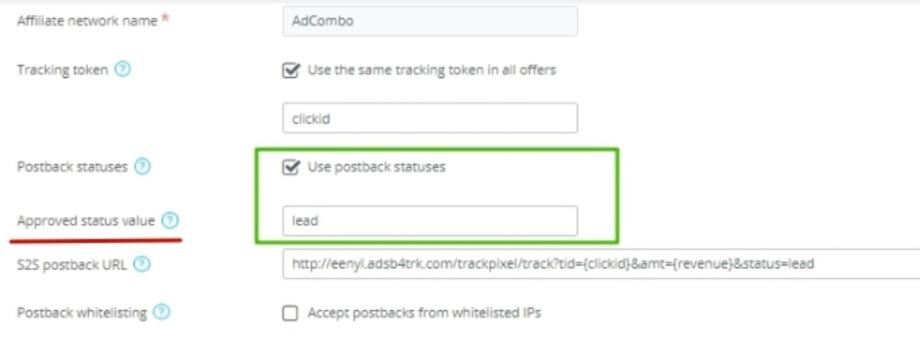
- You set up an approved status of postback.
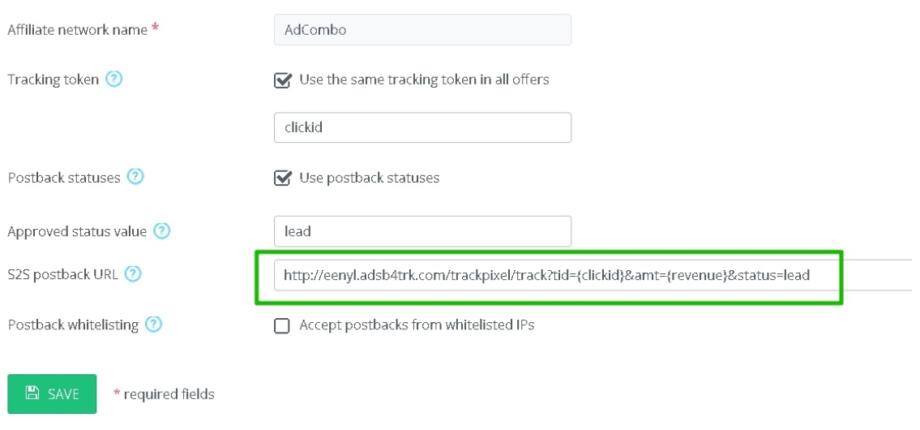
If you made such settings, in the General report you will see conversions only with the approved status. Conversions with all statuses will be displayed in the Conversion report.
Therefore, if your conversions have status different from the approved one, e.g. trash or new, check them in the Conversion report.
For instance, if you set up an approved status value for an affiliate network as lead, then in the General report you will see conversions only with this status, all other conversions, including approved ones, will be displayed in the Conversion report.
In order to get conversions with all statuses in the General report, use the parameter “txid” instead of “status” in the postback to get statuses. This parameter passes the type of transaction. So put txid={status}, i.e. indicate the macro of an affiliate network, used to pass postback statuses. Also don’t forget to uncheck the box “Use postback statuses”.

At the same time, set the type of offer as CPS on AdsBridge. This is a mandatory requirement in this case.
We hope this manual helped you understand the main difference between the types of postback and the reason why you sometimes might not see your conversions in the tracker.
Contact AdsBridge support managers in case you have any questions. We will be glad to help you out!?