
AdsBridge never stops. We are working even during these winter holidays. Take a moment and enjoy step by step guide “How to create an offer on AdsBridge?”
Get started!
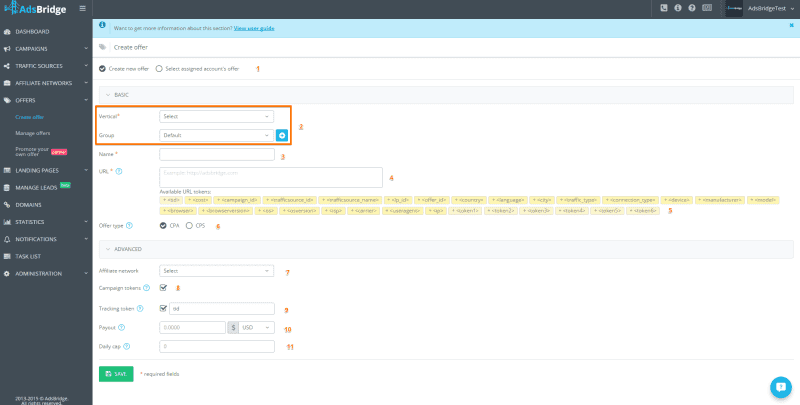
The screenshot shows the interface for setting an offer on AdsBridge.
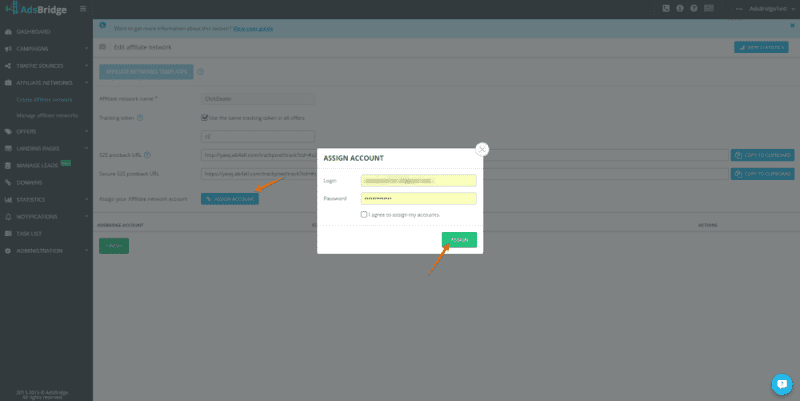
1. The first field you see in offer settings is the selection of “Create new offer” and “Select assigned account’s offer” options. Our tracker can pull all data from your offer through API of our integrated affiliate network, ClickDealer. This feature is available for users with Professional, Business, Enterprise and Exclusive subscription plans.
In order to use it, when creating the ClickDealer affiliate network in our interface, enter your ClickDealer account details in the pop-up that will appear after you press this button:
2. Vertical selection and offers’ grouping – these features are made for your convenience. The selected vertical enables you to sort out offers by the vertical in the “Manage offer” section, and grouping lets you see statistics by groups of offers and not just by each offer separately.
3. Name the offer. You can name it as you like (the name must not be less than 3 characters and consist of a-z‚ A-Z‚ 0-9‚ – ‚ _, *, /, &, [, ], (, ), !, №, %, ?, @, #, <, >, +, comma, full stop).
4. Insert a clear URL of your offer into this field. Usually, this URL is generated by your affiliate network.
5. This list includes parameters that you can add to your offer URL for passing the information on your affiliate network.
Please note that the adding of parameters <parameter1><parameter2><parameter3> is not correct, and with such settings the offer URL won’t work. It is necessary to type the name of a parameter in the URL in which the affiliate network can receive the needed value, and only then add macros. For instance, parameter1=<parameter1>& parameter2=<parameter2> (however, the links format can vary; some affiliate networks can provide links that pass parameters through /,: and other characters).
6. Choose offer type – CPA (Cost per action) or CPS (cost per sale).
CPS offers differ from CPA, its conversion is the selling of something, and in CPA, the installation of an app, registration or another specific action represents the conversion.
In our tracker, the difference is that by CPA offer there can be only one conversion by one click ID which means that one user makes only one conversion. By CPS offer the user can make several conversions from one click ID (i.e. registration, installation and purchase), but this happens only when there is a txid parameter set in the postback (in this case the conversion is a unique connection of tid-txid parameters that are passed to tracker through postback).
7. If you previously set the affiliate network on our tracker, you can choose it in the drop-down list.
8. The marked checkbox in the “Campaign token” field means that each time users follow the offer URL, the campaign token will be added to this URL.
9. Tracking token is a very important parameter for setting the tracking of conversions. If you previously set it in the affiliate network section and chose the corresponding affiliate network, it will be automatically displayed in this field.
Tracking token is a parameter used by our tracker for passing unique click ID. This field indicates the parameter name from your affiliate network in which it can accept the unique click ID of our tracker, and afterwards, it is added to the offer URL. For instance, if your affiliate network is created on the Cake platform, you can use s2, s3, s4, s5 for the Tracking token. In case your affiliate network is created on the HasOffers platform, you can use aff_sub2, aff_sub3, aff_sub4, aff_sub5. There are a lot of affiliate networks created on custom platforms, and you need to ask your affiliate manager what parameter to use for each one of them.
10. Set up the payout for conversion and currency in which this payout will be made. The payout value indicated in this field will be static (which means it will be used in case the dynamic value of a payout is not returned by an affiliate network in postback or affiliate network does not have this function) unlike the dynamic that is passed in the postback. The pass of a payout sum through postback means its straight pass from affiliate network for each made conversion. If the dynamic payout sum differs from static one, the dynamic payout that came with postback will be used to calculate the revenue from conversions. The sum of payout (for both static and dynamic) will be recorded in the currency selected when creating offer.
11. Daily cap – if there is a limit on the number of possible conversions per day for your offer, you can use this function in order not to lose your traffic when the limit is reached. As soon as you indicate the limit, you will see the additional settings:
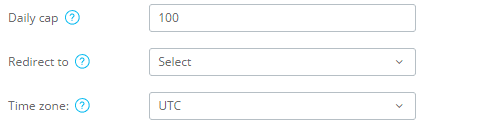
Redirect to – select the offer for redirecting traffic
Time zone – select the time zone for correct calculation of the daily cap statistics.
Create several offers for your campaign and sort them by path option!
Don’t forget to watch this short video before you start!
https://youtu.be/SEvdqVYuE2I
Wishing you happy holidays and highest conversions!