These instructions will help you quickly set up tracking of visits, clicks, and conversions when working with coffers and smartlinks of affiliate networks.
If your funnel is more complex, email us directly at support@adsbridge.com. In the meantime, we advise you to read this manual!
We have prepared material that will help you to know more about how to work with the tracker efficiently and quickly:
Before you start working with the tracker, you need to choose an affiliate network and traffic source to set up a campaign in AdsBridge you need to perform the following steps:
- CREATE AN AFFILIATE NETWORK
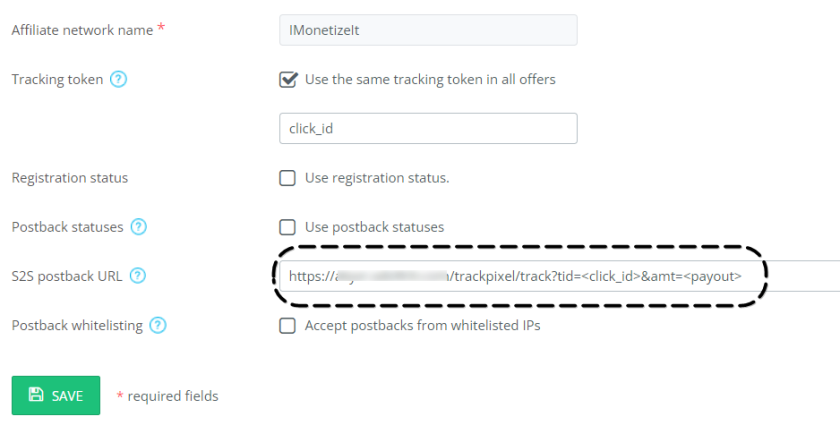
If your affiliate network is in the list of templates, just select and save it. We have taken care of your convenience and added some affiliate networks to the template, so all necessary settings will be pulled up automatically.
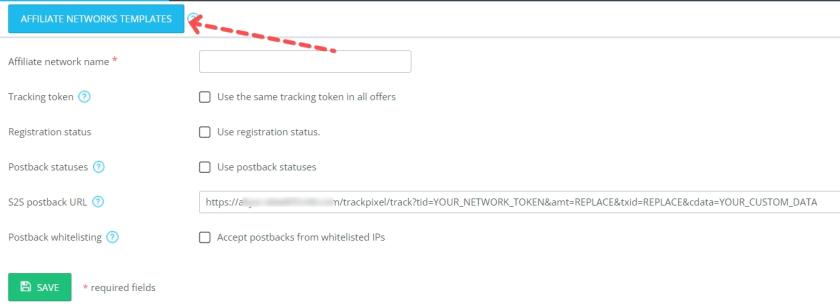
After that you need to copy the postback and paste it on the affiliate’s side, please check with the affiliate’s side for details on placement.
If your affiliate is not on the list of templates, you need to set it up manually or contact your AdsBridge support manager.
To do this, ask your affiliate grid manager for a list of parameters and macros for postback.
The main parameter for postback to work correctly is the click ID. Therefore, clarify with the affiliate manager which of the specified parameters you can use for this purpose.
- To customize the affiliate network, check out this video.
- You will also need to set up postback and place it on the affiliate network side. How to set up postback in this Manual
- OFFER CREATING
Next, create an offer (the link provided to you by the affiliate) and select an affiliate grid for it, which you have previously configured – this is an important step of customization.

URL. In this field, you need to enter the link of your offer.
Offer Type. CPA – one-time payment per conversion (one click ID = one conversion).
CPS – when tracking conversions from a single click ID by adding the txid parameter to the postback.
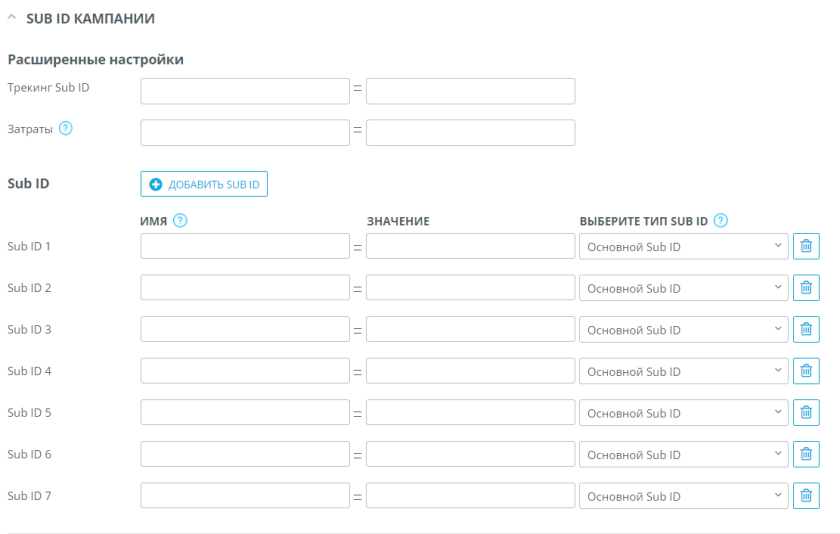
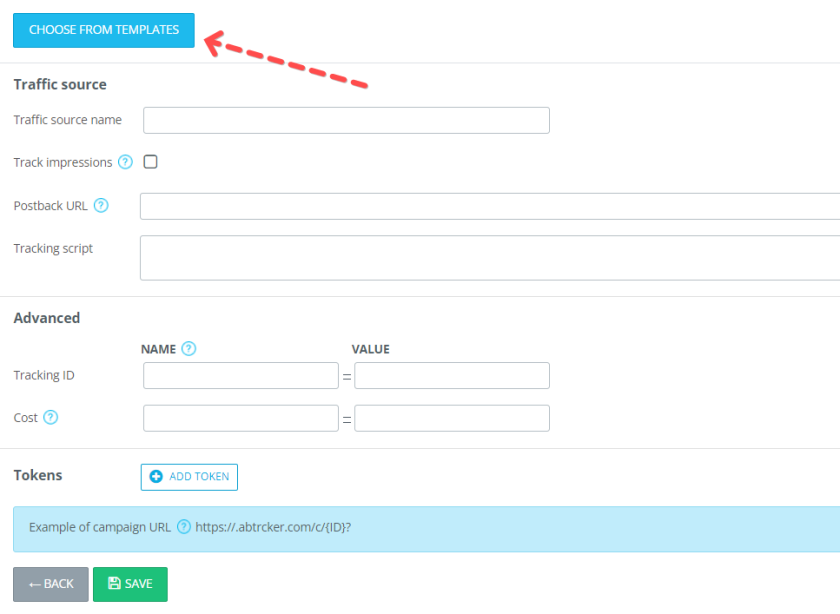
Campaign Sub ID. This option does not need to be enabled, as it is responsible for passing additional traffic information to the affiliate network side. With the “Campaign Sub ID” option enabled, all Sub IDs you have added in the campaign settings (main and additional) will be automatically added to the offer link and sent to the affiliate network side. Campaign sub IDs can be viewed in the traffic source settings at the bottom of the page (see screenshot below)
Tracking Sub ID. This field sets the affiliate network parameter, where the affiliate network can receive and transmit back the tracker click ID value. If you select an affiliate network from the drop-down list and have a Tracking Sub ID preset in that affiliate network, you will see this value preset.
Please note that in the field for Tracking Sub ID you need to set the parameter without any characters. For example, you need to spell out the value in the format aff_sub2, instead of {aff_sub2}.
Payout. In this field, you can enter the payout value you receive for the conversion and specify the currency (USD, EUR, GBP, RUB, UAH). By default, AdsBridge considers the payout value that comes through the postback in the amt parameter. However, if this value does not arrive, the value specified in this field’s settings will be considered. In addition, this option can be used if the affiliate network does not have a parameter that conveys the payout value.
Daily limit. This option is not mandatory. In case you have a daily limit for conversions on a certain offer (for example, 100), you can specify this number of conversions in this field, after which 2 more fields will appear: “Redirects” and “Time Zone”. In the “Redirection” field you need to choose the offer to which the traffic will be redirected in case the conversion limit on the first offer is reached. “Time zone” – here you need to select the time zone by which the daily conversion limit for the offender will be calculated.
- CREATING A TRAFFIC SOURCE
If your traffic source is in the list of templates, just select it and save it. We have taken care of the convenience of work and added some sources to the template, so all the necessary settings will be pulled up automatically.
If your traffic source is not in the list of templates, you need to set it up manually or contact your AdsBridge support manager.
To do this, ask your source manager for a list of parameters and macros, as well as a postback template. Instructions on how to create a traffic source.
- ADDING A DOMAIN
For full functionality, we recommend adding your custom domain before creating a campaign to avoid antivirus blocking. Instructions on how to add a domain.
Also, you can purchase domains using the “Buy Domain” function. Domain hosting is provided by Amazon, when you buy a domain through this function, it is automatically set up on our account and is immediately ready to work.
- ADDING A LANDING PAGE
There are a few options for creating landings:
- Visual editor
- HTML editor
- Landing from templates
- Landing on own hosting
- Landing pages uploading
Landings created in the HTML or visual editor of AdsBridge or added from templates are stored with us and use CDN. The link to such a landing page will be the link to the campaign to which it is added. Self-hosted landing pages that you attach on the tab of adding such a landing page are stored on your hosting.
You can read more detailed descriptions and customization of each type of landing page creation here.
- Start with a blank page.
To open the visual editor, you need to select the type of creating a landing page “Start with a blank page”.
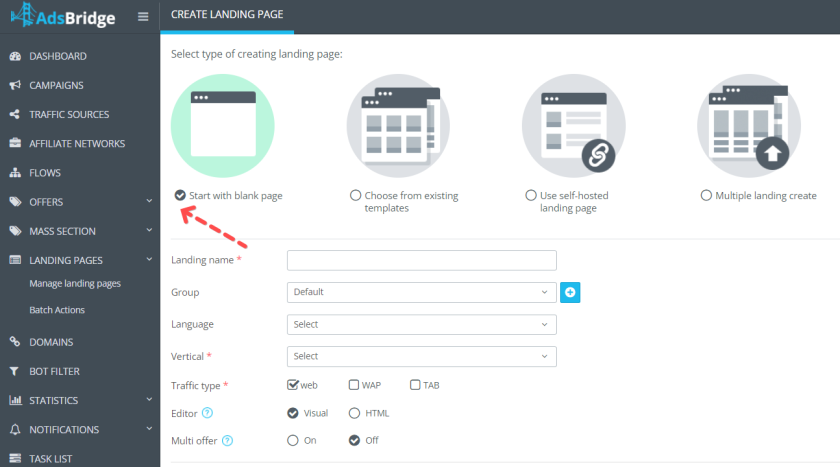
“Editor”. Here we select the editor itself. Available: Visual and HTML.
Please note that you can edit your page only in the editor in which it was created. At the moment there is no possibility to switch between editors.
- Choose from existing templates.
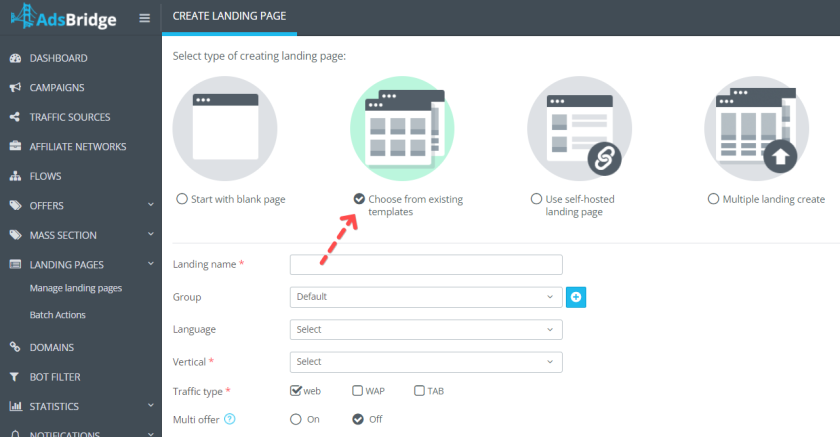
After filling in all the fields, to go to the next step and select a template, click “Continue”. All templates will appear below.
Once you have selected a template, click on the “Use” button to start editing. Editing such a landing page is done in the AdsBridge visual editor. At the moment, there is no way to upload the code of a pre-configured landing page for editing in the HTML editor or for uploading to your hosting.
You can find more information about visual editing capabilities in the “Visual Editor” section of the user guide.
- Self-hosted landing page
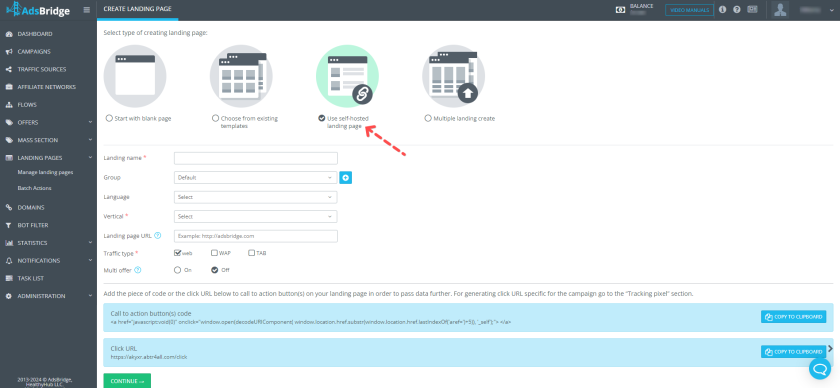
If you have a landing that you would like to add to the campaign, use this item.
Please note that in this case, you will need to place our click URL on the CTA button of your landing page. In this case, the domain of the click URL and the campaign domain must match. So if you are using a custom domain in your campaign, replace the click URL domain with your domain.
If your landing page uses the Multi-Offer feature, insert the code for the CTA button or Click URL with the order number of the offer on the different buttons of your landing page.

Example code for CTA buttons on a multi-offer landing page with 2 offers:
— for the first one — <a href=”javascript:void(0)” onclick=”window.open(decodeURIComponent( window.location.href.substr( window.location.href.lastIndexOf(‘aref=’)+5) + ‘&multi_offer=1‘), ‘_self’);”> </a>
— for the second — <a href=”javascript:void(0)” onclick=”window.open(decodeURIComponent( window.location.href.substr( window.location.href.lastIndexOf(‘aref=’)+5) + ‘&multi_offer=2‘), ‘_self’);”> </a>
Example Click URL on a multi-offer landing page with 2 offers:
– for the first one – http://example.test.com/click?multi_offer=1
– for the second – http://example.test.com/click?multi_offer=2
- Multiple landing create
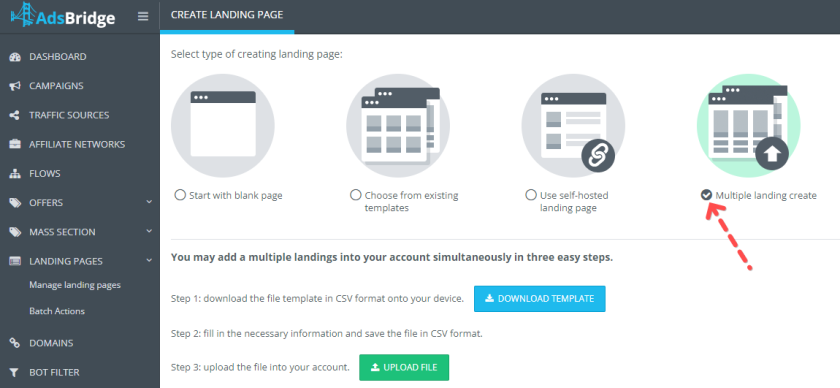
Step 1 – download the file template in CSV format to your device.
Step 2 – fill in the required information and save the file in CSV format.
Required fields:
- Landing name (you can’t use the same names),
- URL,
- vertical,
- type (Web or WAP).
Optional fields:
- Group ID (data from your account)
- Language
- Number of Offers
In the file, you need to specify the name of the bandings (you can’t use the same names), their links, vertical and type (Web or WAP). In the link of the placeholders, you can immediately specify the parameters to be transferred to the landing page. More information about available placeholders and conditions for adding them can be out in the section “Adding a Landing Page on your hosting”.
Step 3 – upload the file to your account.
- CAMPAIGN CREATION
After that you can proceed to campaign creation – the result of campaign creation will be a tracking link, which should be placed on the traffic source. Learn more about each point of campaign customization here.
The campaign creation section consists of 2 steps – General Information and Target Settings.
STEP 1 – General Information.
- BASIC SETTINGS
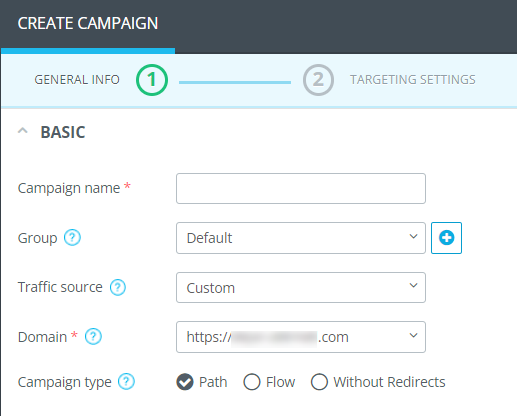
- “Campaign Name.” You can name it whatever you feel comfortable with.
- “Group”. You can select a previously created campaign group from the drop-down list to add a new campaign to it. By default, all your campaigns are in the “Default” group.
- “Traffic Source”. Select the previously set traffic source to automatically populate the campaign Sub ID fields.
- “Domain”. Select the redirect domain through which all campaign traffic will go.
- “Campaign Type”. Selected depending on the targeting settings of your campaign.
Path is a targeting setting that is only used for one campaign.
Stream – a ready-made targeting setting that can be applied to multiple campaigns at once.
Without redirect – setup without using redirects, this type is available when working with self-hosted landings. When selecting this type you should enter the link of the landing page in the field below.
- ADDITIONAL SETTINGS
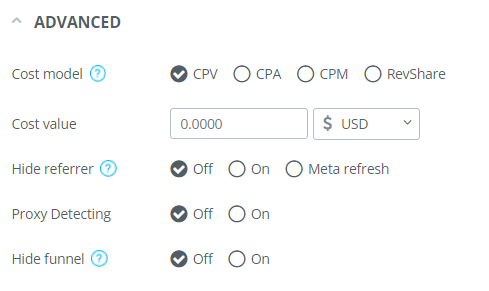
When using the campaign type Without redirect, additional settings will have 2 items: “Cost Model” and “Cost Value”. For Path and Flow campaign types, all of the following settings.
- “Cost Model”. Select the traffic payment model and enter the cost value:
– CPV (Cost Per Visit) – the price for 1 visit to the landing page. It can also be used as CPC (Cost per Click) and CPM (most often in case of using pop-under traffic, when 1 click on a campaign link is equal to a view, because the campaign link was opened in another browser window);
– CPA (Cost per Action) – price per action (for 1 conversion).
– CPM (Cost per Mille) – price per 1000 banner impressions. When selecting this item, you should also set up a traffic source so that you can track the displays and place an “Image pixel” on your banner.
– RevShare (Revenue Share) – percentage of conversion payout.
- “Cost Value. Here you can specify a static value on the selected cost model for this campaign. In addition, in this field, you can select the required currency, which will record both static cost values specified when creating the campaign and dynamic values that are passed from the traffic source for a specific campaign.
Please note: If you use dynamic cost value transmission with a special Sub ID of your traffic source, but have customized this field, the dynamic value will be taken into account first (for CPV and CPM models).
- “Hide referrer link”. With this function, you can hide information about your traffic and/or pre-landings. By enabling this option in the campaign settings, you show affiliate network representatives only a clean domain (the default is the AdsBridge system subdomain for hiding the transition link: example.ab4hr.com). You can also add your own domain in the “Domains” section under the “Domains to hide jump link” tab.
“Meta refresh” is an option that allows you to leave the jump link blank and simulate a direct link to the site. In browsers that do not support this option, the link will be displayed as if the “Hide link” option is enabled.
- “Proxy detection”. This option will appear in the campaign settings after you activate it in the “Bot Filter” section.
To enable proxy traffic detection for a specific campaign, check the “On” checkbox. Note that this option on the Campaign Creation page is linked to an additional Allocation Rule for proxy traffic, which can be found on the Create Target Settings page.
- “Bot Filter”. This option will appear in the campaign settings after you activate the bot filter in the corresponding section of the account (“Bot Filter”). Read more about the customization here.
- “Hide Funnel”. This function allows you to hide pre-landing from advertisers or affiliate network managers.
Please note that the “Hide Funnel” option is available only for pre-landing created in the AdsBridge editor.
III. 3RD SIDE PIXEL
- “S2S Postback URL.” If you use a previously created traffic source in the campaign that contains Tracking ID and Postback URL, then the Postback URL of the traffic source will be automatically substituted in the “S2S postback URL” field.
- JS pixel 3rd party. This field is used to set the js tracking pixel of your traffic source (if it provides such functionality on its side, e.g. Facebook, Adwords).
- CAMPAIGN SUB ID
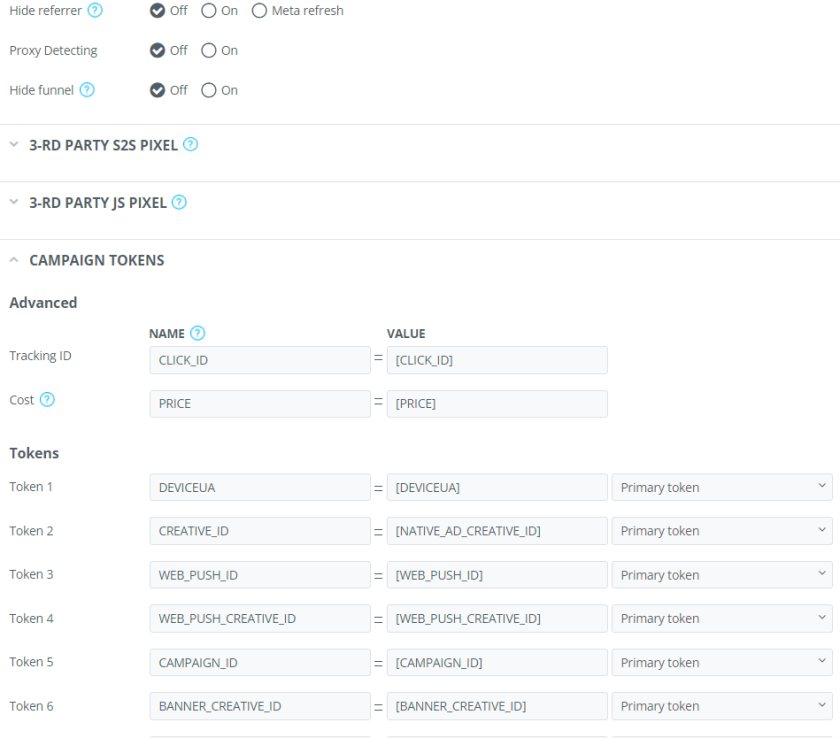
“Sub IDs” are certain values that can be added to your campaign link to pass their values from the traffic source to AdsBridge or the target site.
For the tracker to work properly, you will also need to set up Step 2 of the campaign.
STEP 2: Target Settings.
The second step of campaign creation is responsible for setting up targeting. Visually, setting up the “Path” campaign type and the “Flow” campaign type you selected in step 1 is slightly different.
Path campaign type
If you have chosen the “Path” type (set by default), then in the target settings you need to set the rules according to which each specific segment of your traffic will be directed to the corresponding distribution rule only in this campaign.
Target Settings.
“Default Rule” is a campaign element that includes default distribution paths.
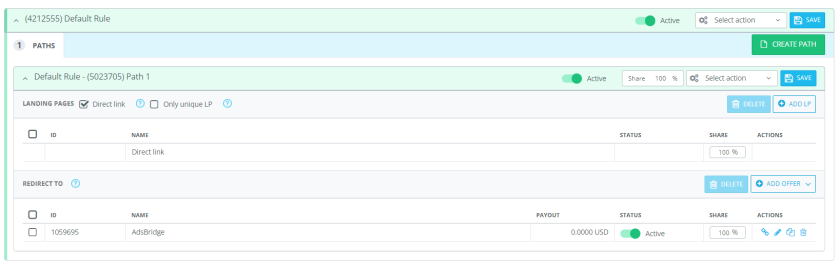
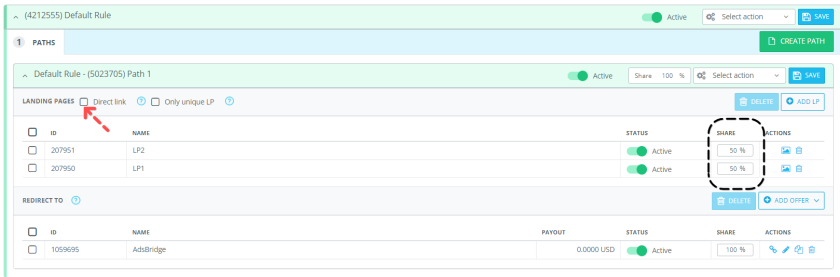
“Direct Link” checkbox – with the “Direct Link” checkbox selected, the user will be redirected directly to the link of the offer.
The traffic goes to such a rule if it does not match any of the Rules with certain distribution conditions. If you do not need to use traffic distribution, it is sufficient to configure only the “Default Rule”. In this rule, you can add up to 100 distribution paths to split them. To add a new path, click “Create Path”.
Actions available to customize distribution paths in the “Default Rule”:
“+ Landing Page” – When you click on this button, a pop-up appears where you can select a landing page or multiple landing pages that you would like to add to this distribution path.
In the “Landing Page” field in the distribution path settings, you will see this information:
“Share” – the percentage according to which the traffic will be distributed between the landing pages, or between the landing pages and the direct link. If you would like to set up, for example, a split-test of landings with 50% of traffic to each of them, you only need to click on the word “Share” and the percentages will be distributed equally automatically. Also, you can edit the percentages manually.
Here you can add a previously created offer, or create it immediately in the campaign. The following actions are available to you:
“+Offer” – by clicking on this button, you will see a drop-down list “Select Offer” or “Create Offer”. When you click on “Select Offer”, a pop-up will appear where you can select an offer or multiple offers that you would like to add to this distribution path.
The “Create Offer” option works differently. It allows you to quickly create an offer, which will be automatically displayed on the offer management page. You can fill in only the mandatory fields and further edit the offer in the “Manage Offers” section.
You can also do an A/B test of direct link with landing pages. To do this, check the box and add the landing pages together.
“Proxy rule” – is displayed in case proxy traffic detection is activated in the bot filter settings. In it you need to configure where to redirect proxy traffic. The customization process is identical to the default Rule settings.

Using the “Create Rule” button you can create a Rule and add a specific distribution condition (ISP, IP, Country, OS, etc.) to it. The number of rules with defined conditions is unlimited.
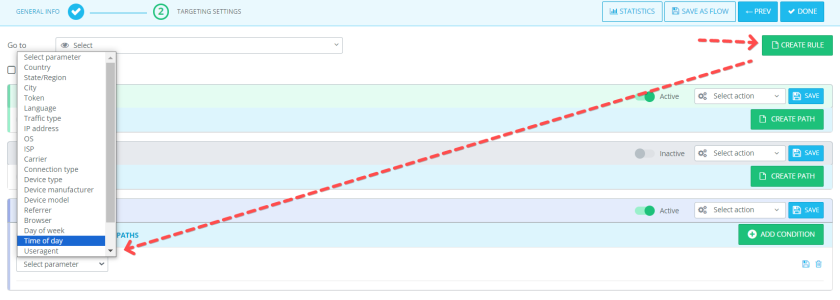
“Rule 1”, “Rule 2”, “Rule 3”, etc. – rules with special conditions for traffic distribution. If you need to add one, click “Create Rule” in the upper right corner above “Default Rule”. After that, a new rule will appear under all already created rules. In such a rule, you will see 2 tabs:
– Condition;
– Distribution Paths.
On the “Condition” tab you need to add conditions according to which the traffic will go to this particular path.
Having set up the conditions, go to the second step of Rule creation – “Distribution Paths”. On this tab, the customization process is the same as in the “Default Rule”.
When you have finished customizing the Rule, click “Save” in the upper right corner of the Rule. Note that after saving the Rule, its name will change to a list of conditions with a slash (/). You can edit such a title.
Please note that a logical “OR” relationship is in effect between Rules, and a logical “AND” relationship is in effect between conditions in a Rule. Traffic will be sent first to the Rule to which it matches the most (by the highest number of matches). Then, in order of priority, it will go to the Rule that is higher than the other one. You can use several transition conditions within one Rule. To do this, click on “Add Condition” and select the desired traffic filtering parameters from the drop-down list. Using several transition conditions for one distribution rule, keep in mind that the user will be directed to this distribution rule only if all the specified conditions are met. If the traffic does not meet at least one of the transition conditions, it will be redirected to the “Default” rule.
Campaign type “Flow”
Setting up such a campaign differs in that on the second step of “Target Settings” you will see a drop-down list “Select flow”. Clicking on this field opens the list of flows created earlier in the corresponding section of the admin panel.
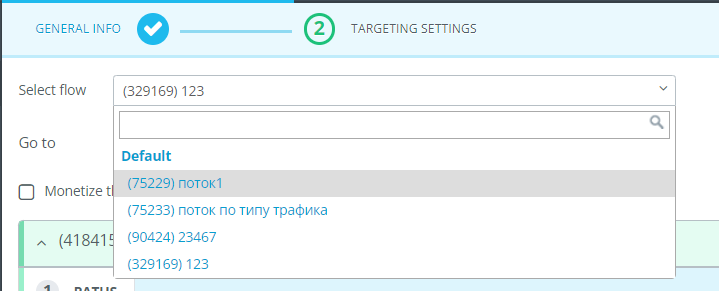
Select the one you would like to use for your campaign. After that, the settings identical to the “Path” campaign type will be displayed below. You can learn more about the customization process in the paragraph about creating a campaign with this type. Note that at this point you can edit the settings of a flow after adding it in the second step of creating a campaign. However, changes will be made to all campaigns that use this flow.
“Without redirect” campaign type
If you have chosen the “No redirect” type, then in the target settings you need to add a self-hosted landing page and the required offer in the “Default” rule.
Please note: The “No redirect” campaign type can only be used for one landing page. I.e. using 2 rules in the expansion, the same landing page must be added in the distribution paths.
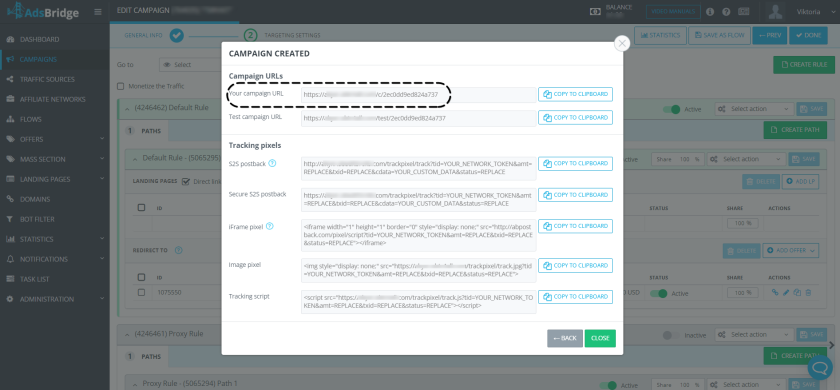
After saving the campaign, a popup appears in front of you, which contains the necessary links and the script to use:
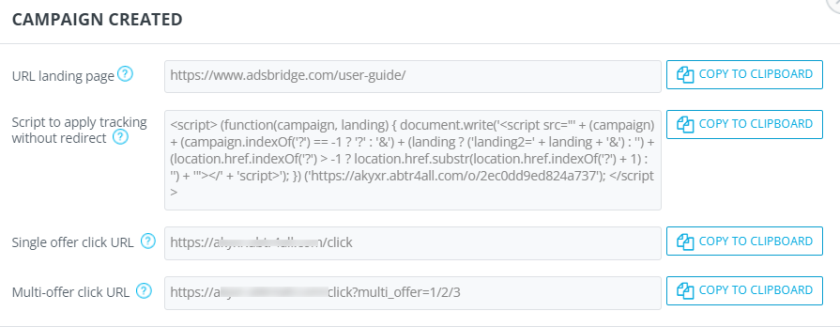
- Tracking script without redirect – copy and paste this script into the HTML code of your self-hosted landing page between <body></body>.
- Click URL – add this link to the CTA – buttons of your landing page so that all the data is passed to AdsBridge.
- Landing page URL – this is the ready-made link to your landing page. Just copy it in this form and add it to your traffic source.
Also, the auto-optimization feature is available in the campaign setup. Brief description of the system:
– Auto-optimization is a system of making decisions on the best traffic distribution to increase EPV (Earnings per visit) for landings and EPC (Earnings per click) for offers.
– Optimization is performed based on statistics obtained for the last step, taking into account historical data (statistics obtained for the last 10 steps).
– Auto-optimization is connected to a rule or distribution path within a campaign. This is done to ensure that optimization is performed based on real data obtained by this distribution rule.
– Landing pages are optimized independently of the offers.
More details about the functionality and setup are here.
After you finish setting up the campaign, you should click on “Done” and you will see a pop-up with the campaign link to be placed on the side of the traffic source.