Free Guide by iAmAttila
AdsBridge the all in one tracker, and landing page builder tool. It is a must for any affiliate marketer that does a lot of testing!
I wrote this guide assuming that You already have an account with AdsBridge so that we can skip the registration process.
Those who are reading this guide but don’t have an account with AdsBridge can create one HERE.
Here we go!
1. Getting to the Landing Page creation
After logging in, the first thing you will see is your dashboard, now, if you are a new user, these fields will be blank to you.
1. Getting to the Landing Page creation
After logging in, the first thing you will see is your dashboard, now, if you are a new user, these fields will be blank to you.
Now, how to begin working on your landing page:
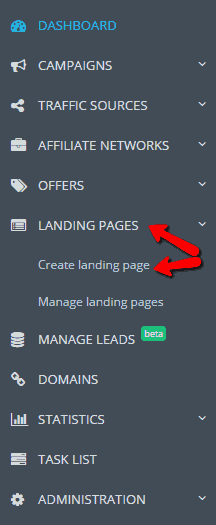
1. Click on the Landing Pages tab on the left-side menu.
2. Click on Create landing page
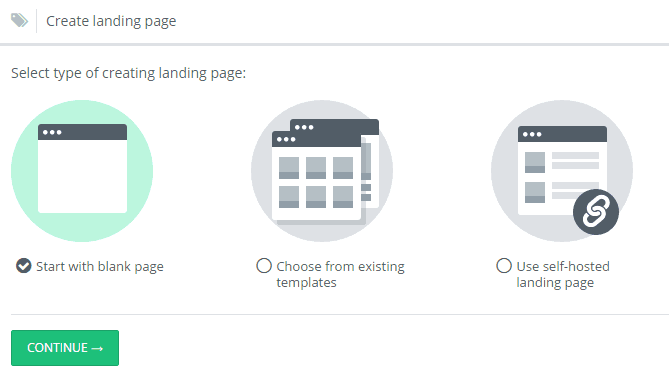
You will now be confronted with three options:
1. Start with blank page (create your landing page from scratch)
2. Choose from existing templates (choose and edit a template)
3. Use self-hosted landing page (upload your own landing page via URL)
2. Choosing the type that suits your needs
Start with a blank page:
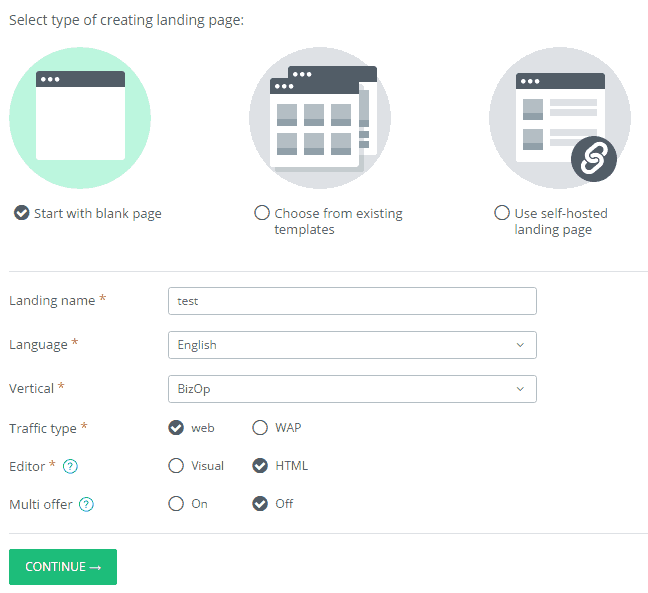
When you select the blank page type, by clicking continue you will need to fill up a few fields:
- Landing name – enter the desired name for landing page
- Language – choose for which language will the landing page be for
- Vertical – choose the niche
- Traffic type – pick between web or WAP
- Editor – if you pick Visual, then you will have elements like Image or Text on the side, and you just drag and drop them into the field. If you pick HTML, then you can write code but the elements on the side will be unavailable to you.
- Multi offer – choose ON if your lander supports more than one offer, or OFF if it supports only one.
When you are done, just click Continue.
Depending on which option you choose Visual or HTML, you will get a blank page with a big empty field.
If you have chosen Visual – the blank page will look like a piece of paper with active elements on the sides. You can drag these elements onto the paper to construct your landing page. There are buttons, text, images and plenty other elements to use until you get the landing page you want.
If you have chosen HTML – then your paper will look a bit different, more in Notepad style. But that’s not the only difference, the elements on the sides are not available anymore. But now you can input code onto the paper, while in the Visual editor that was not possible. Practically I believe the HTML option to be better, because you can, for example, insert code from an existing lander and just edit it here.
Both Editors have the Preview option, which will show your landing page in another window. When you are finally pleased with your landing page, you can click on Save and then Exit Editor.
Start with an existing template:
If you are using a free AdsBridge plan, this option will be unavailable to you. You must be either Starter or Professional to be able to view all the templates AdsBridge is offering.
The templates match the chosen traffic vertical and type. You have the liberty to browse through them all even if you are not interested in a particular vertical by filtering all of the verticals. When you decide on which template to use, click on “Use this” to start editing.
An editor will then open, that looks the same as if you would choose the blank page type lander creation. But the difference is that the editor will be automatically filled with all the elements of the chosen template which you can edit at your leisure. When you have made all the necessary changes, click Save and then Close Editor.
Start with a self-hosted landing page:
If you already have a lander of your own, you can safely upload it by choosing the self-hosted landing page type.
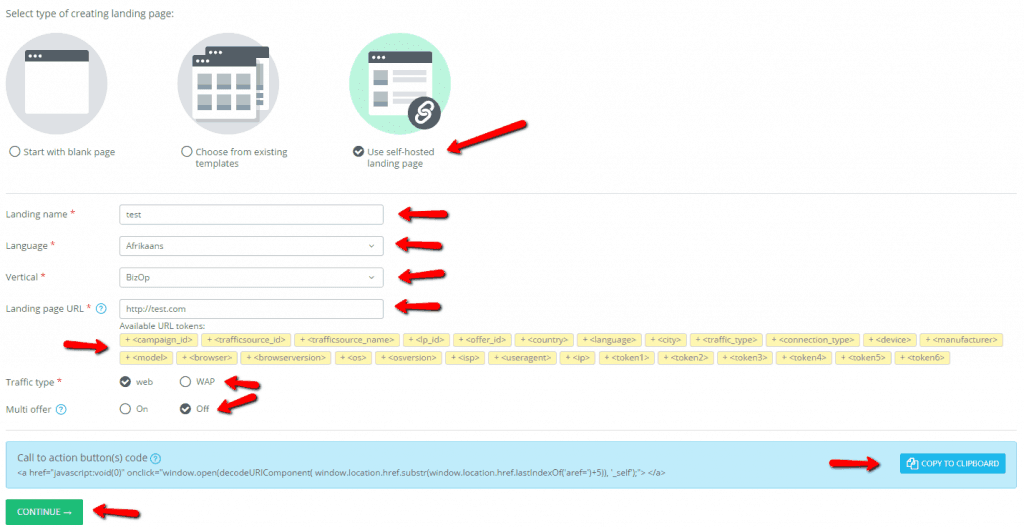
By clicking Continue you will have a few fields to fill up with necessary information:
- Landing name – enter the name of the landing page
- Language – enter the language your landing page is targeting
- Vertical – Choose one of the verticals
- Landing page URL – copy the URL of your landing page into this box (if you wish to add tokens to your landing page, you can do so by choosing the placeholders below the box. Those placeholders will later be replaced with the appropriate values.
- Traffic type – choose between web or WAP
- Multi offer – Pick ON for multiple offers or OFF for a single offer.
Before continuing it’s good to copy the CTA button(s) code for future use.
Click Continue.
3. Managing your Landing Page(s)
This page contains all of the landers you have made previously. There are multiple categories, some of which include landing page ID, name, vertical, traffic type, language, type, multi-offer, date and even the amount of campaigns a specific landing page is added to.
Short description of each category:
Type – sorts landing pages by which type it has been created (Template, self-hosted or created in editor)
Multi-offer – lets you know which landing pages have multiple offers and the exact number of offers.
Landing page ID – shows the ID of the landing page, helps in tracking the exact landing page you want to edit
Name – name of the landing page(s)
Vertical – displays the verticals chosen for each landing page
Traffic type – displays the traffic type chosen for each landing page
Language – displays the language chosen for each landing page
Date – date of landing page creation
There are certain actions you can do to landing pages you select:
View statistics – get a detailed overview of your landing page options
Preview – by hovering over the icon, you get a resized version of your lander
Edit – change the name, language, vertical, traffic type and multi-offer of the landing page
Copy – Make a copy of the desired landing page
Archive – remove the landing page from the list, but it can be recovered at any time.
And there you have it. A brief but very informative guide on how to add, create and edit landing pages in the AdsBridge interface.
If you still didn’t have the chance to register, just follow this LINK.
